If you are like me, you think (for no valid reason) that it is a low-key flex to say that you know C#… If you are like me, you might also want to get better at .NET and C# so that you can back up the statement that you know C#… Finally, if you are like me, you might think that Raspberry Pis are cool devices that you want to understand a bit more.
This post is an explanation and tutorial that touches on both .NET and Raspberry Pis. This tutorial will not make you an expert in either .NET or Raspberry Pis, but it will serve as a way to get started using .NET on your Raspberry Pi.
Disclosure
In this article, I suggest the use of particular tools in the Blinking Light Tutorial – I reference these tools using affiliate links. If you click on an affiliate link and make a purchase on the target website, I will receive a commission.
Introduction
Here is a quick intro to .NET and Raspberry Pi. To skip to the tutorial, click here: Blinking Light Tutorial.
What is .NET
In short, .NET is a development platform and framework by Microsoft for building and running custom software applications. For more information see my post, What is .NET (don’t worry, it’s short).
What’s the deal with the Raspberry Pi?
A Raspberry Pi is a computer. For a better explanation, see how the Raspberry Pi Foundation describes it here.
Raspberry Pis are terrific educational vehicles for understanding computers from both a hardware and software perspective. Plus, Pi’s have tons of practical uses from serving as a complete desktop computer for personal use to being used as a remote server (web, email, etc.) , an IoT sensor, a Weather Station, and much more.
Blinking Light Tutorial
Let’s get on with it, shall we?
In this tutorial, we will create a .NET application for blinking a light on and off with a Raspberry Pi. This tutorial assumes some basic working knowledge of the command-line/terminal (but if you don’t know too much, you should be able to pick it up).
I used .NET Core 3.1 while building this project. Hopefully this solutions should continue to work for future versions!
Let’s do it
Requirements
You will need the following:
- Raspberry Pi 4 – This is the exact one that I ordered off of Amazon: https://amzn.to/3cUs5mM
- Electronic Components – I used an electronic set (though it might be overkill for a simple project like this): https://amzn.to/2AUos20. Specifically, you need:
- A Solderless Breadboard
- A 220 Ohm Resistor
- 1 LED
- 2 Male-to-Female Dupont Wires
- Wired/Wireless Keyboard (for your Raspberry Pi)
- Wired/Wireless Mouse (for your Raspberry Pi)
- Monitor (for your Raspberry Pi) – This monitor should accept HDMI input.
If you don’t have an extra wired/wireless keyboard and mouse laying around, I was able to plug into my Raspberry Pi and play without issue using this simple set: https://amzn.to/2WXhgux.
As for monitors, I have a Lenovo that I really like. The one that I bought doesn’t look like it is available anymore (https://amzn.to/3ecFTJk), but this one looks similar:
Setup
Now that we’ve got all the pieces that we need, let’s get set up.
1. Set up the Raspberry Pi
Follow the instructions in your Raspberry Pi kit to get set up. If you purchase the CanKit starter kit, you should have all the pieces that you need to
- Hook the Raspberry Pi up to a monitor and plug in your mouse/keyboard.
- Boot the Raspberry Pi
- Install an OS from the SD chip
I installed the recommended Raspbian OS. When complete, you will be able to interact with your Raspberry Pi through a desktop interface similar to any other (Linux) PC.
For a solid video walk-through of setting up your Pi, see the Raspberry Pi Setup Tutorial, part of the IoT 101 Series from Channel 9 (by Microsoft). I highly recommend watching this series as you put together your Blinking Light application to learn more about IoT and to see some of this tutorial in action. The IoT series does skip over a few things, though, that I hope to explain more thoroughly in this article.
2. Download and Install .NET Core onto the Raspberry Pi
This step is optional. You don’t have to install .NET Core on your Raspberry Pi. Your decision here, though, will determine how we publish our light blinking application later.
If you want to install .NET Core on your Pi (or you are thinking about it), see my other post, Install .NET Core on your Raspberry Pi 4.
3. Install Visual Studio and .NET on your personal machine
Having fun yet? 😁 In order to properly develop, debug, and test .NET applications, you will want to use an IDE suited for .NET development. An IDE or Integrated Development Environment allows developers to build, test, run, and publish code quickly and in a standardized way. Many IDEs nowadays integrate with Git allowing you to manage source control without leaving the comfort of your IDE.
Without question (in my opinion) there is no better IDE for .NET development than Visual Studio.
At this point, we need to install Visual Studio Community 2019 (the free version) onto our personal machines (the laptop or desktop that you normally use to do stuff).
As you go through the installation process, make sure that you choose the latest .NET Core SDK and Runtime during the installation process. I think that the simplest way to do this is by selecting all of the Web & Cloud workloads as well as all of the Desktop & Mobile workloads when prompted. This will give you tools to develop ASP.NET, C#, F#, VB, Node.js, and Python applications (as well as others that you select).
See Micorosft’s Visual Studio installation documentation here.
4. Create a new Visual Studio project
- Once Visual Studio 2019 is installed on your regular computer, go ahead and open it from the Start menu.
- Click on Create a new project.
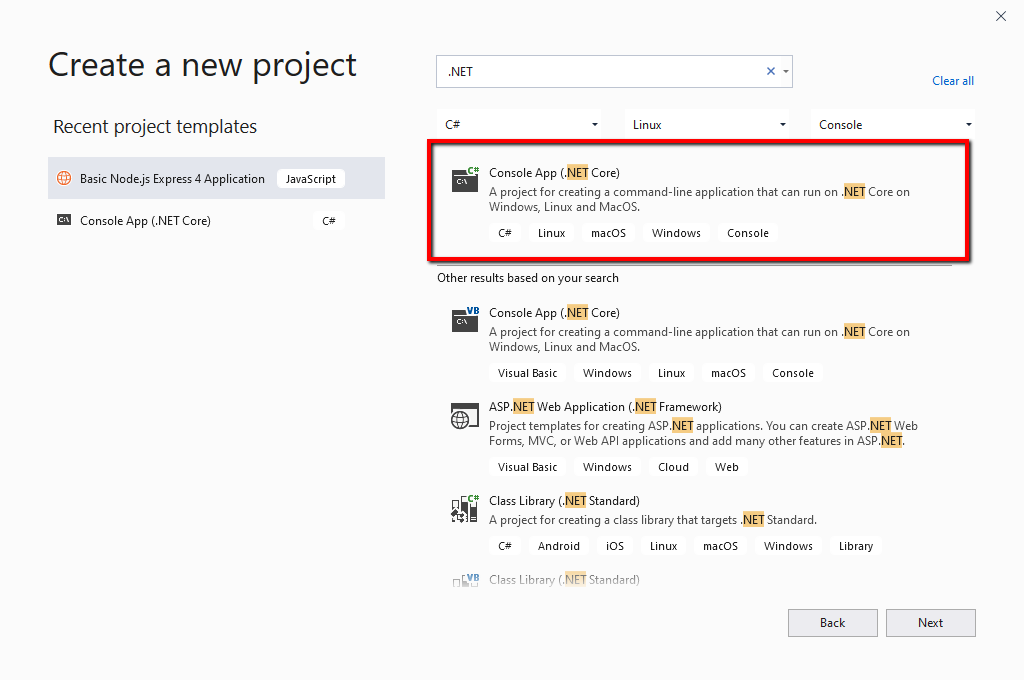
- Search for and select the C# Console App (.NET Core)
- Note: We are creating a .NET Core application that will run on any major operating system, including Linux.
- Note: We are create Console application as opposed to another type because this light blinking application will be run from the console (terminal), and it will not have a graphical interface.
- Choose a name and folder for your new project. You might call it “blinky” or “blinker” or something.
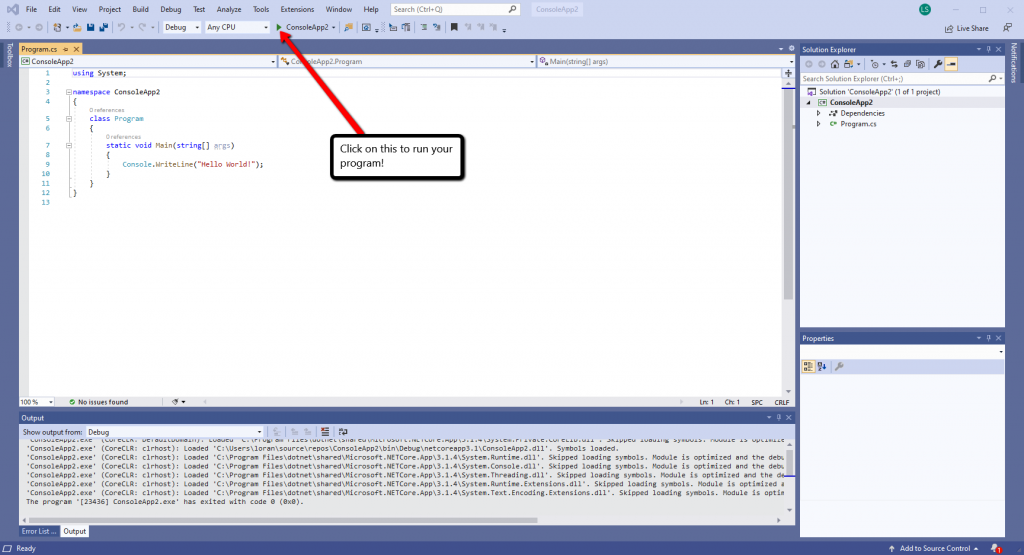
- Click on the run button to run the sample code that is populated in your new project.
- You should see a console appear and the “Hello World!” message display.
- Note: If the console disappears automatically, un-check the following: Tools -> Options -> Debugging -> Automatically close the console when debugging stops.
5. Install the Libraries
Finally, some C#!
But first, in order for our C# application to be able to communicate with the Raspberry Pi’s physical input and output ports used to interact with physical equipment (sensors, cameras, LEDs, etc.), we need to include libraries designed for communicating with these interfaces within our application. Does that make sense?
Basically, we need to install libraries (extra code) so that our application will know how to interact with the stuff we hook up to the Raspberry Pi like our LED (which we will wire together later).
We will be adding the .NET Core IoT Libraries to our application in order to fulfill this requirement. These libraries are open source and managed by the .NET Foundation, founded by Microsoft to promote the open source ecosystem around .NET). This means that anyone can contribute to these libraries, but people from the .NET Foundation generally review and approve changes or enhancements. As of writing this piece, these libraries are still “experimental.” Pretty cool, right?!
You can install the .NET Core IoT Libraries into your blinker project from directly within Visual Studio.
- Open your new blinker project in Visual Studio on your regular machine. Right now, all it does is print “Hello World!” to the console.
- Go to Project > Manage NuGet Packages.
- Click on the Browse tab.
- Search for Iot.Device.Bindings and select the Iot.Device.Bindings option.
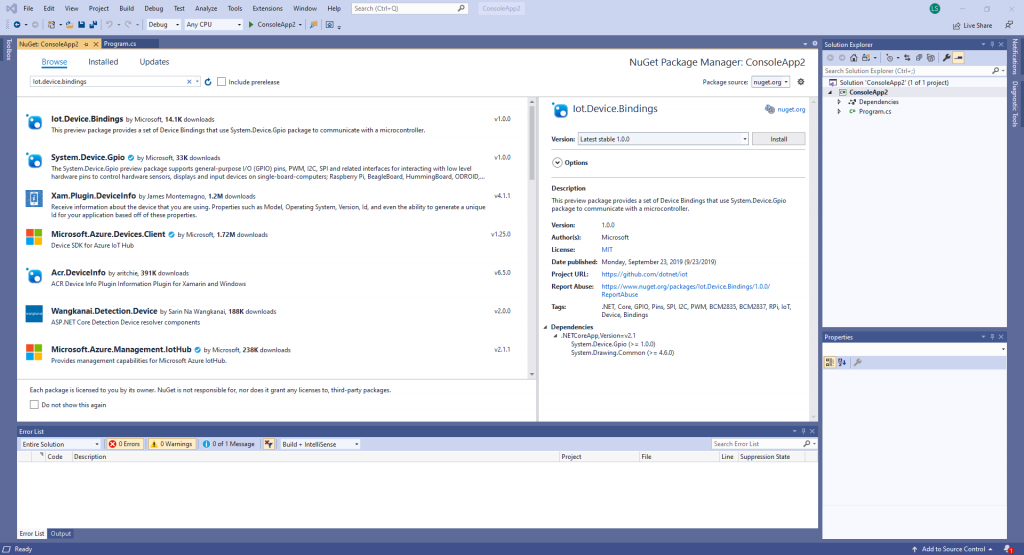
- Click on Install.
- Click on Okay and accept the license.
Great. Now that we’ve got the libraries installed, let’s write some code!
6. Wire the LED to the Raspberry Pi
… I’m sorry. Let’s get one more setup item out of the way – let’s wire together our LED circuit.
I wired my circuit similarly to how the .NET Foundation suggests wiring the circuit in their Blink an LED with .NET Core on a Raspberry Pi sample. There are a few important things to note, though.
First, I will assume that you have a basic understanding of electrical circuits and that electricity flows from the power source (+) to ground (-). I won’t get into breadboards or electronics here (but I might do another article on the subject later…). If you want to learn more about how a breadboard works, I found this video from 2009 (it seems so long ago when looking at the video quality) that explains it quite well.
Second, the positive lead on the LED is the longer leg/lead. This leg should be connected to the side of the circuit the power/electricity is coming from.
Third, take a look at the GPIO (General Purpose Input/Output) reference diagram on page 11 of the CanaKit Quick-Start guide (or see below). GPIO pins allow the Raspberry Pi to interface with external circuits and devices. Note that the physical pin number is different from the GPIO pin number. We will be using GPIO pin 17 as the power source of our circuit. This pin will be referenced in our code to control the LED. GPIO pin 17 corresponds to physical pin 11 as seen in the diagram.
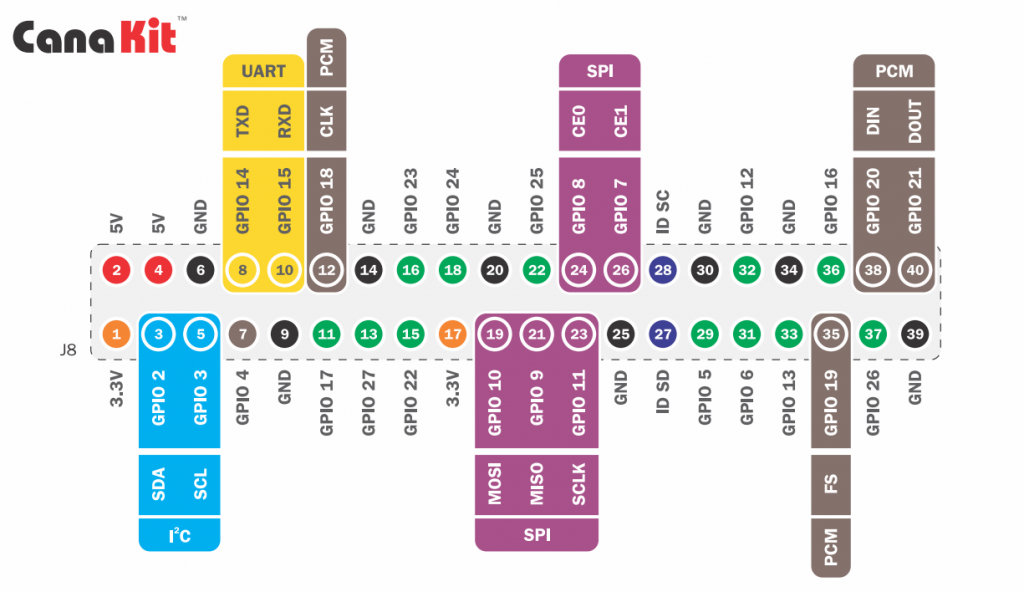
Fourth, the ground wire in your circuit can get plugged into any of the ground (GND) pins noted in the diagram. I plugged my ground wire into pin 6.
Fifth, perform any and all wiring while the Raspberry Pi is off in order to avoid damaging the Raspberry Pi or harming yourself.
With those points made, it might be helpful to reference this video from the IoT Series by Channel 9 and Microsoft as your wire up your circuit:
Code
I think it’s safe to say that we have all of the “setup” done. Now we can write our code, publish and deploy our application, and run our light blinker program.
7. Write some code
I’ll make this too easy. Within your Visual Studio blinker project, replace the contents of the Program.cs file with this code. That code is from the C# .NET application that I built and based this article off of. My code is wholly based off of the led-blink sample code from the .NET Foundation. Referencing line numbers from my code, I’ll walk us through it.
The first three lines of code initialize/import the libraries that our application requires.
using System;is always present – this library allows our application to interact with the system our code is running on with classes/functions likeConsole.WriteLine("...");.using System.Device.Gpio;allows our application to interact with the GPIO pins of the Raspberry Pi by introducing theGpioController()class.using System.Threading;introduces functions for controlling application threads likeThread.Sleep(...).
I’ll avoid delving too deep into the structure/purpose of namespaces and classes, and we can jump down to the code that sits in the Main method, the method that gets called when you run your .NET application.
On line 13, we set the GPIO pin number.
Lines 14 and 15 respectively set the on and off time (in milliseconds) for the LED.
Line 18 instantiates a new GpioController with which our program can interact with the GPIO pins on the Raspberry Pi.
On line 20, we tell the program to use GPIO pin 17 for output purposes because we will be outputting instructions to pin 17.
Lines 22 and 23 are simple messages that we will write to the console at this point in our program.
Lines 25 through 28 handle the safe disposal of resources that our program uses. We essentially release use of the GPIO pins (pin 17 in our case) and any other ports or resources that our program may have called on.
Finally, lines 30 through 38 run a loop that turns our LED on and off.
- Line 32 sets the pin value of our GPIO pin 17 to “High.” This effectively raises the voltage of pin 17 compared to the Ground in our circuit, allowing electricity to flow and the LED to turn on.
- Line 33 tells the application to wait (sleep) for the amount of time (in milliseconds) that we set earlier on line 14.
- Line 34 writes to the console that our LED is “On.”
- Line 35 sets the pin value of our GPIO pin 17 to “Low.” This lowers the voltage of pin 17 (and the voltage across our circuit), causing the flow of electricity to stop and our LED to turn off.
- Line 36 again tells our application to wait (sleep) for the amount of time (in milliseconds) that we set earlier on line 15.
- Line 37 writes “Off” to the console.
8. Publish the code
Now that our code is in place, make sure to save your application (File > Save All). At this point, we need to publish our application so that we can copy it, share it, and (most importantly) use it.
- Click on Build > Publish <application name>
- Select Folder when asked to pick a “publish target.”
- Choose a folder where your release items will be placed – choose or create an empty folder for this.
- Click on Create Profile
- Under the name of your publish profile, click Edit.
Pause
Did you install .NET Core onto your Raspberry Pi?
Yes, I have .NET Core installed on my Raspberry Pi
- Make sure the Profile Settings match these (your Target Location will be different… and your Target Framework might be different if you are using a newer version in the future):
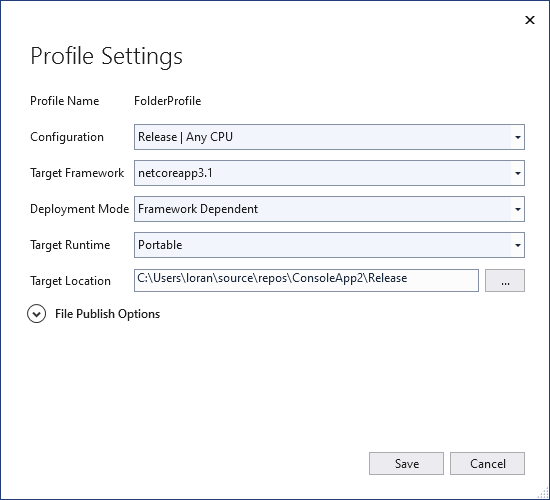
These settings indicate that we will be publishing an application that is “Framework Dependent” with a “Portable” runtime. This means that our application will require the .NET framework to already exist in the target environment in order to run. It also means that our application is allowed to run in a variety of .NET runtime environments – it is transferable between a Microsoft, OS X, and Linux runtime. A “Portable” runtime isn’t really necessary for us because we only intend to run our application on our Raspberry Pi (a Linux environment), but it will work 🙂. You could specify a linux-arm Target Runtime if you want instead.
For more information on .NET Core application publishing, see this documentation from Microsoft.
No, I do not have .NET Core installed on my Pi
- Make sure the Profile Settings match these (your Target Location will be different… and your Target Framework might be different if you are using a newer version in the future):
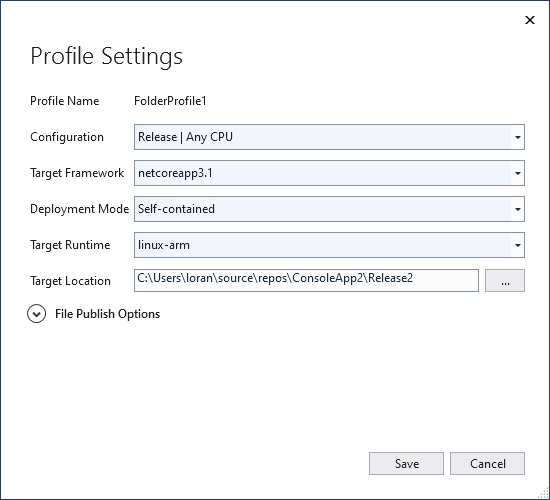
These settings indicate that we will be publishing an application that is “Self-contained” with a “linux-arm” runtime. This means that our application will include all of the .NET libraries and the Linux runtimes necessary to run within it. Our application will, as a result, be quite larger. It also means that our application can only run in Linux environments. This is fine for this application because we only intend to run it on the Pi anyway.
For more information on .NET Core application publishing, see this documentation from Microsoft.
Continuing on
- Click Save
- Click on Publish
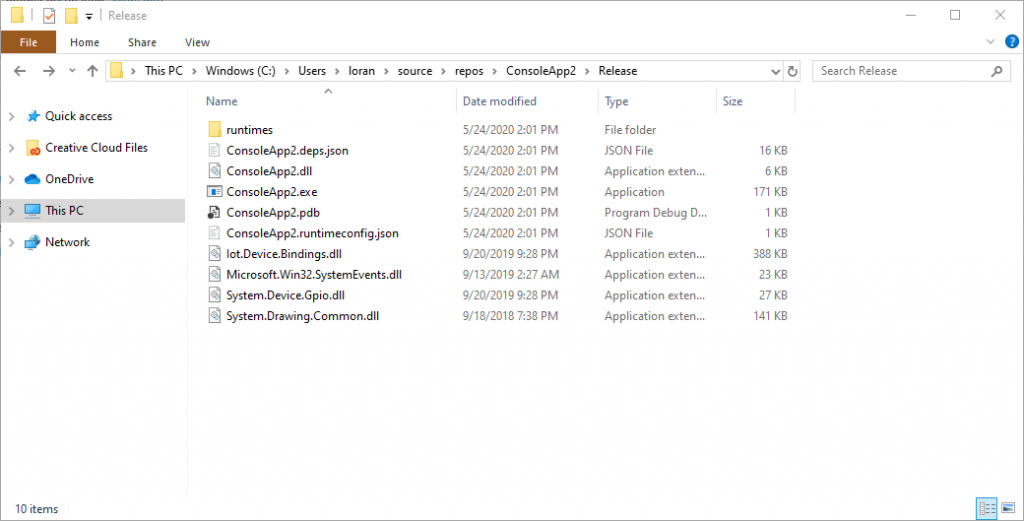
- Navigate to the folder you designated as your Publish Target. You should see it now contains a bunch of files.
Our application is now published!
Deploy and Run
We are almost there!! 😃 Now, all we need to do is deploy (send a copy of) our application to our target environment, the Raspberry Pi.
9. Deploy to the Pi
There are a few ways to deploy your code to your Pi. Basically, you want to create a folder for your application on the Pi, and then you want to migrate/copy your newly published application release files/folders from your main computer over to the new folder on your Pi.
Deploy with Google Drive
The first time, I did this, I did it with Google Drive. I loaded my files (everything in my Publish Target folder where I published my application, including all sub-folders) to Drive from my local development machine then downloaded them from Drive onto the Raspberry. This can be time consuming and slow because you have to go back and forth between your computer and your Pi. Plus you will have to download and then unzip the files, or download them one by one.
Deploy with SSH
A simpler/faster, way for somebody that might be doing more regular migrations would be to use the command-line and SSH. If you watched the Raspberry Pi Setup Tutorial, you may know that by running ifconfig in the Pi’s terminal, you can access the network address of the Raspberry Pi. We can use the network address to SSH into the Raspberry Pi from our local machine (on the same network) as well as to send files to the Pi from our local machine.
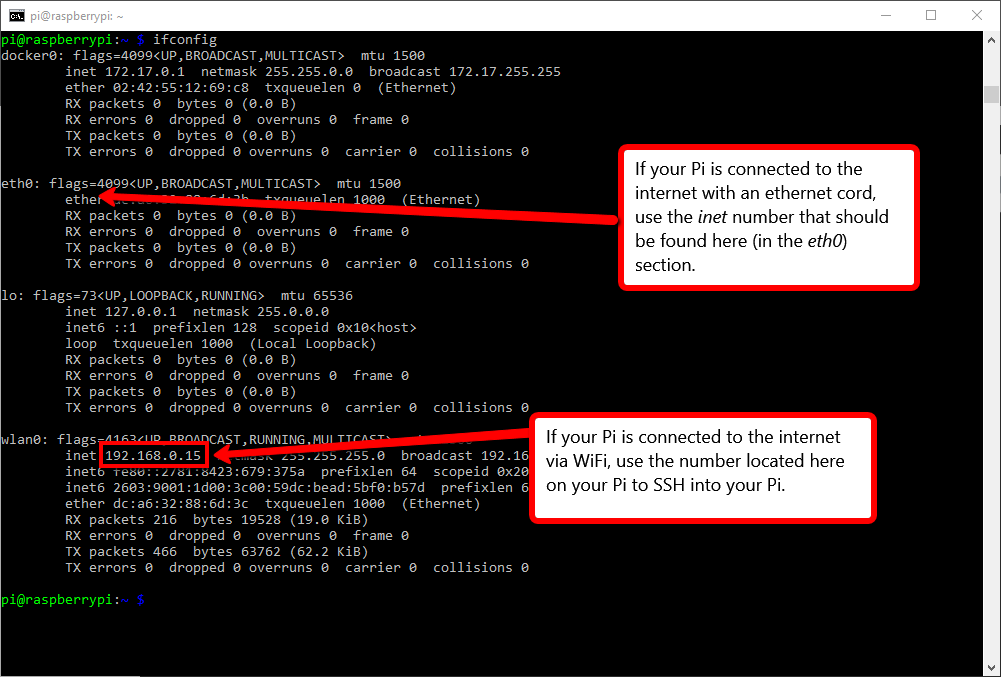
With your Pi’s inet address (and with the Raspberry Pi on),
- Go back to your main computer,
- Open the terminal/command-line,
- Type
ssh pi@<inet.address>and hit Enter, - Enter your password for your Pi. (Hopefully you still remember it! If not, you might have to go back to the Pi and change it.)
You should now be logged into your Raspberry Pi from your main computer. If you run ls, you should be able to see the folders in your Pi’s home directory. You can run logout to close the connection.
Be sure to create a folder in your Raspberry Pi as the target for our light blinker application. To do that, SSH into the Pi following the steps immediately above (or go directly to your Pi and open the terminal), and type mkdir <folderName>. Replace <folderName> with whatever you have decided to call this project.
To actually copy over your files to the target folder on your Raspberry Pi via SSH, do the following:
- Open the terminal/command-line on your main computer.
- Navigate to the directory (folder) that contains your published application. For example, I might run the following:
cd ./someFolder/.../blinkyReleaseFolder
- Run the scp command to copy files via SSH as follows:
scp -r ./* pi@<inet.address>:<targetFolderPath/Name>
- The
-roption tells the system to copy all sub-folders and content. - Be sure to replace <inet.address> with your Pi’s inet address.
- Be sure to replace <targetFolderPath/Name> with the path to and name of your desired target folder.
- I wanted to save my files in a folder called raspberryPi-1, which was a sub-folder of Projects (another folder that I created) on my Pi. The Projects folder was created in my HOME directory.
- As such, my <targetFolderPath/Name> looked like Projects/raspberryPi-1
For a good demo of how to SSH and SCP into the Raspberry Pi, see the following video from Channel 9’s IoT series.
Note that Sweeky (the speaker in the video) publishes her code from the command line (as opposed to using Visual Studio like we did). She publishes her .NET application specifying that the runtime should be linux-arm. It also looks like she published a Self Contained application as opposed to a Framework Depenedent one. A Self Contained application will have many more files (the runtimes and libraries necessary to support the application).
Phew! 😌
10. Run your application!
The moment of truth.
- Open your Raspberry Pi’s terminal.
- You can either SSH into your Pi’s terminal from the command line of your main computer:
ssh pi@<inet.address>.
- Or you can open the Pi directly and open the terminal.
- You can either SSH into your Pi’s terminal from the command line of your main computer:
- Navigate into the directory where you application is located:
cd <projectFolderPath/Name>
Pause
Did you deploy the Framework Dependent application (the one that requires .NET Core to be installed on the Pi)? Or did you deploy the Self-contained application?
I deployed the Framework Dependent application
- Run your code!
dotnet <ProjectName>.dll
I chose the Self-contained application
- Change the permissions of the application file so that you can run it.
chmod 755 <ProjectName>
- Run your code!
./<ProjectName>
Celebrate your success!
Is your light blinking? We did it!!!
You can stop your program by typing Ctrl + c in the terminal.
Conclusion
Man… this post is way longer than I thought it was going to be. As you can tell, there is a lot here (and a lot more that we didn’t get into)!! All to make a light blink on and off programmatically!
There are a number of other tutorials and demos that I drew from to put this together, but I hope that this proves to be a more complete tutorial with fewer gaps that doesn’t require as much jumping around on your part.
Check out the resources below to learn more and explore additional concepts. Now that you have the foundational pieces in place, you can try putting together new/different/more complex applications for your Raspberry Pi using .NET!
I hope this has been fun! Thanks so much for reading.
Resources
A big thanks to the great resources that allowed me to put this together.
- Setup .NET Core 3.0 Runtime and SDK on Raspberry Pi 4 – Edi Wang – 09/29/2019
- .NET Core IoT Libraries – .NET Foundation
- IoT 101 from Channel 9 – Microsoft – 01/06/2020