For those new to the terminal/command-line/command-prompt, here is a list of common commands to get you looking like a pro in no time.
What is the Terminal?
The terminal, otherwise known as the command-line, command-prompt, shell, or simply as the console, is a text-based interface for interacting with a computer via the Operating System. You can do most things in a terminal that you can do via the normal, graphical user interface that you interact with every day:
Navigate the folders and files on your system
Create/Delete/Modify files
Install/Remove/Run applications
Access information over the internet
At a basic level
Everything on your computer lives in a directory. A directory is another word for folder. Your desktop is a directory, and so is your Documents folder, your Music folder, your Pictures folder, and so on. Every application and file lives in a folder somewhere. Thus, the most important and basic commands (in my opinion) are the commands used to traverse your directories.
A few of notes:
The working directory refers to the directory/folder that you are currently in.
. represents the directory that you are currently in.
.. represents the parent directory of the directory that you are currently in.
Generally, when opening the terminal, you land in the HOME directory. The HOME directory is the main (top-level) directory for the current user of the system.
Basic Commands
A list of basic, cross platform (Windows, MacOS, Linux) terminal commands.
pwd
pwd stands for “print working directory.” This command is used to print out the path of the directory (folder) that you are currently in within the terminal. This command does not work in the Windows Command Prompt (see dir).
ls
The ls or list command is used to list the files and folders (sub-directories) of the directory that you are in. This command is for Linux and MacOS systems (there is a different command for the Windows Command Prompt, dir).
If you run ls by itself, you will see a list of the files/folders within the current working directory (the folder that you are currently inside of) in the terminal.
You can list the files/folders of a particular directory by running ls <.../path/to/directory> where <…/path/to/directory> is the path to the directory that you want to look into. For instance, you might run ls ~/myFolder/ to see what is inside the myFolder folder located within your HOME directory (~).
Use ls -a to list all files/folders in the current (or specified) directory. Not all files show up by default, some are hidden (usually those that start with a “.”).
dir
The dir command is used specifically in the Windows Command Prompt to list files and folders within a given directory. The dir command also prints out the path of the current working directory (the folder that you are currently inside of within the terminal).
dir shows all files/folders by default.
cd
The cd command is short for “change directory.” It is used to….. wait for it…. change the working directory. In layman’s terms, it means to move from your current folder into another folder that you specify. Following are a few examples of cd.
cd .
The “.” symbol represents the directory that you are currently in. Running cd .effectively does nothing. You are telling the terminal to move into the directory that you are currently already inside of.
cd ..
Two “.” symbols in succession, “..”, represents the parent directory – the directory that contains the directory that you are in. Running cd .. tells the system to move up to the parent folder.
For example, take a look at the folder structure below. The root folder is the top-level directory. Inside of root, you have bin, modules, public, routes, views, app.js, package.json, package-lock.json, and README.md.
Let’s say you had your terminal open, and you were currently inside of the module1 folder. If you ran thecd .. command, you now be in the modules folder. Running cd .. again would land you in the root folder.
cd folder1
Running cd folder1 would move you into the folder named folder1 if there was a folder with the name of folder1 in your current working directory.
cd folder1/folder2
Assuming that folder1 exists in your current working directory, and assuming that folder2 exists as an immediate child folder of folder1, this command, cd folder1/folder2 would move you into folder2.
mkdir
mkdir is short for “make directory.” When running this command, you specify the name of a directory that you want to create. This command creates the directory (folder) as you specify.
mkdir myNewFolder creates a new folder called myNewFolder in your current working directory.
mkdir folderA/folderB would create a new folder called folderB inside of folderA. If folderA already exists, then it would create folderB inside of the existing folderA, otherwise, a new folderA would be created. (Flip the slash to “\” if you are running this in the Windows Command Prompt).
echo
The echo command is used to print text to the terminal. Running echo test 123, for example, would print “test 123” to the terminal (try it!).
This command is useful within scripts when it is desirable to print output to the console.
exit
Finally exit. This command is used to close the console. Of course, you can always close the console by clicking on the close button, but it looks cooler to close it with exit. Also, the exit command comes in handy when you want to automatically close the terminal upon completion of a script.
End
I will add some more basic commands to this list as I think of them, but my intent here is to provide a simple, basic/starter list of cross-platform commands. From here, anyone should be able to get going!
If you think there is a command that should be included, feel free to comment below!
As we know, .NET applications require the .NET platform/framework in order to run.
Now, you don’t actually need to install the .NET framework on your Raspberry Pi if you only intend to run self-contained .NET apps deployed to your Pi. However, these self-contained apps will be larger because they need to contain all of the libraries and runtimes that would otherwise be a part of the already installed .NET platform/framework.
So, if you plan to install a number of .NET apps on your Pi, and/or if you really enjoy spending time on your Pi and want to build .NET apps directly on it (maybe using unofficial builds of VS Code or some other editor), you might consider installing .NET Core on your Raspberry Pi. Also, if you simply want to learn more about building/running .NET applications on the Pi, installing .NET Core might be good from an educational point of view.
Let’s look at how to install the .NET platform on the Raspberry Pi.
This walk-through will discuss installing the .NET Core platform on a Raspberry Pi 4. This tutorial assumes that you
Have a Raspberry Pi (4+)
That your Pi is setup, hooked up to a monitor, mouse, and keyboard and powered on.
That your Pi is connected to the internet.
If you don’t have a Pi, consider getting a starter kit! (This is an affiliate link for which I may receive financial compensation if you click on the link and make a purchase on the target website).
.NET Core
There are two options, .NET Core and .NET Framework. The .NET Framework is for use on Windows PCs and devices… The Raspberry Pi, though, is running a Linux based Operating System (Raspbian). Luckily, we have .NET Core available to us – .NET Core is for use on a broader range of devices and computers (not just Windows). Thus, we need to install .NET Core on our Raspberry.
Let’s do it
To install .NET on my Raspberry Pi 4, I followed Edi Wang‘s steps (outlined as follows) in his article Setup .NET Core 3.0 Runtime and SDK on Raspberry Pi 4. I highly recommend reviewing Edi’s post as he shows you how to create a simple console app and ASP.NET web app as well as how to turn your Pi into a web server. I, however, hope to focus (in this post) simply on the installation of .NET Core on your Raspberry Pi.
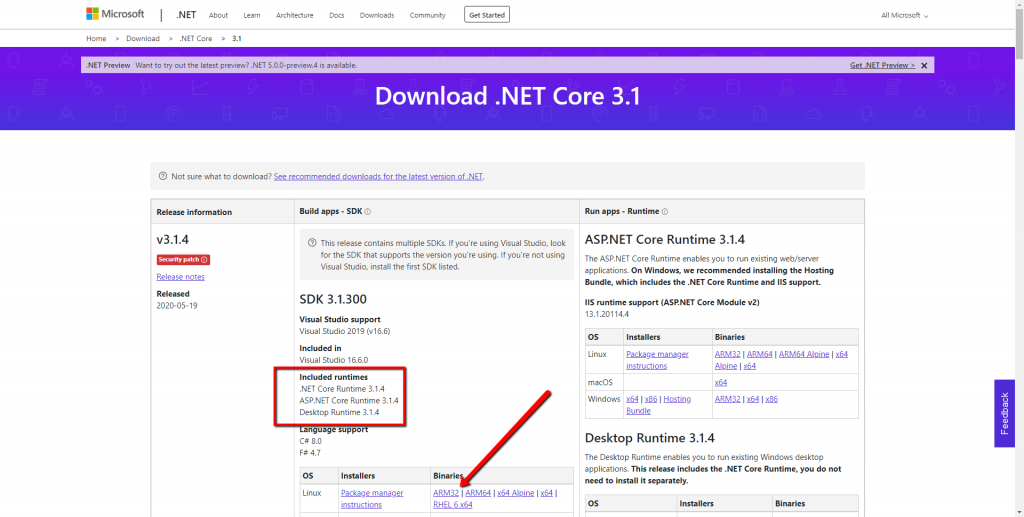
Download the .NET Core 3.x SDK – Linux ARM 32 Binaries from (see image below) directly onto your Raspberry Pi from your Pi’s browser.
If you are running Raspbian, you need to use the ARM 32 Binaries. Other Operating Systems might support ARM 64, but I cannot comment on those.
Note: Edi Wang suggests downloading/installing both the .NET Core 3.x SDK and the ASP.NET Core 3.x Runtime. I do not believe that this is necessary to install both because the .NET Core 3.x SDK claims to include the ASP.NET Core Runtime. The .NET Core 3.x SDK alone should suffice.
Download the ARM32 Binaries onto your Raspberry Pi from Mircosoft (click here)
Within the terminal on your Raspberry Pi, in your home directory, create a new folder called dotnet.
Note: I named my folder dotnet as you can see in the screenshot of the terminal below. Edi Wang named his folder dotnet-arm32 – make sure to use whatever folder name you choose consistently moving forward.
Note: For those unaware of what I mean by “home directory,” the “home” directory typically is the folder that contains all of the content created by the user of the system. Each time you open a new terminal window, it should open in the “home” directory.
mkdir dotnet
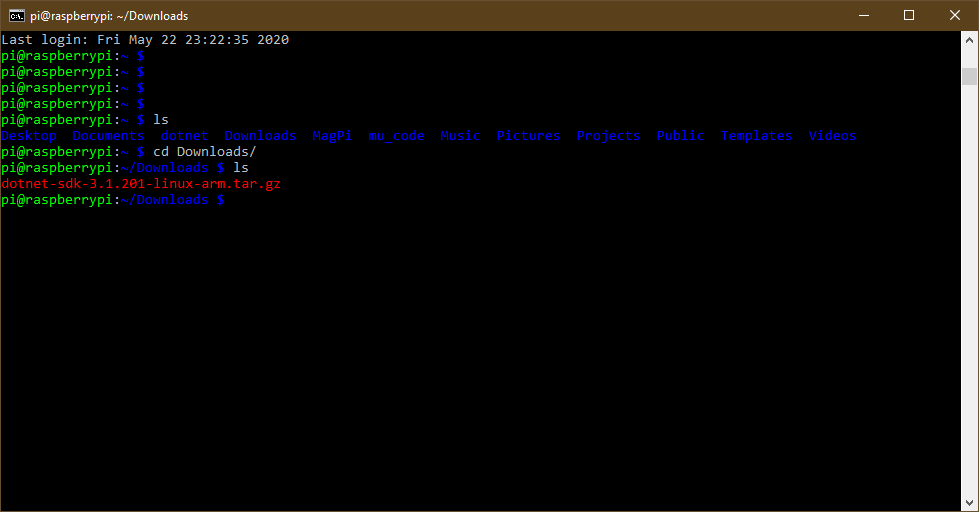
Within your terminal on the Raspberry, navigate to the location of the downloaded ARM32 tar.gz file.
If you downloaded the binaries directly onto your Raspberry, the zip file should be in the Downloads folder.
The terminal on my Raspberry Pi showing the folders in my $HOME director and the zipped .NET Linux ARM32 Binaries file in my Downloads/ folder.
Unzip the contents of the tar.gz file into your dotnet folder as follows (replace <filename> with the name of the tar.gz file; for example, dotnet-sdk-3.1.201-linux-arm.tar.gz).
tar zxf <filename> -C $HOME/dotnet
Set Environment Variables so that you can reference your newly installed dotnet tool anywhere within your terminal by running the following commands:
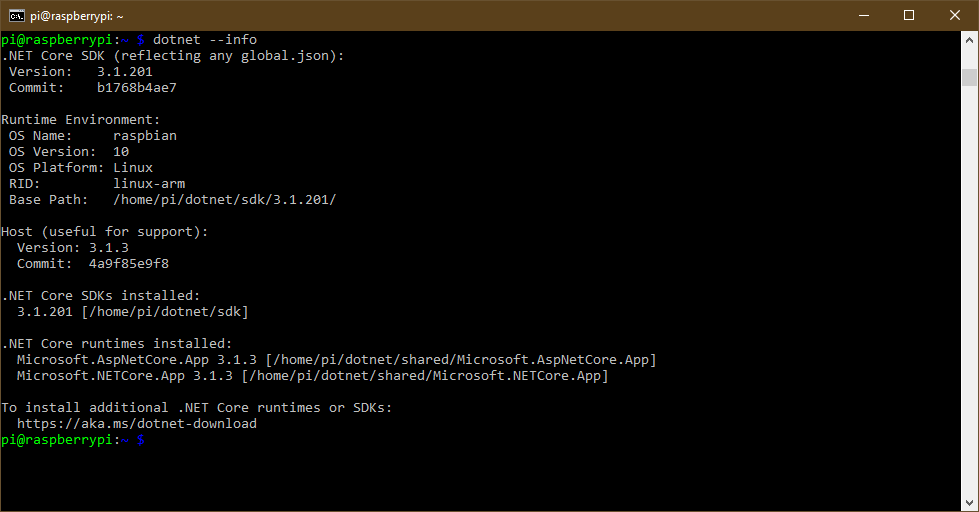
Run a test to confirm that .NET is installed on the Pi:
dotnet --info
Run dotnet –info on the Pi to see if .NET Core is installed
Update the .profile file with your new Environment Variables.
From the home directory run ls -a, you should see a list of all files/folders in the directory (including .profile).
Run the following command to open the .profile file:
nano .profile
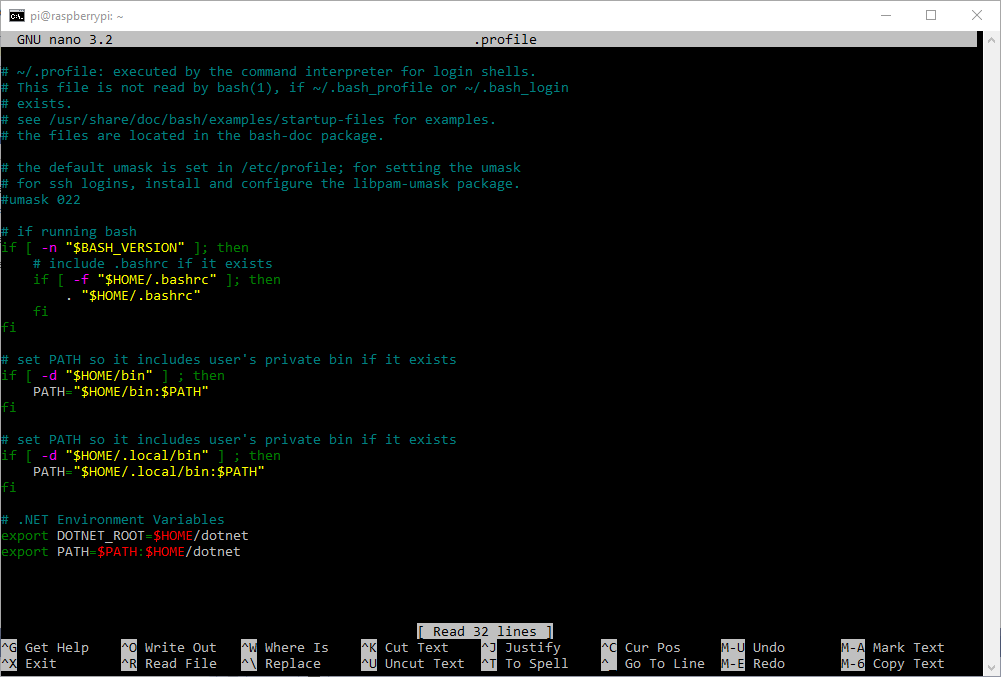
At the bottom of the file add the following lines (see my screenshot of the .profile file below).
export DOTNET_ROOT=$HOME/dotnet
export PATH=$PATH:$HOME/dotnet
Type Ctrl + o to save.
Hit Enter to save the file with its original name (.profile).
Type Ctrl + x to exit the editor.
Adding the two export statements to the bottom of the .profile file. Remember to maintain consistent usage of the directory name (dotnet vs. dotnet-arm32). I used dotnet, but if you used dotnet-arm32, be sure to use that instead.
Note: Updating the .profile file is important to do so that the dotnet command is available to all terminal sessions in the future on your Pi. If you do not update the .profile file, you will have to reset the environment variables (step 6) every time you open the terminal.
Note: The .profile file is a “startup file” that runs on startup of the Pi and initializes variables and functions.
The End
Boom, you did it! Thanks for Reading!
As mentioned earlier, Edi Wang’s article goes on, to show you how to create some simple .NET apps and ASP.NET web apps directly on/for the Pi. Be sure to check it out!!
According to the video above, a development platform is a set of languages and libraries that enable developers to create and run software applications. That means that the .NET platform needs to be installed in your development environment so that you can create, debug, and test your .NET application, and the .NET platform needs to be present anywhere that a .NET application is running.
There are a few flavors of the .NET platform:
.NET Framework
.NET Core
Xamarin/Mono
.NET Framework is the version of .NET that is tailored for use creating/running apps on Windows.
.NET Core is the version of .NET for creating and running applications that are cross-platform. .NET Core can be used to create/run .NET Core application on Windows, MacOS, and Linux. The .NET Foundation supports .NET Core, which is open source.
Xamarin/Mono is a .NET implementation/extension for creating and running applications on mobile Operating Systems (Android and iOS).
The .NET platform supports a set of development languages by Microsoft for specific use on .NET:
C#
F#
Visual Basic
Putting all of this together, it should makes sense that .NET applications are software applications written in one of the languages supported by .NET (C#, F#, VB), and .NET applications require and run on .NET (the platform).
Why use a Development Platform?
For anyone that might be asking this question, a development platform allows developers to more simply create complex software applications. The libraries and languages of a development platform allow people to perform common tasks in simple, efficient, and predefined ways by providing standard data types, functions, and data management flows so that developers don’t have to build everything from scratch. These capabilities are easily extensible within the development framework so that developers can create more complex data types, functions, and libraries. Development platforms promote standardized development in order to allow for modularization and sharing/reuse of code.
If you are like me, you think (for no valid reason) that it is a low-key flex to say that you know C#… If you are like me, you might also want to get better at .NET and C# so that you can back up the statement that you know C#… Finally, if you are like me, you might think that Raspberry Pis are cool devices that you want to understand a bit more.
This post is an explanation and tutorial that touches on both .NET and Raspberry Pis. This tutorial will not make you an expert in either .NET or Raspberry Pis, but it will serve as a way to get started using .NET on your Raspberry Pi.
Disclosure
In this article, I suggest the use of particular tools in the Blinking Light Tutorial – I reference these tools using affiliate links. If you click on an affiliate link and make a purchase on the target website, I will receive a commission.
Introduction
Here is a quick intro to .NET and Raspberry Pi. To skip to the tutorial, click here: Blinking Light Tutorial.
What is .NET
In short, .NET is a development platform and framework by Microsoft for building and running custom software applications. For more information see my post, What is .NET (don’t worry, it’s short).
What’s the deal with the Raspberry Pi?
A Raspberry Pi is a computer. For a better explanation, see how the Raspberry Pi Foundation describes it here.
Raspberry Pis are terrific educational vehicles for understanding computers from both a hardware and software perspective. Plus, Pi’s have tons of practical uses from serving as a complete desktop computer for personal use to being used as a remote server (web, email, etc.) , an IoT sensor, a Weather Station, and much more.
Blinking Light Tutorial
Let’s get on with it, shall we?
In this tutorial, we will create a .NET application for blinking a light on and off with a Raspberry Pi. This tutorial assumes some basic working knowledge of the command-line/terminal (but if you don’t know too much, you should be able to pick it up).
I used .NET Core 3.1 while building this project. Hopefully this solutions should continue to work for future versions!
Let’s do it
Requirements
You will need the following:
Raspberry Pi 4 – This is the exact one that I ordered off of Amazon: https://amzn.to/3cUs5mM
Electronic Components – I used an electronic set (though it might be overkill for a simple project like this): https://amzn.to/2AUos20. Specifically, you need:
A Solderless Breadboard
A 220 Ohm Resistor
1 LED
2 Male-to-Female Dupont Wires
Wired/Wireless Keyboard (for your Raspberry Pi)
Wired/Wireless Mouse (for your Raspberry Pi)
Monitor (for your Raspberry Pi) – This monitor should accept HDMI input.
If you don’t have an extra wired/wireless keyboard and mouse laying around, I was able to plug into my Raspberry Pi and play without issue using this simple set: https://amzn.to/2WXhgux.
As for monitors, I have a Lenovo that I really like. The one that I bought doesn’t look like it is available anymore (https://amzn.to/3ecFTJk), but this one looks similar:
Setup
Now that we’ve got all the pieces that we need, let’s get set up.
1. Set up the Raspberry Pi
Follow the instructions in your Raspberry Pi kit to get set up. If you purchase the CanKit starter kit, you should have all the pieces that you need to
Hook the Raspberry Pi up to a monitor and plug in your mouse/keyboard.
Boot the Raspberry Pi
Install an OS from the SD chip
I installed the recommended Raspbian OS. When complete, you will be able to interact with your Raspberry Pi through a desktop interface similar to any other (Linux) PC.
For a solid video walk-through of setting up your Pi, see the Raspberry Pi Setup Tutorial, part of the IoT 101 Series from Channel 9 (by Microsoft). I highly recommend watching this series as you put together your Blinking Light application to learn more about IoT and to see some of this tutorial in action. The IoT series does skip over a few things, though, that I hope to explain more thoroughly in this article.
2. Download and Install .NET Core onto the Raspberry Pi
This step is optional. You don’t have to install .NET Core on your Raspberry Pi. Your decision here, though, will determine how we publish our light blinking application later.
3. Install Visual Studio and .NET on your personal machine
Having fun yet? 😁 In order to properly develop, debug, and test .NET applications, you will want to use an IDE suited for .NET development. An IDE or Integrated Development Environment allows developers to build, test, run, and publish code quickly and in a standardized way. Many IDEs nowadays integrate with Git allowing you to manage source control without leaving the comfort of your IDE.
Without question (in my opinion) there is no better IDE for .NET development than Visual Studio.
At this point, we need to install Visual Studio Community 2019 (the free version) onto our personal machines (the laptop or desktop that you normally use to do stuff).
As you go through the installation process, make sure that you choose the latest .NET Core SDK and Runtime during the installation process. I think that the simplest way to do this is by selecting all of the Web & Cloud workloads as well as all of the Desktop & Mobile workloads when prompted. This will give you tools to develop ASP.NET, C#, F#, VB, Node.js, and Python applications (as well as others that you select).
See Micorosft’s Visual Studio installation documentation here.
4. Create a new Visual Studio project
Once Visual Studio 2019 is installed on your regular computer, go ahead and open it from the Start menu.
Click on Create a new project.
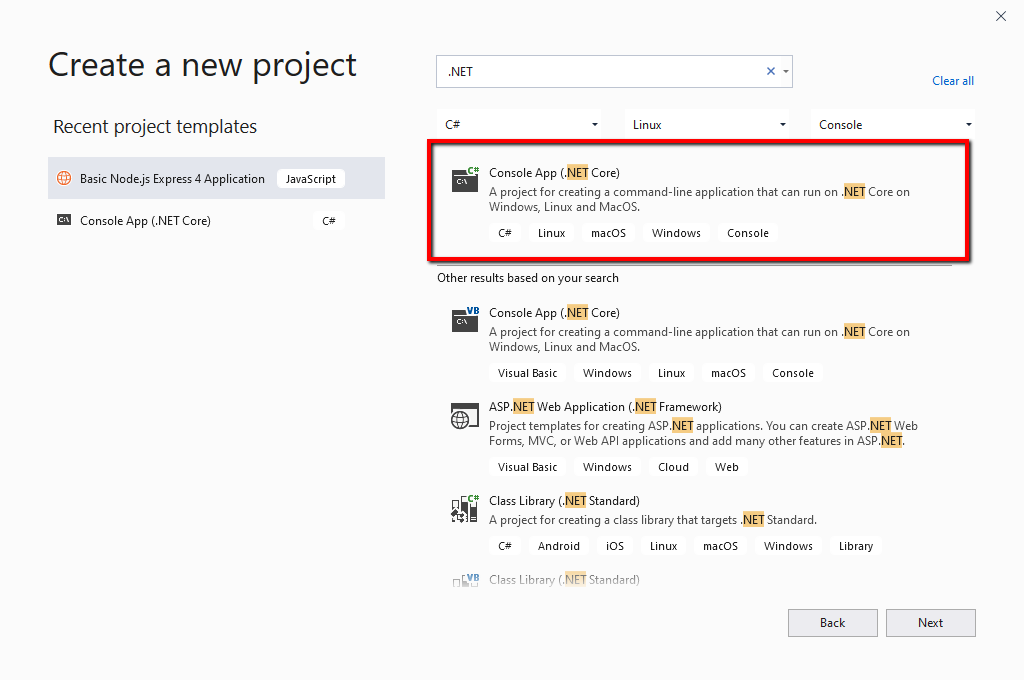
Search for and select the C# Console App (.NET Core)
Note: We are creating a .NET Core application that will run on any major operating system, including Linux.
Note: We are create Console application as opposed to another type because this light blinking application will be run from the console (terminal), and it will not have a graphical interface.
Choose a name and folder for your new project. You might call it “blinky” or “blinker” or something.
Select the C# Console App (.NET Core) when creating your new Visual Studio project.
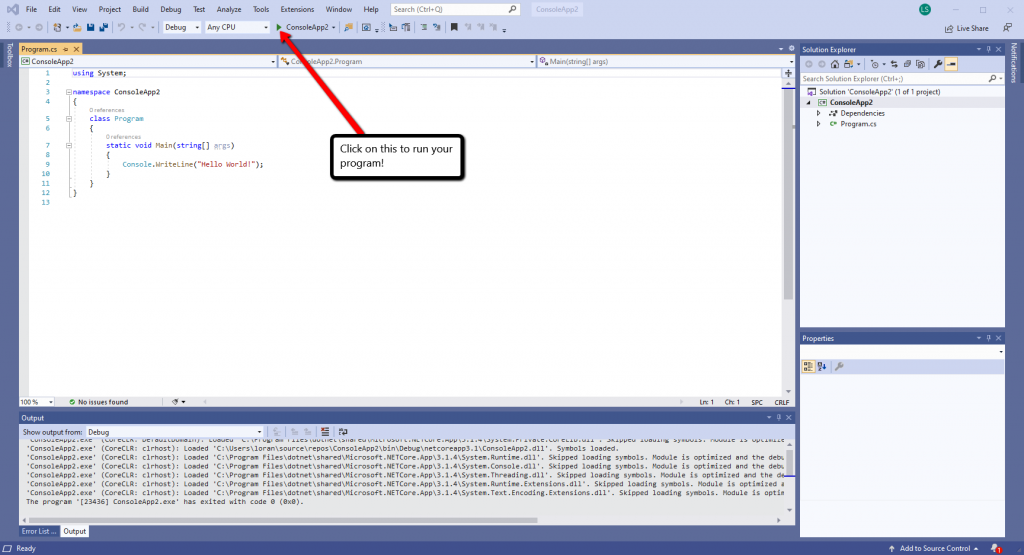
Click on the run button to run the sample code that is populated in your new project.
You should see a console appear and the “Hello World!” message display.
Note: If the console disappears automatically, un-check the following: Tools -> Options -> Debugging -> Automatically close the console when debugging stops.
This is what your new Visual Studio C# .NET Console App looks like!
5. Install the Libraries
Finally, some C#!
But first, in order for our C# application to be able to communicate with the Raspberry Pi’s physical input and output ports used to interact with physical equipment (sensors, cameras, LEDs, etc.), we need to include libraries designed for communicating with these interfaces within our application. Does that make sense?
Basically, we need to install libraries (extra code) so that our application will know how to interact with the stuff we hook up to the Raspberry Pi like our LED (which we will wire together later).
We will be adding the .NET Core IoT Libraries to our application in order to fulfill this requirement. These libraries are open source and managed by the .NET Foundation, founded by Microsoft to promote the open source ecosystem around .NET). This means that anyone can contribute to these libraries, but people from the .NET Foundation generally review and approve changes or enhancements. As of writing this piece, these libraries are still “experimental.” Pretty cool, right?!
You can install the .NET Core IoT Libraries into your blinker project from directly within Visual Studio.
Open your new blinker project in Visual Studio on your regular machine. Right now, all it does is print “Hello World!” to the console.
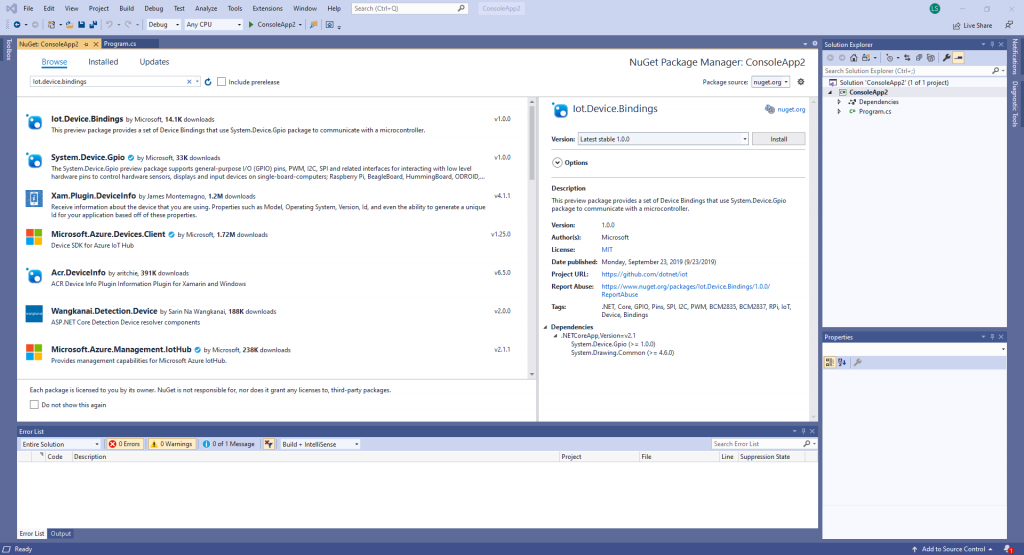
Go to Project > Manage NuGet Packages.
Click on the Browse tab.
Search for Iot.Device.Bindings and select the Iot.Device.Bindings option.
Install the Iot.Device.Bindings package
Click on Install.
Click on Okay and accept the license.
Great. Now that we’ve got the libraries installed, let’s write some code!
6. Wire the LED to the Raspberry Pi
… I’m sorry. Let’s get one more setup item out of the way – let’s wire together our LED circuit.
First, I will assume that you have a basic understanding of electrical circuits and that electricity flows from the power source (+) to ground (-). I won’t get into breadboards or electronics here (but I might do another article on the subject later…). If you want to learn more about how a breadboard works, I found this video from 2009 (it seems so long ago when looking at the video quality) that explains it quite well.
Second, the positive lead on the LED is the longer leg/lead. This leg should be connected to the side of the circuit the power/electricity is coming from.
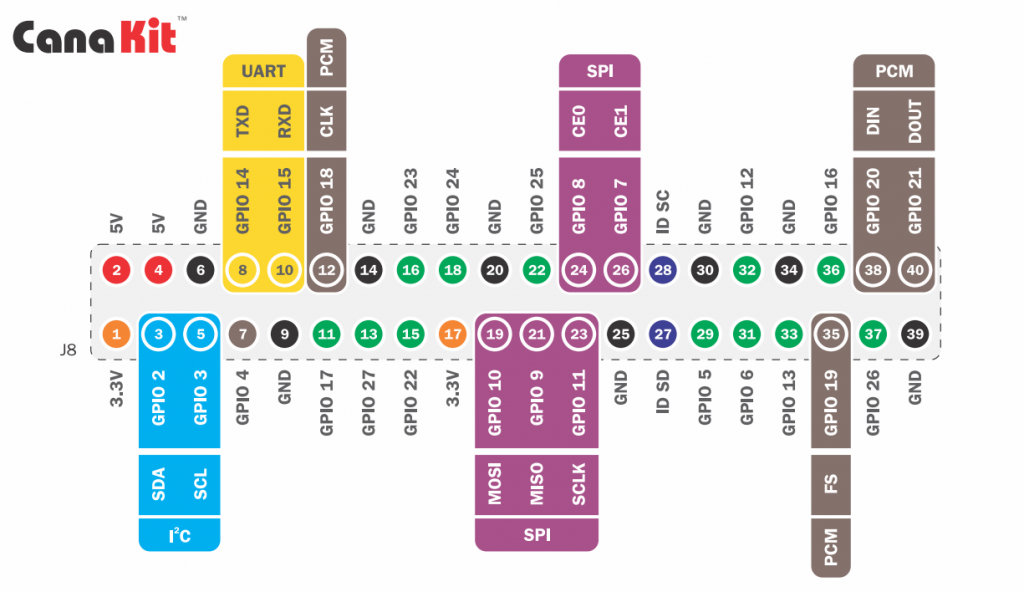
Third, take a look at the GPIO (General Purpose Input/Output) reference diagram on page 11 of the CanaKit Quick-Start guide (or see below). GPIO pins allow the Raspberry Pi to interface with external circuits and devices. Note that the physical pin number is different from the GPIO pin number. We will be using GPIO pin 17 as the power source of our circuit. This pin will be referenced in our code to control the LED. GPIO pin 17 corresponds to physical pin 11 as seen in the diagram.
Raspberry Pi 4 GPIO Pins diagram – this corresponds to the pins on the Raspberry Pi when looking at the Pi from above with the Raspberry Pi symbol the correct side-up.
Fourth, the ground wire in your circuit can get plugged into any of the ground (GND) pins noted in the diagram. I plugged my ground wire into pin 6.
Fifth, perform any and all wiring while the Raspberry Pi is off in order to avoid damaging the Raspberry Pi or harming yourself.
With those points made, it might be helpful to reference this video from the IoT Series by Channel 9 and Microsoft as your wire up your circuit:
Code
I think it’s safe to say that we have all of the“setup” done. Now we can write our code, publish and deploy our application, and run our light blinker program.
7. Write some code
I’ll make this too easy. Within your Visual Studio blinker project, replace the contents of the Program.cs file with this code. That code is from the C# .NET application that I built and based this article off of. My code is wholly based off of the led-blink sample code from the .NET Foundation. Referencing line numbers from my code, I’ll walk us through it.
The first three lines of code initialize/import the libraries that our application requires.
using System; is always present – this library allows our application to interact with the system our code is running on with classes/functions like Console.WriteLine("...");.
using System.Device.Gpio; allows our application to interact with the GPIO pins of the Raspberry Pi by introducing the GpioController() class.
using System.Threading; introduces functions for controlling application threads like Thread.Sleep(...).
I’ll avoid delving too deep into the structure/purpose of namespaces and classes, and we can jump down to the code that sits in the Mainmethod, the method that gets called when you run your .NET application.
On line 13, we set the GPIO pin number.
Lines 14 and 15 respectively set the on and off time (in milliseconds) for the LED.
Line 18 instantiates a new GpioController with which our program can interact with the GPIO pins on the Raspberry Pi.
On line 20, we tell the program to use GPIO pin 17 for output purposes because we will be outputting instructions to pin 17.
Lines 22 and 23 are simple messages that we will write to the console at this point in our program.
Lines 25 through 28 handle the safe disposal of resources that our program uses. We essentially release use of the GPIO pins (pin 17 in our case) and any other ports or resources that our program may have called on.
Finally, lines 30 through 38 run a loop that turns our LED on and off.
Line 32 sets the pin value of our GPIO pin 17 to “High.” This effectively raises the voltage of pin 17 compared to the Ground in our circuit, allowing electricity to flow and the LED to turn on.
Line 33 tells the application to wait (sleep) for the amount of time (in milliseconds) that we set earlier on line 14.
Line 34 writes to the console that our LED is “On.”
Line 35 sets the pin value of our GPIO pin 17 to “Low.” This lowers the voltage of pin 17 (and the voltage across our circuit), causing the flow of electricity to stop and our LED to turn off.
Line 36 again tells our application to wait (sleep) for the amount of time (in milliseconds) that we set earlier on line 15.
Line 37 writes “Off” to the console.
8. Publish the code
Now that our code is in place, make sure to save your application (File > Save All). At this point, we need to publish our application so that we can copy it, share it, and (most importantly) use it.
Click on Build > Publish <application name>
Select Folder when asked to pick a “publish target.”
Choose a folder where your release items will be placed – choose or create an empty folder for this.
Click on Create Profile
Under the name of your publish profile, click Edit.
Pause
Did you install .NET Core onto your Raspberry Pi?
Yes, I have .NET Core installed on my Raspberry Pi
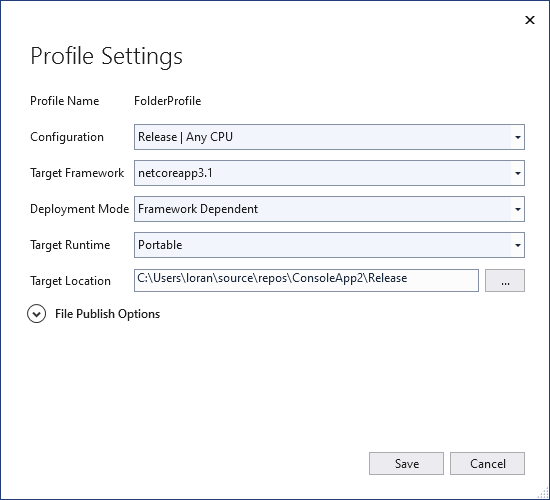
Make sure the Profile Settings match these (your Target Location will be different… and your Target Framework might be different if you are using a newer version in the future):
Publish Profile Settings if .NET is installed on your Raspberry Pi.
These settings indicate that we will be publishing an application that is “Framework Dependent” with a “Portable” runtime. This means that our application will require the .NET framework to already exist in the target environment in order to run. It also means that our application is allowed to run in a variety of .NET runtime environments – it is transferable between a Microsoft, OS X, and Linux runtime. A “Portable” runtime isn’t really necessary for us because we only intend to run our application on our Raspberry Pi (a Linux environment), but it will work 🙂. You could specify a linux-arm Target Runtime if you want instead.
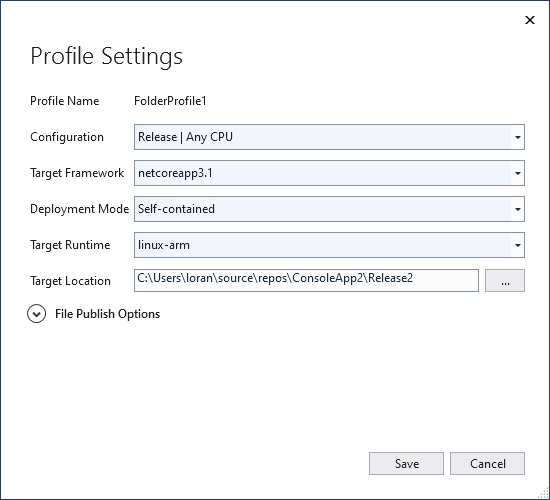
Make sure the Profile Settings match these (your Target Location will be different… and your Target Framework might be different if you are using a newer version in the future):
Publish Profile Settings if .NET is not installed on your Raspberry Pi.
These settings indicate that we will be publishing an application that is “Self-contained” with a “linux-arm” runtime. This means that our application will include all of the .NET libraries and the Linux runtimes necessary to run within it. Our application will, as a result, be quite larger. It also means that our application can only run in Linux environments. This is fine for this application because we only intend to run it on the Pi anyway.
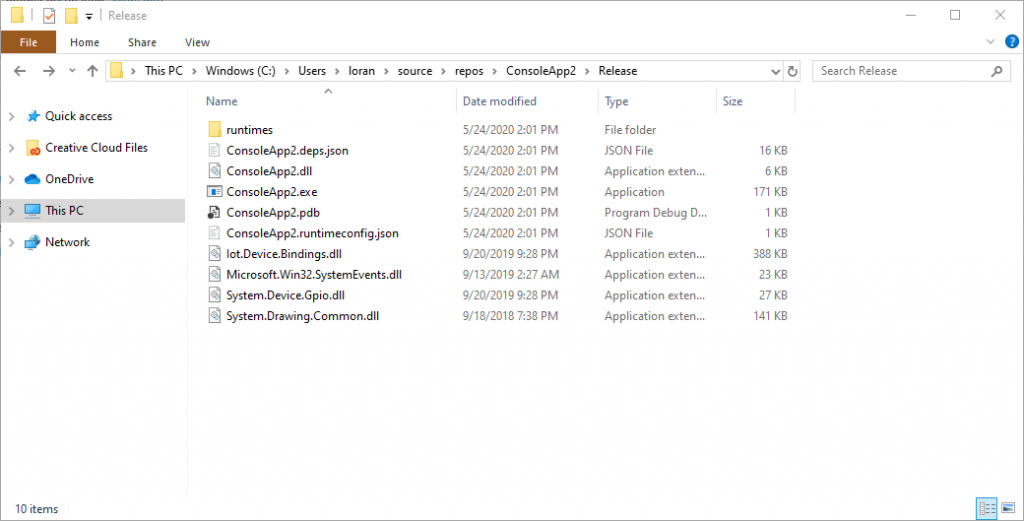
Navigate to the folder you designated as your Publish Target. You should see it now contains a bunch of files.
A bunch of .dll and other files in my target Release folder. You will have a different set of files if you published a “Self-contained” application.
Our application is now published!
Deploy and Run
We are almost there!! 😃 Now, all we need to do is deploy (send a copy of) our application to our target environment, the Raspberry Pi.
9. Deploy to the Pi
There are a few ways to deploy your code to your Pi. Basically, you want to create a folder for your application on the Pi, and then you want to migrate/copy your newly published application release files/folders from your main computer over to the new folder on your Pi.
Deploy with Google Drive
The first time, I did this, I did it with Google Drive. I loaded my files (everything in my Publish Target folder where I published my application, including all sub-folders) to Drive from my local development machine then downloaded them from Drive onto the Raspberry. This can be time consuming and slow because you have to go back and forth between your computer and your Pi. Plus you will have to download and then unzip the files, or download them one by one.
Deploy with SSH
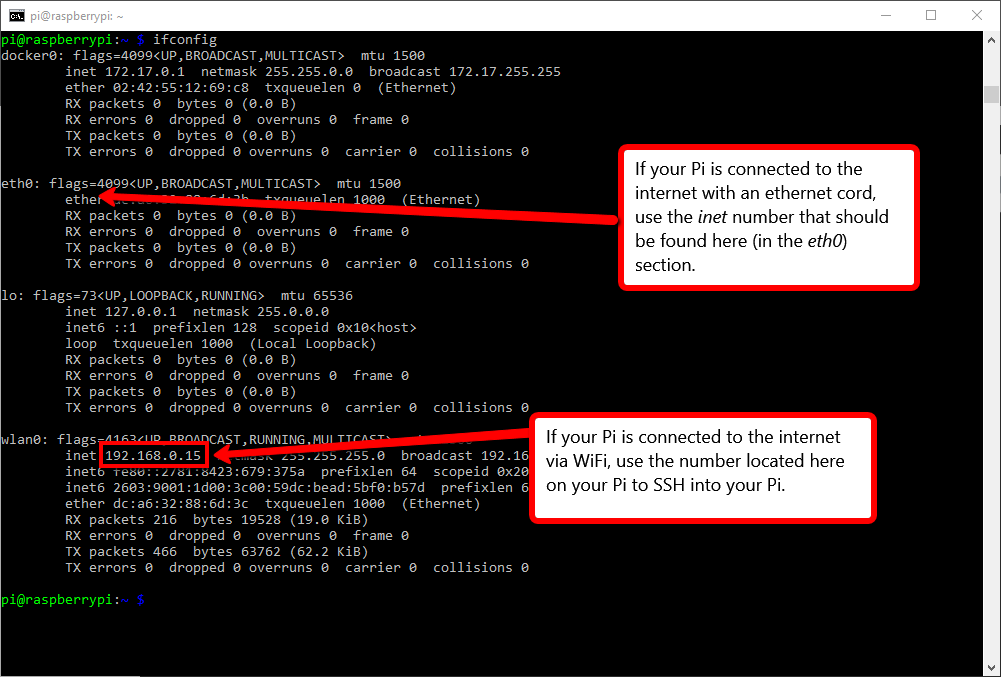
A simpler/faster, way for somebody that might be doing more regular migrations would be to use the command-line and SSH. If you watched the Raspberry Pi Setup Tutorial, you may know that by running ifconfig in the Pi’s terminal, you can access the network address of the Raspberry Pi. We can use the network address to SSH into the Raspberry Pi from our local machine (on the same network) as well as to send files to the Pi from our local machine.
How to find the inet address of your Raspberry Pi, used to SSH into the Pi from another computer on your network.
With your Pi’s inet address (and with the Raspberry Pi on),
Go back to your main computer,
Open the terminal/command-line,
Type ssh pi@<inet.address> and hit Enter,
Enter your password for your Pi. (Hopefully you still remember it! If not, you might have to go back to the Pi and change it.)
You should now be logged into your Raspberry Pi from your main computer. If you run ls, you should be able to see the folders in your Pi’s home directory. You can run logout to close the connection.
Be sure to create a folder in your Raspberry Pi as the target for our light blinker application. To do that, SSH into the Pi following the steps immediately above (or go directly to your Pi and open the terminal), and type mkdir <folderName>. Replace <folderName> with whatever you have decided to call this project.
To actually copy over your files to the target folder on your Raspberry Pi via SSH, do the following:
Open the terminal/command-line on your main computer.
Navigate to the directory (folder) that contains your published application. For example, I might run the following:
cd ./someFolder/.../blinkyReleaseFolder
Run the scp command to copy files via SSH as follows:
The -r option tells the system to copy all sub-folders and content.
Be sure to replace <inet.address> with your Pi’s inet address.
Be sure to replace <targetFolderPath/Name> with the path to and name of your desired target folder.
I wanted to save my files in a folder called raspberryPi-1, which was a sub-folder of Projects (another folder that I created) on my Pi. The Projects folder was created in my HOME directory.
As such, my <targetFolderPath/Name> looked like Projects/raspberryPi-1
Note that Sweeky (the speaker in the video) publishes her code from the command line (as opposed to using Visual Studio like we did). She publishes her .NET application specifying that the runtime should be linux-arm. It also looks like she published a Self Contained application as opposed to a Framework Depenedent one. A Self Contained application will have many more files (the runtimes and libraries necessary to support the application).
Phew! 😌
10. Run your application!
The moment of truth.
Open your Raspberry Pi’s terminal.
You can either SSH into your Pi’s terminal from the command line of your main computer:
ssh pi@<inet.address>.
Or you can open the Pi directly and open the terminal.
Navigate into the directory where you application is located:
cd <projectFolderPath/Name>
Pause
Did you deploy the Framework Dependent application (the one that requires .NET Core to be installed on the Pi)? Or did you deploy the Self-contained application?
I deployed the Framework Dependent application
Run your code!
dotnet <ProjectName>.dll
I chose the Self-contained application
Change the permissions of the application file so that you can run it.
chmod 755 <ProjectName>
Run your code!
./<ProjectName>
Celebrate your success!
Is your light blinking? We did it!!!
You can stop your program by typing Ctrl + c in the terminal.
Conclusion
Man… this post is way longer than I thought it was going to be. As you can tell, there is a lot here (and a lot more that we didn’t get into)!! All to make a light blink on and off programmatically!
There are a number of other tutorials and demos that I drew from to put this together, but I hope that this proves to be a more complete tutorial with fewer gaps that doesn’t require as much jumping around on your part.
Check out the resources below to learn more and explore additional concepts. Now that you have the foundational pieces in place, you can try putting together new/different/more complex applications for your Raspberry Pi using .NET!
I hope this has been fun! Thanks so much for reading.
Resources
A big thanks to the great resources that allowed me to put this together.
Want to build a web application using Node.js? Let’s dive right in and build one from a template (that I created from another template). This tutorial will show you how to quickly clone and launch a Node.js web application locally and how to deploy your application to Heroku.
We are using Node.js because… well, because I like Node.js! Node is designed with modularization in mind, and the Node package manager, npm, is an incredibly powerful tool. It really makes getting projects started a breeze once you know the basic framework.
Heroku allows you to deploy an application super quickly and share it with others. To learn more about why I like Heroku, see my previous post, Heroku and Other Cloud Services.
After this tutorial, you should have a simple, cool web application that you can customize, enhance, or totally scrap and rebuild. If you are a more junior developer, this can be a great learning experience, and it could result in something fun to add to your portfolio. All I ask is that you
Change the name and the styling within your application if you plan to share it with others or use it for other purposes.
Give type-recorder LLC credit somewhere on your website! Link to our blog and the original site!
Let’s get started!
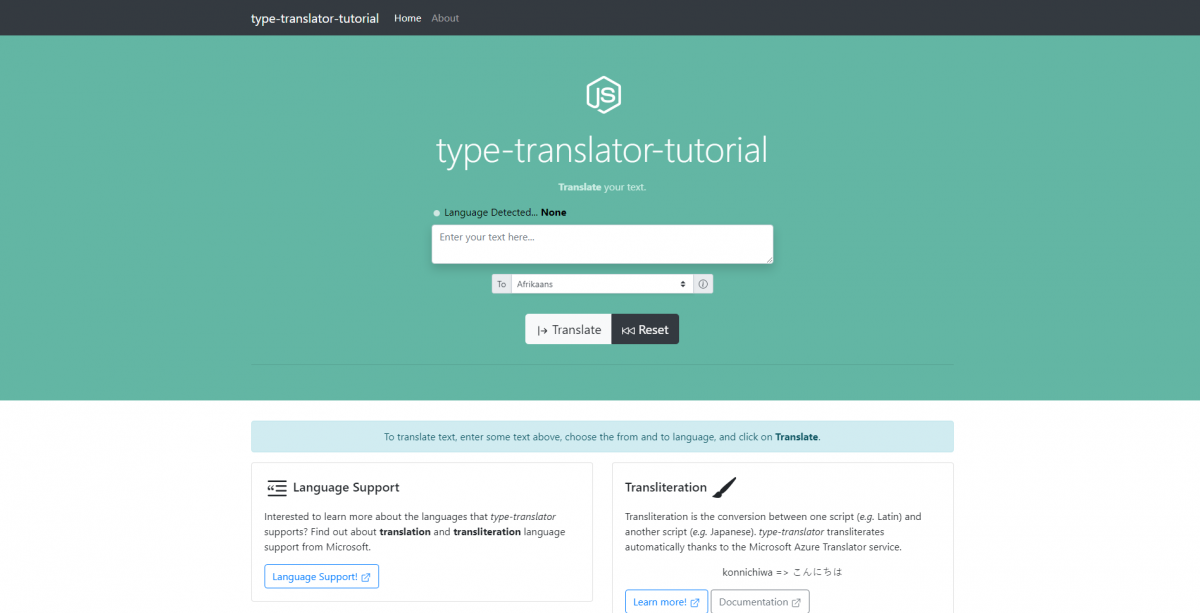
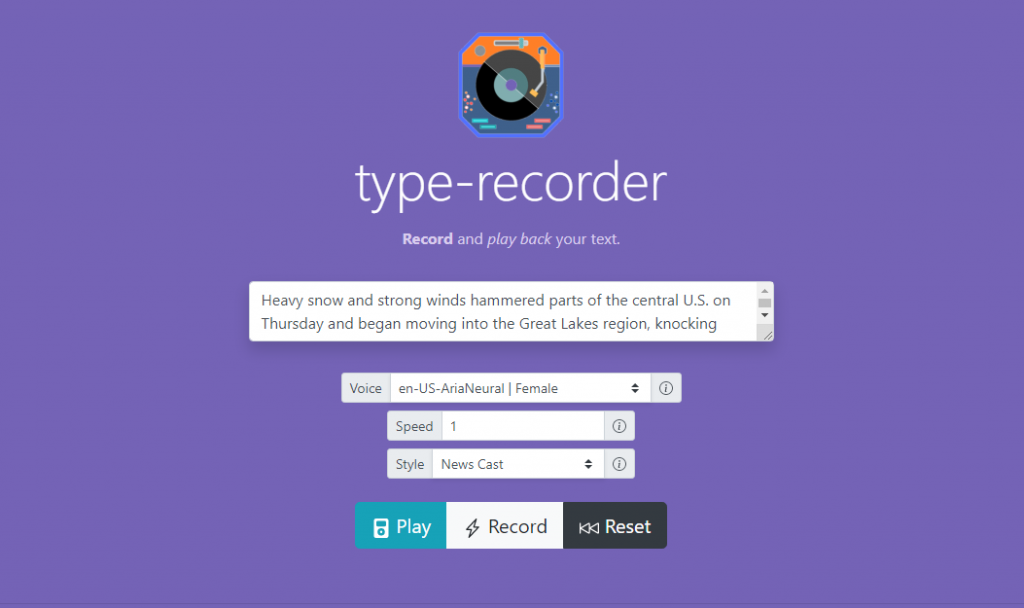
Take a look at this! This web app is what you are going to build! type-translator is a Node.js application using the Express framework and the EJS template engine that performs real-time translation of text to a specified language. Nothing out-of-this-world these days, but it’s still pretty cool, and it requires a few different pieces of technology: Node.js, Microsoft Azure, and Heroku.
This tutorial assumes that you have a basic knowledge of the command line interface, source control, and of general software/development principles. Don’t let that scare you off though! Most of this stuff is straightforward and simple to pickup. I encourage you to work along and Google what you don’t know!
Step 1: Install the basics
Node.js
Our web app is a Node.js app – it runs on Node.js. In order to run and test our application locally, Node.js needs to be installed.
Downloading and installing Node.js also installs npm (Node Package Manager). npm is critical for installing and updating modules and libraries that our application relies on.
Git
Git is necessary to clone our source code, but it is also necessary to have if you plan to do future development and utilize source control.
Install Git: Follow the instructions for your operating system.
Confirm Git is installed:
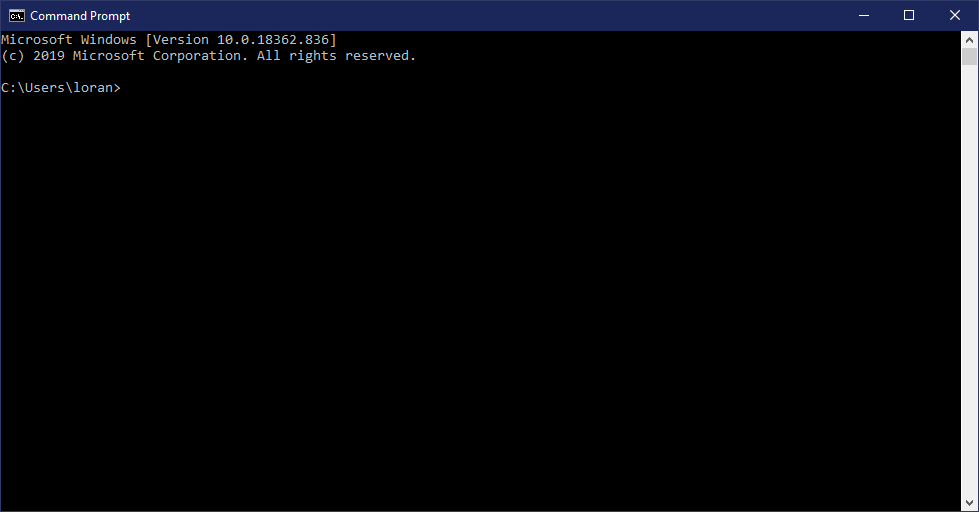
Open the terminal/command-prompt.
Type git --version
If you do not receive an error, you are in good shape!
Heroku Account
If you intend to launch your test application on Heroku as part of this demo/tutorial, you will need to create an account on Heroku. Don’t worry, it’s free. This step is optional – you don’t have to host/launch your app on Heroku to create the web application on your machine locally. You will not be able to share a link to your app, though, without hosting your application on a publicly accessible web server (be it Heroku or something else).
The Heroku CLI (command-line interface) is utilized for deploying your application from your local machine to Heroku. If you do not intend to launch your application on Heroku, you do not need to install the CLI. That said, I recommend doing it if you are trying to learn more about development because it is a fun learning experience (and it is fun to share the link with your friends and say, “I put this web app together!”).
Confirm the installation by running heroku --version on the command terminal.
Visual Studio Code
Visual Studio Code is an all around great editor, and it has been embraced by much of the developer community. This is a matter of personal preference, but if you don’t already have an editor for code development, I recommend using VS Code!
Microsoft Azure’s Translator Service (part of Microsoft Azure’s Cognitive Services set of tools) allows for real-time language detection and translation of text via API. We use Azure’s Translator Service to perform translations on type-translator, and it is, therefore, what I will show you how to use in your app!
Log in to the Microsoft Azure Portal after account setup.
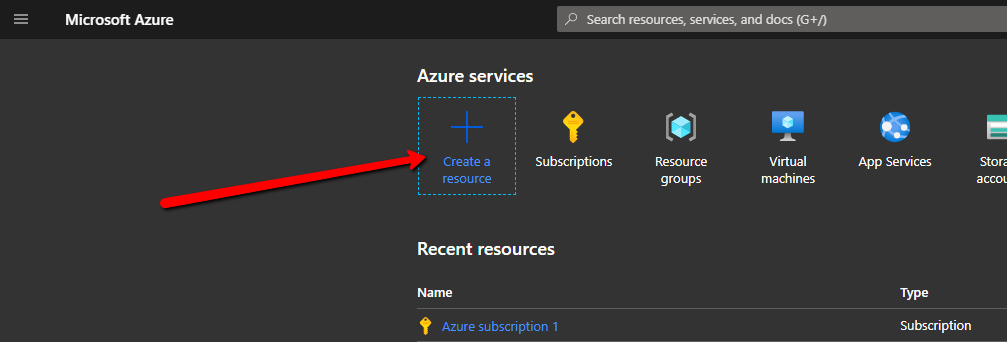
Create a New Resource
Create a resource in Microsoft Azure
Type Translator and select the suggested result:
Translator resource in Microsoft Azure
Click on Create.
Select or create a Resource Group.
Choose the “Global” Region (or another region suitable for you).
Enter a name for the resource (ex. MyTranslatorResource).
Select the F0 (free) Pricing Tier.
Click on Review + create.
Click on Create.
Open your new Translator resource once it is ready.
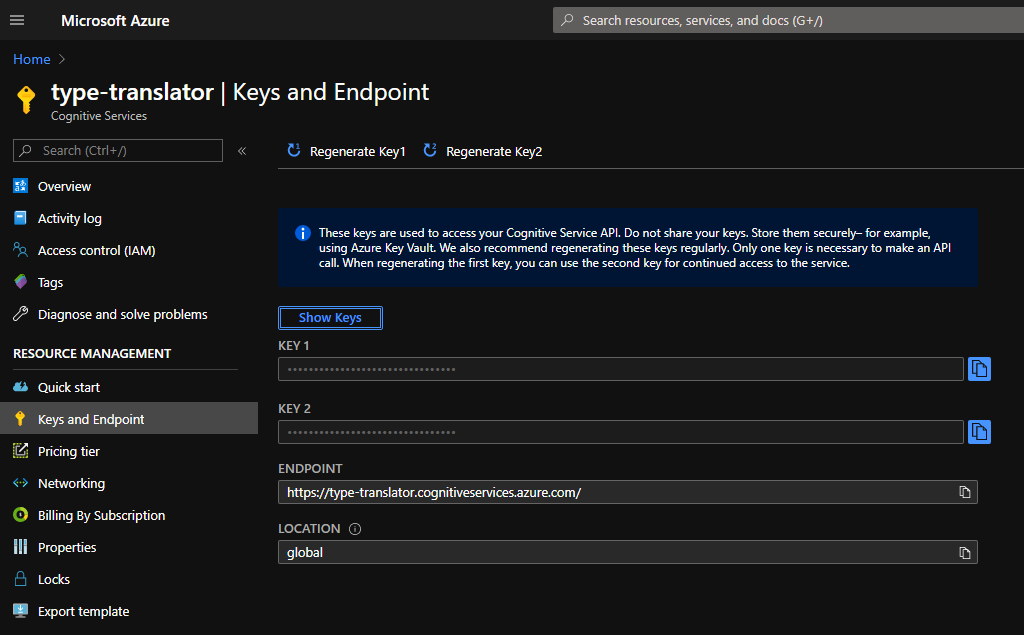
Click on Keys and Endpoint to access important subscription key and endpoint information:
The Keys and Endpoint section of the Translator resource. These keys will be important for accessing the Translator service via API.
We should be good to move on to the next step for now.
To learn more about Microsoft Azure’s Translator, check out the Quickstart.
Step 3: Clone repository
Good to go with Git? Here is the Install Git link if you still need it. I’ll do another post explaining Git, but in the meanwhile, we’ll get on with this.
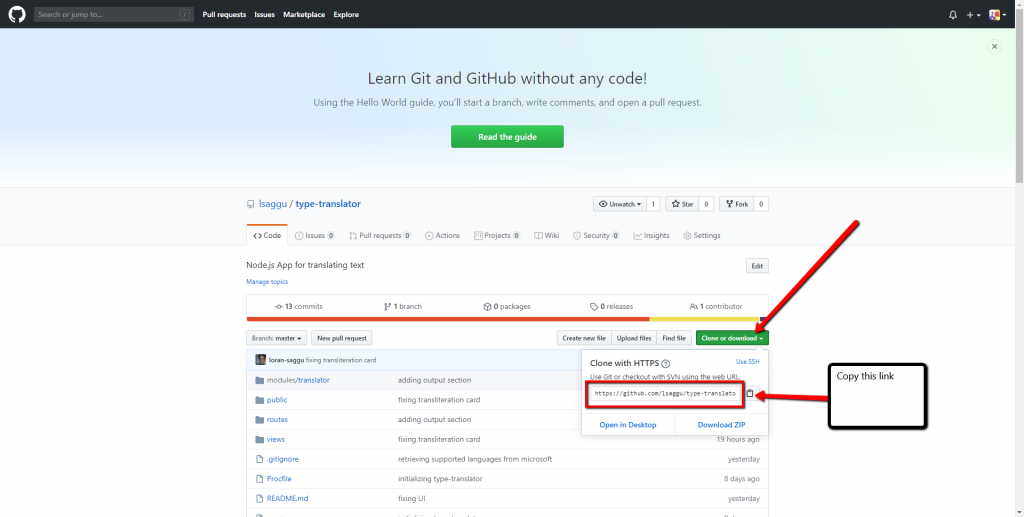
You need to clone (copy) my project from GitHub. This will serve as your template. You won’t be building the site from scratch, but you will instead be taking my site, modifying it, and deploying to Heroku (or wherever you want).
Nice. Now you have a local copy of the web app on your machine. At this point, you can change the name of the parent folder from type-translator-tutorial to something that you prefer. You can also set up your own git remote using your preferred git provider (GitHub, GitLab, etc.). I’ll leave that to you.
Step 4: Update Keys
In order for your instance of type-translator-tutorial (or whatever you’ve decided to call it) to work properly and interact with Microsoft’s Translation services, you will need to update some information in the app. Specifically, you will need to specify your Subscription Key (from Step 2) in order to make callouts to the Translator service.
Open Visual Studio Code (or your preferred editor), and open the type-translator-tutorial folder that you cloned.
Type Alt
Click on File > Open Folder…
Once the type-trasnlator-tutorial is open in VS Code, create a new file in this top-level app folder – do not put the file in a subfolder.
Right click in the bottom (empty space) of the Explorer in VS Code.
Click on New File.
Name the file .env
Copy the following content into the file:
TIMES=2
AZURE_TRANSLATION_SUBSCRIPTION_KEY=<Replace with your Microsoft Azure Translator Service Key>
AZURE_SERVICE_REGION=global
Add your Key (either Key 1 or Key 2) where specified in the content above. See step 13 in Setup Azure for reference as to where to find your keys.
Save the file as “.env”.
The file should not have any other extensions… .env.txt is not going to work.
The Heroku system uses the .env file that we just created to reference global environment variables specific to the app that we are running.
Step 5: Run Locally
Okay! We have the application code on our computers, and we have Node.js, Git, and Heroku CLI installed.
Open the terminal.
cd into the directory that contains the application.
Run npm install
This will install all dependencies that the app requires to run!
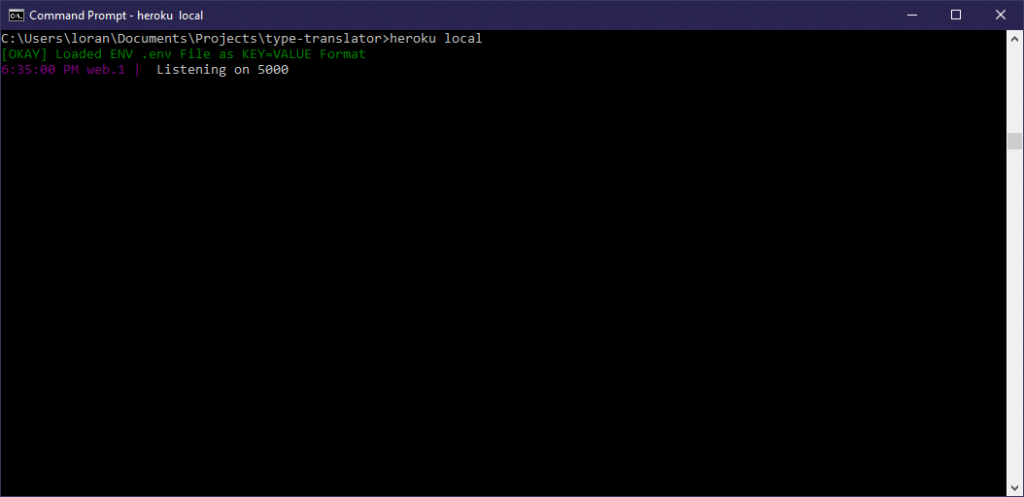
Run heroku local
The heroku local command emulates a Heroku web dyno (server) locally on your machine, and it runs your app.
heroku local
After running heroku local, you should see that the server is “Listening on 5000.” This means that the server is listening for requests to the web application on port 5000.
Open a web browser.
Navigate to localhost:5000 in the browser.
Boom! We should see type-translator up and running locally on your machine.
Step 6: Change Styling
Now, we can’t have you parading around, sharing and/or using my app as your own. Let’s change the styling to something that is original and unique. Also, I’d like a bit of credit on your site!
Open Visual Studio Code (or your preferred editor) and open the directory containing your web app.
I suggest making the changes below one at a time, saving, and checking. This way, you can easily identify the cause of any issues that you might face.
Change Jumbotron Color
Open the ./public/stylesheets/main.css file.
Change the background attribute in the .jumbotron block.
Choose a color that you like that is different from the one that I am using.
If you are unfamiliar with hex color codes, Google “hex color”, and use the color picker to find a color that you like. Copy and paste the HEX value into the CSS file.
You can change the text color of the main heading by changing the “color” attribute in the .jumbotron block.
You can change the text color of the subtitle by changing the “color” attribute value in the .jumbotron p block.
Change Names
Let’s give your app a new name. Come up with something that you like. Or name it after yourself (e.g. “John’s Translation App”).
Note: You may notice that the pages have a .ejs extension (instead of .html as you might expect). This is because this Node.js app uses Embedded JavaScript Templating (EJS) to allow for the injection of code and data from the application framework.
Header
Open ./views/partials/header.ejs.
Change the text between the <title> tags from type-translator-tutorial to whatever you’ve decided to call your app.
Save.
Footer
Open ./views/partials/footer.ejs.
Change type-translator-tutorial to whatever you have decided to call your app.
Remove Copyright 2020 type-recorder LLC.
If you want to create your own Privacy Policy and/or Terms & Conditions, the app includes template Privacy Policy and Terms & Conditions pages in the ./views/pages folder. You will need to update these pages.
Body
Open the ./views/pages/index.ejs page.
Type Ctrl+f and search for type-translator-tutorial.
Change all instances of type-translator-tutorial to your app’s name.
About Page
Open the ./views/pages/about.ejs page
Type Ctrl+f and search for type-translator-tutorial.
Change all instances of type-translator-tutorial to your app’s name.
Give Credit 😁
See the Build this App section on the About page? If you leave that section in your app (or maintain a section that says the same thing with the same links), then you are giving me and the open source community credit! Thank you!
Save and Verify
Make sure to save all of your changes!
Refresh the browser window that contains localhost:5000. If you don’t see all of your changes, you might need to restart your local (Heroku) webserver.
Open the terminal where you are currently running heroku local.
Type Ctrl+c.
Type Ctrl+c again to confirm that you want to terminate the job.
Run heroku local to restart the app.
You should now see all of your changes, and you should be able to continue making and testing changes in the same way.
Step 7: Deploy to Heroku
Are we doing okay so far? Awesome!
Finally, let us deploy our application to Heroku so that we can share it with the world! Or at least one or two of our friends…
Open the terminal.
Navigate to the directory containing your application.
Log into Heroku via the command line:
Type heroku login
Follow the instructions to log in to and authenticate your Heroku account.
You should see a bunch of information print to the console. This is the output of Heroku building and deploying your application.
We use the git push command to deploy to Heroku because Heroku is acting as a remote Git repository for our application. For more information, see Creating a Heroku Remote.
Let’s open our Heroku App:
Type heroku open
Voila! This should open a browser window containing your app. The URL is the app’s address on Heroku. If you continue working on your own app and want a custom domain name, Heroku let’s you associate your own domain with an app.
The End
Thanks for reading!! Hopefully this gave you some tangible skills and some practice using Node.js, Heroku, and Git! Hopefully you had some fun!
Well, I do! I care because I am a Salesforce consultant and professional, and Trailhead has been an invaluable tool when it comes to learning about the Salesforce platform and about specific functions and features quickly and in a way that sticks. In fact, you have to know about and use Trailhead if you intend to participate in the Salesforce ecosystem for long. I’ve used Trailhead to
Solve quick problems on the fly when solutioning, developing and building
Learn about new and existing features or tools like Lightning Web Components, IoT Orchestrations, Sales Console, and so many more
Maintain my certifications
Make myself marketable as a consultant and Salesforce professional
The content that I’ve reviewed so far indicates that Microsoft intends to leverage their new Learn platform in much the same way Salesforce uses Trailhead to up-skill, train, and maintain professionals in their own ecosystem.
You should care too if you are a Salesforce, Microsoft, or cloud professional or you hope to become one.
What does this mean?
I think it means a more competitive space because access to educational resources often empowers the community. In this case, the community of developers and enterprise software professionals are being given the tools to educate and up-skill themselves in order to not only meet the demand in the marketplace, but also to drive demand for Microsoft tools and services.
To Salesforce (and other cloud) Professionals
Microsoft Learn means that Microsoft is here to play as a cloud competitor, and Microsoft intends to leverage its community of developers, partners, and users to strengthen its brand. Microsoft is not just attacking customers in the marketplace, but in a way, it’s going after professionals too by mimicking a tool (Trailhead) that has successfully been used to build a strong network of professionals that learn from one another and promote their platform (Salesforce).
If you are someone (like me) interested in furthering your knowledge of the Microsoft cloud platforms/tools, the Learn platform provides the perfect opportunity to get started on your own terms and at your own pace with engaging content that allows you to track your progress. It presents an opportunity for cloud professionals outside of the Microsoft ecosystem to become fluent about Microsoft’s capabilities to speak to (or against) them. Plus, it gives you the ability to be cross-functional, opening up the door to career transitions or advancements.
To Microsoft Professionals
Microsoft Learn also means an enhanced and more engaging learning experience for professionals within the Microsoft ecosystem. Plus, it could be a huge tool for those new to the space to learn about Microsoft’s platform, train themselves, and market themselves as Microsoft professionals.
The gamification of learning on the platform reinforces engagement with the platform and the content, and it allows users to track and measure their learning progress. The points system (as is the case with Trailhead), where points are awarded for learning modules and challenges completed, doubles as a marketing tool for professionals to market themselves to prospective employers. Employers familiar with Salesforce know that Trailhead is the go-to learning system supported by Salesforce itself, and employers place value in it. I anticipate the same will become true of Microsoft Learn if it isn’t true already.
What do I think?
I think it is great! Considering I personally have wanted to become more familiar with Microsoft’s Azure platform for a while, I’m definitely happy to be able to take advantage of Microsoft Learn.
Laying aside my personal desire to learn about Azure, as a consultant and technology professional, I believe it is important to stay abreast of the latest tools and tech. Any technology professional knows that the landscape is constantly evolving, and that there is no guarantee that a tool that is popular today will remain popular tomorrow. You need to be ready to pivot and learn new things quickly in order to stay relevant and in-demand. For these reasons alone, Microsoft Learn is a gift because the platform enables me and other professionals to quickly scale up our knowledge of Microsoft tools and services in a space where our progress is measured and in such a way that can be marketed to potential employers.
Ultimately, I’m excited because Microsoft Learn makes Azure accessible to me as a novice Microsoft professional eager to learn more and grow my skills set. Plus, Microsoft Learn is presenting content and engaging with me in a way that I’m already very familiar with through Trailhead. The discussion as to whether Microsoft Learn adopted its current framework because it was successful with Salesforce and Trailhead or because its simply an intuitive design for gamified learning is a discussion for another article…
What do you think?
I’m eager to know what you think! Leave your comments below.
Neural voices are all the rage in the text-to-speech world. Neural voices are what sophisticated text-to-speech systems use to synthesize natural sounding speech with computers. As the name implies, neural voices utilize neural networks to perform this synthesis. This article discusses neural voices and how punctuation plays a role in neural network speech synthesis.
Neural Networks
First, neural networks though.
I don’t want to spend too much time on them here, but neural networks, in short, are large computer systems… These systems enable “deep learning” and other forms of machine learning (where computer systems use exceptionally massive amounts of data to recognize and replicate patterns). With the right algorithms in place, feeding a deep learning system data allows the system to “learn,” and the more it learns, the smarter (better at recognizing and replicating patterns) it becomes.
If you are interested to learn more, here are some links to check out:
In the case of neural voices, neural networks replicate speech patterns and construct speech using phonemes, the most basic unit of speech, along with other building blocks like tone. These speech outputs by neural systems are able to sound much more like human speech because the neural computer systems emulate the same or similar patterns during speech synthesis that they “learn” from speech samples provided as part of learning/training data.
Can you explain that last sentence?
In an attempt to explain, let me explain. Basically (and I mean at a basic conceptual level), neural speech systems are fed large amounts of learning/training data: think of samples of speech paired with the corresponding string of text representing that speech. For example, the training data might include a key-value pair where the key is a string of text,
“Hey man, what’s going on?”
The value in that key-value pair is a recording of someone actually saying that phrase:
After comparing millions if not billions if not trillions of pieces of training data like the key value pair above, the system is able to identify patterns of speech based on the text it is associated with. The neural system then builds speech on its own from a string of text using the building blocks at its disposal (phonemes, tones, etc.) attempting to use the pattern that it has identified from its training.
In reality, training models are much more complex, and trainers need to worry about handling bias, creating sustainable learning models, positive/negative reinforcement, and so on. This ai.googleblog article goes into some of these training concepts in its discussion of the neural networks behind Google Voice.
Finally, as is the case with most machine learning systems, designers and developers adjust the algorithms that the systems use to help the system achieve the desired result.
All the big players are doing it
Google, AWS, IBM, and Microsoft are all leveraging neural networks to create neural voices.
A couple of the articles above are some years old now, so this isn’t new news, but it still has yet to fully reach the mainstream. I know for a fact that as of writing this article and recently building type-recorder, the documentation for the APIs that I use are very recently developed – in fact, some of the SDK functions were not finished being built out yet! That means that this stuff (text-to-speech) is just now being made available to the broader audience of developers to experiment with and extrapolate on, and that is exciting!
So… Punctuation?
So… Punctuation. What about it? (Using: en-US | Male | Neural)So Punctuation What about it (Using: en-US | Male | Neural)So, punctuation. What about it? (Using: en-US | Male | Neural)
Can you hear the differences between the above three recordings (from type-recorder 😉😎 using the en-US | Male | Neural voice)? Compare how each recording sounds to the punctuation of the text it was synthesized from. Can you spot a difference between how the first recording sounds and the third one? Listen to how “So” is said at the beginning of both.
As deep learning has become and becomes more sophisticated, these complex neural systems utilize more features and building blocks to synthesize human-like speech including punctuation and even the words themselves. Take a look at the second recording (the one without punctuation); even without punctuation, the system knows that the word “what” is a question word, so the synthetic speaker raises the tone of its voice when “what” is present (as an English speaking human would do) at the end of the sentence to indicate that a question is being asked.
I will say, that when using neural voices on type-recorder, I do not see the system differentiate the speech pattern much when I use an exclamation point as opposed to a period… at least it isn’t doing it yet. Hopefully, at least, you have a couple of tips to try as you create your own recordings!
What’s next?
I plan to create a separate blog post about this, but if you want to get really crazy, Microsoft Azure Cognitive Services text-to-speech system does allow you to distinguish the speaking style (i.e. News Cast, Cheerful, Empathetic) for certain neural voices. AWS allows the same thing, and I’m sure that Google and IBM probably do too. That said, they only allow this feature for a small subset of their neural voices, which tells me it is a newer feature that requires some heavy implementation on their part. I’m excited for more to come in the world of synthetic speech!
Thanks for reading!
Thanks for reading! (Using: en-US | Female | Neural voice with a Cheerful style)
The comments/suggestions in this article apply to websites and web applications using Bootstrap (specifically Bootstrap 4.4.1+). These notes may also apply to websites that do not use Bootstrap, but I was using Bootstrap when testing for and writing this article.
The Main Point
You can adjust the alignment (as well as other display features) of your Amazon Affiliate banner using CSS (shocker).
The Amazon Associates Responsive Banners FAQ mentions that the default alignment for a banner is left, but an affiliate may adjust the containing div elements of the banner during installation to alter the alignment to suit the affiliate’s needs.
The above code sample depicts the HTML framework of an Amazon Affiliate banner (when using JS instead of iFrame). Notice the “alignleft” class in the containing div.
What is not mentioned anywhere (except in the obscure blog that I provide the link for above) is that the “alignleft”, “aligncenter”, “alignright” classes do not have any defined styling associated with them in your app unless you’ve explicitly defined styling for these classes in your CSS file… Now, most experienced web-devs could probably figure this out on their own, but sometimes (like me) you just need a little refresher (or a smack on the head).
Wait – What about WordPress?
Good question. It turns out that WordPress has built-in definitions for handling the “alignleft”, “aligncenter”, and “alignright” classes in Amazon Affiliate Banner JS HTML (make sure to note the JS and not iFrame).
Check out the ads that are rendered here on this WordPress page with their respective sizes and classes:
Most Wished for Sofware
728×90
“aligncenter”
Everything You Need to Upgrade Your PC
120×600
“alignleft”
Best Sellers in Illustration and Design Software
120×600
“alignright”
Best Selling Point and Shoot Cameras
728×90
“alignright”
Amazon Affiliate Banner Advertisements and their respective sizes and styling classes on this WordPress page.
These ads are all being rendered by WordPress’s engine, and they are all responsive (try resizing the page to see). See my notes about what size banners to use for responsive behavior towards the end of this article if you intend to add your own Amazon ads to your blog or site.
And if I’m not using WordPress?
If you are trying to install your banner in your own personal site or app, you’ll have to come up with your own fix until Amazon gives us something.
The Fix
To gain control of your affiliate banner styling/justification in your own personal site or app, you should define styling for the class in the banner’s containing div. Better yet, you should add to or replace the existing class (“alignleft”) with your own class (ex. “aws-flex”) and define the styling for that class inyour CSS file. Here is the styling that I used to center my banner within it’s containing div.
No. This fix looks pretty solid on large size screens and/or with banners that do not require resizing fit on all size screens (125×125 for example). However, when you look at the page on mobile, the banners overflow.
A responsive route?
One route to make the banner more “responsive” is to leverage Bootstrap’s Display Properties to hide elements along with the Bootstrap Grid. Essentially, the idea is to show one banner when the view-port is big, and another banner while the view-port is small. Bootstrap’s Display Properties makes this very straightforward. You are going to do some extra work here, but you’ll have a more responsive solution.
Note: It is possible to show different banners for each view-port size (xs, sm, md, lg, xl), but I will illustrate the concept by showing one banner on lg and above view-ports and another banner on less than lg view-ports.
This is basically the idea:
<div class="row">
     <div class="col"></div> <!-- styling div -->
     <div class="col mb-2">
          <!-- ad shown on lg and xl screens -->
          <div class="aws-flex d-none d-md-block">
               <script type="text/javascript">
                    ... <!-- large ad content -->
               </script>
               ...
          </div>
          <!-- ad shown on screens smaller than lg -->
          <div class="aws-flex d-md-none">
               <script type="text/javascript">
                    ... <!-- small ad content -->
               </script>
               ...
          </div>
     </div>
     <div class="col"></div> <!-- styling div -->
</div>
You can see this concept in action on type-recorder‘s home and about pages.
Alas…
This solution isn’t perfect. If your banner is wider than the view-port, it will get cutoff. It will not overflow, though, and give your page that awkward left/right scroll when viewing on mobile.
My (and Amazon’s) Recommendation
In conclusion, I would also like to note that responsive affiliate banners by Amazon are only recently being developed… I actually thought these would have long existed by now…
Anyhow, Amazon (on its Amazon Associates Responsive Banners FAQ page) recommends that you use Responsive Banners as often as possible (if not everywhere) in your website. As of writing this article, the Responsive Banners are only available in JavaScript (not iFrame!), so make sure to click the JS radio button when copying the link for your website’s banner from the Amazon Affiliate’s hub.
Also, as of writing this article, only 320×50 or 728×90 sized banners are responsive according to the FAQs, and even then, not all of the banners of those sizes are fully responsive.
My recommendation: if you are adding banners to your site, then make sure that you use the JS HTML (not iFrame). Try to stick to the 320×50 or 728×90 sizes whenever possible, or (ideally) use sizes that will not require resizing on mobile along with some creative <div> placement with Bootstrap Display Options. Finally, test on mobile to see how your ads look!
Thanks!
Thanks for reading – I hope this was valuable. If you have additional information concerning this topic to consider, please comment below!
Interested in building a web application? There are a bunch of tools out there and services to consider when it comes to building and hosting an application. This article discusses different types of cloud services for supporting web applications, and it specifically talks about the benefits of using Heroku for quickly launching a web application.
Heroku (in my opinion) provides the perfect space to quickly setup, test, deploy, and launch your application. And for small businesses, hobbyists, and those who simply want to learn and teach themselves, Heroku makes it easy to get started for free.
Disclaimer
This article is not affiliated with Heroku – the recommendations made here are the recommendations and opinions of type-recorder only. type-recorder is not compensated by Heroku in any way for or through this article.
Please perform your own additional and comprehensive research when making decisions for yourself or for your business regarding cloud service selection and website development/hosting tools.
Why did you write this article?
Good question. It’s an especially good question when you consider that I appear to really be selling Heroku in this article’s opening paragraph.
I wrote this article because I built type-recorder on Heroku. Heroku made the job of building type-recorder straightforward and (I would say) fun. As I will discuss in this article, Heroku allowed me to not have to worry about the complicated infrastructure pieces involved in hosting a web application – I only had (and have) to really worry about the application itself. I want to share the tools and methods that I used to get type-recorder off the ground with anyone that might be interested in building their own web application. I also want to help give others a better understand of the different cloud tools/services available to individuals and businesses for developing applications.
Building type-recorder has given me a terrific avenue to improve my knowledge of application development, website hosting, source control, and so on. Plus, it has allowed me to work on building a brand and a business (however small). The project has turned into a huge learning experience for me, and it is something that (at the very least) I can add to my portfolio. I highly encourage any techies as well as any wannabe techies interested in building an application for themselves to do so (with whatever tools that you want to use)! You will learn and reinforce a lot!
What is Heroku
Heroku (owned by Salesforce) is a PaaS (Platform as a Service). A PaaS system is a cloud service that is (usually) generally available to the public, used to build and host custom applications. Heroku, specifically, is a PaaS that allows users to build and host web applications built in modern application languages and framworks. For more information on Heroku from Heroku, see What is Heroku. (Now, say Heroku three times fast.)
What is a PaaS
As mentioned, a PaaS or Platform as a Service is a cloud service.
What’s a Cloud Service?
A cloud service is a service that is available (for free or for a fee) to users over the internet that would traditionally require hardware if the cloud service did not exist. A simple example of a cloud service is Google Photos. Normally, or maybe I should say “in the old days,” you would need a hard-drive to store photos. Today, you can store photos in the cloud on services like Google Photos or Google Drive, and you do not need to have a large hard-drive somewhere to keep those photos. The other awesome thing about storing photos in the cloud is that you can access them from anywhere and from any device, and you don’t need to worry about losing your photos if you lose your hard-drive(s).
Cloud services abstract away the infrastructure required to perform those services so that users only need to focus on what the services allow them to do. Looking at Google Photos again, users only need to think about their photos, making sure that they get loaded into Google Photos, making sure that any tags are applied to the photos as desired, editing the photos as desired, and so on. Users of the service don’t have to worry about where the photos are physically stored, how they are stored, making sure the storage drives are on or hooked up to the internet, or any of the concerns one might associate with managing the infrastructure required to store photos.
Cloud Services: IaaS, PaaS, SaaS
So we know conceptually what a cloud service is, and we know that there is a type of cloud service known as a PaaS (Platform as a Service). As you may have guessed (or as you may already know), there are multiple types of cloud services. Here is a list of the ones that I am fully aware of along with common tools that fit within each category.
Cloud Service
Examples
IaaS: Infrastructure as a Service
– Google Cloud – Amazon Web Services – Microsoft Azure – DigitalOcean
– Atlassian – Zoho – Slack – Microsoft 365 – Google Photos
Cloud Service types and well-known examples of each type
Note: Some consider Salesforce to be a SaaS instead of a PaaS. If your business primarily uses Salesforce’s out-of-the-box capabilities, then yes, I would agree from that perspective. However, if your business, like many businesses, leverages Salesforce’s capabilities to build out custom solutions, tools, integrations, and the like, than I would argue that Salesforce is being used as a platform.
Another Note: Through my (albeit brief) research on this subject, I have found that the definitions for what may or may not be considered SaaS or Paas, or IaaS, or none of the above are somewhat varied. Some arguments (like this one from an IBM blog post in 2014) suggest that any software that provides a service through the internet and that does not require download/installation and additional hardware by a user is inherently XaaS. This would include Facebook, Google, and any web application out there. Others, however, argue that applications/tools may only fall in the XaaS realm if their business model is such that users subscribe to the services and pay a monthly or annual fee for the services (see this thread on Quora, or this blog post by SaaStr). With all of that said, I suggest understanding the concepts of Cloud Services and what differentiates IaaS, PaaS, and Saas so that you can make your own determination.
To understand the differences between IaaS, PaaS, and SaaS, we can break out, at a high level, the pieces of infrastructure that are required to support a software application.
Applications – the service or tool that an end-user interacts with
Data – this encompasses the metadata (the definition of the data) as well as the data itself
Runtime – the libraries necessary to run an application
Middleware – software used to connect an application to external applications via a standardized set of APIs
OS – the operating system that allows all programs to interact with a computer
Virtualization – creation of virtual resources to support multi-tenancy in large scale computing systems that support large numbers of users and large numbers of highly complex tasks
Servers – the physical computers that any and all software tasks and programs are completed on
Storage – the physical databases that store information
Networking – routers, cables, WiFi, and the tools needed to allow separate computers to talk to one another
Not all software tools will use all of these pieces, but these pieces are required for any comprehensive application with a front-end for user interaction, a processing layer (back-end) for computing, sending, and transforming data, and a storage component for storing data. Think GMail, Box, Slack, etc. Most user facing applications will use most, if not all, of these components.
In most cases, an application is the thing being supported by a cloud service, whether that application is hosted by the cloud service or somewhere else.
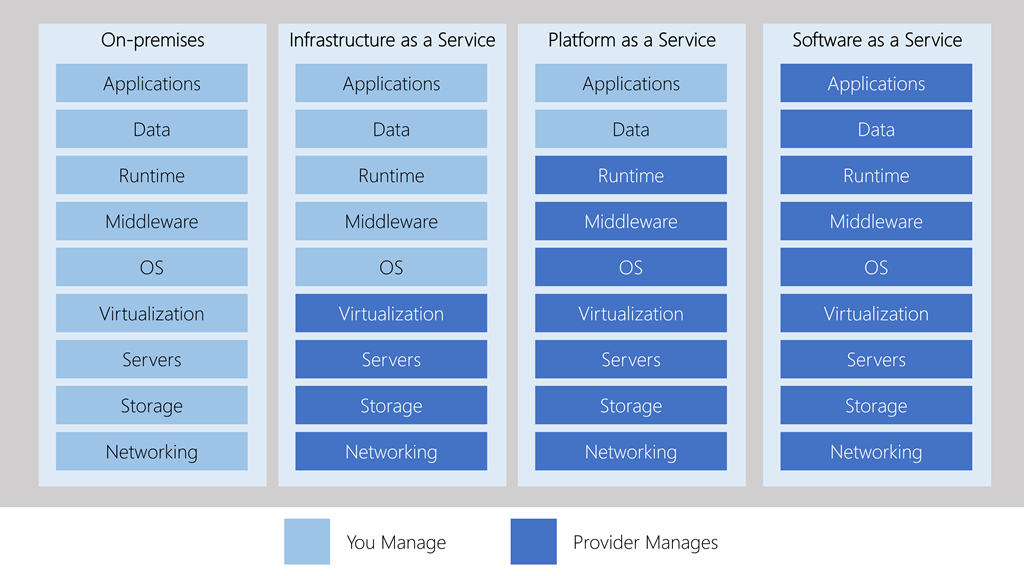
The fundamental difference between the types of cloud services is in what pieces of infrastructure the cloud service provider manages and controls and what pieces the provider allows the user to manage and control:
Diagram from Microsoft Learn depicting the resources involved in running a software application and who is responsible for managing those resources in each category (IaaS, PaaS, SaaS). On-premises is the scenario where all of an applications resources and support framework are entirely owned and managed without the use of a cloud service.
On-premises in the diagram above illustrates the scenario where you acquire, manage, and maintain the entire physical infrastructure required to host an application. The on-premises scenario does not involve a cloud service. Though there may be valid scenarios requiring the use of on-premises solutions, this article, as mentioned, focuses on cloud services.
SaaS
As we can see from the diagram above from Microsoft Learn (check out their learning module on Types of Cloud Services), the entire underlying framework for a SaaS tool including the application itself is completely managed by the service provider. If you think about GMail (a SaaS), all of the underlying components like the storage of email and the sending/delivery of email are managed by Google (the service provider). Users access GMail over the internet. You do not have to download and install anything on your own computer, and you do not need your own email Server even if you have a custom domain (example@myCustomDomain.com) – you simply pay Google to set it up and maintain it for you.
SaaS solutions are targeted at specific needs like GMail for email management, Google Photos for photo storage, Microsoft 365 (Word, Excel, PowerPoint) for office tools, or Jira for business productivity. SaaS providers make money by charging a monthly or annual fee to users for use of their tools (though a number of SaaS solutions are free for individuals).
PaaS
With SaaS, the application is already built for you. What if you wanted to build your own custom application that allowed you to input/output/transform data as needed and desired by you and/or your business? That’s where PaaS comes in.
For users that want to develop custom applications without worrying about the setup and maintenance of additional layers (such as determining the servers, operating systems, runtimes, databases, and so on), a PaaS solution is optimal. A PaaS provider handles all of the items indicated in the graphic above, and it leaves the actual application and data definition to the application developer (you).
For instance, if you want to build an application in Python for users to be able to log in and upload and share their favorite quotes, you could do this with a PaaS. You would develop the Python application to allow users to create an account, log in, and upload a quote. You would define how the quote gets uploaded and where it gets saved (do you have the user fill out a form on your website and enter some text, or do you let the user upload a file?). You also define the user experience and how your application looks/feels. When you are done, or as you continue to build out new features, you deploy your application to your PaaS host. The PaaS gives you a framework and infrastructure to host and run your application after you’ve developed it and as you work to maintain and improve it. You may have to build your application locally (on your own computer) depending on what capabilities the PaaS offers, but after deploying your application to the PaaS, it will run from there. It won’t matter if your computer is on or off, or at the bottom of the ocean at that point.
As a PaaS user, you pick an application framework and language (from what is supported by your PaaS*), and you define the type of data that your application will handle (and how it will handle it). Again, the beauty here is that you don’t have to spend tons of time setting up servers, managing traffic, or keeping operating systems up to date. Your main focus is on the application itself, how it looks, how efficiently the code is written, and so on.
* As mentioned in parentheses above, you choose your language and application framework from options that are supported by your given PaaS, and these options may vary between different PaaS systems. Due to the fact that PaaS systems manage and maintain the underlying infrastructure to build and host applications, only certain application frameworks and languages are supported based on the whatever the PaaS system and infrastructure has been optimized for. Thus, if you are building an application in Salesforce, you can only build your application using Salesforce tools (Apex, Visualforce, Lightning, etc.). Heroku, on the other hand, offers support for a wider range of more common languages/frameworks (Python, Go, Scala, Java, Node.js, and others).
IaaS
What if you want more control? What if you want to use an uncommon, unsupported (or maybe even proprietary) application language and framework ? How about a complex scenario where multiple custom, complex applications need to be supported, connected, and available to end-users with seasonal or variable demand?
IaaS is where you turn here. IaaS solutions give users more control (as indicated by the diagram above). Users can set up virtual machines or containers that will run their applications. Users can specify the operating systems used on these virtual machines in order to support their custom application frameworks, and users can implement middleware solutions to connect applications together.
Google, AWS, Microsoft Azure, and DigitalOcean are cloud service providers and are bucketed as IaaS providers because they provide a range of cloud tools and services that allow users/businesses to fully manage and customize their technology stack in the cloud. For example, within a single IaaS system, a business could set up an array of resources to support its business operations:
Multiple databases with specific type (relational, no-SQL, etc.), security, and space requirements
Virtual Machines where operating systems and scripts can be specified
Load Balancers to manage traffic and resource demands
Big Data Tools for IoT
AI Tools for Natural Language processing
And the list goes on…
Why Heroku
Essentially because it is straightforward, well-documented, and user friendly. Heroku supports a clearly specified set of languages and frameworks, it offers clear documentation for getting up and running, and it is very easy to create an account.
Why use Heroku over Google, AWS, Microsoft Azure, or DigitalOcean?
For one thing, the UI is not littered with a million different options 🙄! Plus (I think) the documentation is easier to find and navigate.
The big IaaS players (Google, Amazon, Microsoft, DigitalOcean, and others) offer a ton of services. They even offer services like the following that group together their other services in order to make it easy for users to launch and scale applications:
Elastic Beanstalk, App Engine, and App Service are basically PaaS systems analogous to Heroku in that they manage the underlying infrastructure required to launch and host an application.
So Google Cloud, AWS, or Microsoft Azure are viable alternatives to Heroku?
Yes, most definitely. I suggest Heroku, though, over these solutions because Heroku is simpler. The Heroku platform is targeted at hosting applications built in specific languages and frameworks, and it removes all of the extra frills, headache, and mumbo-jumbo associated with the larger IaaS providers. I mean, just take a look at the sheer quantity of services under the Products tab on AWS and Google Cloud compared to Heroku. (It’s really intimidating when you look at all of the options under Services after logging into your AWS console.)
For someone like me, interested in quickly building applications in popular coding languages, Heroku is perfect. I don’t want to spend lots of time setting up my environments or databases, thinking about scaling and system maintenance. I don’t want to have to sift through boatloads of information to understand and use my hosting platform.
Granted, many people want to learn more about (and/or want more control over) the underlying components of a web application. To those persons, I say go forth, immerse yourself, and use Google, AWS, Microsoft Azure, DigitalOcean, or any other tools that you wish.
Why use Heroku as opposed to Wix, Squarespace, WordPress, etc.?
The answer to this has to do with the difference between a website and a web application, which I want to highlight in this article.
A Website
Wix, Squarespace, and WordPress are terrific tools and services for building custom websites, but they are not optimized for creating custom web applications.
A standalone website to showcase a product, a brand, a blog, or a portfolio is powerful. Any legitimate entity is expected to have a website in our current day and age. Wix, Squarespace, WordPress, and other website builders are great tools for setting up, configuring, designing, and even launching a website for these purposes. These website builders also allow users to market and sell products through their websites, capture contact information for mailing lists, and share calendars, photos, and other content. A number of these capabilities are often provided through plugins and add-ons that make building a traditional website super easy.
Though there is some capturing and sending of data, the fundamental focus of a traditional website is on its front-end and the data presented to the user.
A Web Application
A web application has a front-end (HTML, CSS, JS, etc.) like a traditional website with pages, images, and other content for users to interact with, but in addition, a web application has a back-end (Java, Node.js, Python, etc.) for processing and transforming data. The front-end and back-end of a web-application are closely tied together (usually with a web application framework), passing data back and forth to display data to and capture input from the user. Building a custom application requires the ability to define and host the front and back-ends.
As an example type-recorder (😁) is a custom web application. The website shows users information, and it accepts data (text) as an input. That text data is sent from the front-end to the Node.js back-end. The back-end interacts with an API from Microsoft Azure Cognitive Services to transform the text data into audio data. Finally, that audio data is further manipulated by the back-end and sent to the front-end to be presented to the user.
Heroku because…
Again, because it is the simple option for those looking to build an application (as opposed to building a website or a blog).
For those looking to build a website, I think Heroku is a solid option to consider when your site is highly custom with custom styling (let’s say you are using Sass or Less), and/or a highly dynamic front-end with lots of JavaScript. Adding custom CSS or JS in common website builders can be cumbersome (if not allowed).
That said, if you only want to build a site for your portfolio, for your political campaign, or for your line of watches that you sell on Amazon, then a website is all you need, and any one of the website builders out there are worth looking at. For the same reasons that I suggest using Heroku over a more complex solution provider for a straightforward web application, I would suggest using a website building over Heroku for a straightforward website.
Why not Heroku?
I hope that my explanation of and comparison between different cloud services has already answered this question, but I will reiterate the main points and add a couple additional ones here.
You may not want to use Heroku because
Heroku doesn’t support the application tools that you want to use to build your application.
Heroku is overkill for your needs.
Heroku does not meet your hardware/software specifications or it does not give you the necessary control that you require over operating systems, databases, middleware, etc., and you want to manage all of these items through one service provider.
You don’t want to build a web application, but instead want to use an existing tool or service.
You want to learn about and become familiar with other service providers and/or the underlying components required to support an application.
The cost for Heroku is too high or doesn’t make sense for your business model.
I personally think that the price is reasonable, especially considering that you can host an application for free while you are building it.
Other service providers, though, offer more granular control over and insight into costs because you determine what resources you use to support your application.
You may prefer a service provider with on-demand pricing options for an application, for example, where the number of requests to the application are highly variable.
You just don’t want to use Heroku.
Heroku isn’t for everyone, but for people that want to quickly rock-and-roll with a popular web application framework, I think it is the ultimate choice!
Get Started with Heroku
If you are interested in trying Heroku and launching an app (whether you are an experienced dev pro or more of a novice), I highly recommend going through a Heroku Getting Started Guide. Pick the guide for the given language that you want to develop your app in.
I recommend starting from the beginning and going through each step carefully. If you do that, then you will have an app up and running! From there, you can customize your app entirely as you wish, and you can create your own git repository for it to keep it safe.
Going forward, I know that if I want to quickly build a web application, I simply need to
Grab the appropriate Heroku Getting Started Guide for the language that I want to develop in.
Go through the guide and clone the template app code locally (to my own computer).
Associate my local code with my own remote Git repository so that I can make and save changes/versions at will.
Deploy the app (following the guide) to Heroku.
From there, I would have my own application up and running on Heroku! I would be able to customize and iterate on the app to meet my needs and goals.
If you don’t want to read it, though, it’s cool. The gist is that Neural Voices are synthetic voices powered by (usually large) computer systems. These computer systems use Neural Voices to synthesize human-like (some might say “realistic”) speech leveraging Deep Learning and Artificial Intelligence. Computers are able to do this through speech pattern emulation. So, when generating speech from predefined text, the computer emulates speech patterns using contextual clues like words and punctuation to decide what sounds to make and tones to use when synthesizing the speech.
Neural Processing
This article by Microsoft on text-to-speech synthesis in .NET breaks down the ideas of deconstructing speech and artificially reconstructing speech, and it highlights some of the concepts that I mention in my previous article on this subject. Some of those concepts include the idea that speech is composed of basic building blocks (phonemes), and that computers can “learn” to construct speech with phonemes by deconstructing large volumes of training data – speech samples with defined text values.
The amazing thing about these powerful cloud computing systems is that they can perform mind-boggling calculations at incredibly high speeds… they maybe can’t handle computations as complex as the ones tasked to the fabled Deep Thought, but we are headed in the right direction, I think. The computers of today, though, are fast enough to, for example, give us the fastest route from New York to Los Angeles in seconds. There are a plethora of possible routes that you could take to get from New York to Los Angeles. A computer scientist might even say that there are millions or more routes when you consider all of the possible turns that you could make at every intersection. Most of these routes would be inefficient, having you drive into Canada and/or Mexico and probably up and down the continental United States on the way. The point is that even after initially filtering out most of the poor options, there are so many potential routes that it would probably take a human a good few minutes if not longer to consider the options and pick the best one (especially if the human is considering things like construction and traffic). Knowing that a software program like Google Maps, when given two random points on a map can determine the fastest route between them in a matter of seconds is amazing!
I digress here because I got caught up thinking about my algorithms courses from college and the shortest path problem (Dijkstra’s algorithm anyone?). However, I also want to illustrate the point that there are a range of ways that a written sentence may be read aloud when considering things like prosody, tone, inflection, mood, and so on. There are multiple different “routes” one could go with reading the sentence (if you will allow that analogy). It is the job of the neural system to select the best possible “route” of speech to represent the text that is given.
In many cases, though, having the text isn’t enough to accurately read it aloud and express its desired message… Think of all the times you’ve probably misinterpreted a text 📱… What does she mean by “It’s fine.”? People very often need additional information to accurately read text aloud and properly express the desired emotion and message.
Set the Style
Hello, how is it going?
Think of the different ways that this could be said.
Take the phrase above, “Hello. How is it going?” It’s simple, and you probably have already spoken it to yourself in your head. Yet, it, like many sentences, can be said in multiple ways. How would you say those sentences if you were talking to someone who had recently suffered a great loss? Or how might you say it to a stranger compared to a good friend?
Having the context of the situation allows you to more accurately express yourself, and for that reason, modern text-to-speech system developers are allowing inputs for “style” or disposition. The big players like Microsoft, Google, and Amazon are enhancing their Neural text-to-speech capabilities so that developers can specify a style of speech and so that, ultimately, the text-to-speech systems can become evermore realistic and applicable.
Want to get a look at how some of these styles compare? Check out the neural, female en-US-AriaNeural or zh-CN-XiaoxiaoNeural voices on type-recorder. You will be presented with a few style options to select from.
See the Style select list that is available for en-US-AriaNeural and zh-CN-XiaoxiaoNeural voices.
Let’s look at the phrase from earlier, “Hello. How is it going?” Using type-recorder, I’ve recorded the phrase with a “Cheerful” style and with an “Empathetic” style.
“Hello. How is it going?” – en-US-AriaNeural | Female | Cheerful“Hello. How is it going?” – en-US-AriaNeural | Female | Empathetic
Hear the difference? The empathetic voice aligns more so with how one might start to console a grieving friend, while the cheerful voice sounds like how you might say hi to your friends when you go to meet up for a drink.
Pretty interesting to think about.
Many systems these days are actually smart enough to select a style of speaking based on your interactions with them. Try telling Google or Alexa that you are sad and see how it responds. Compare that to how it responds when you tell it you are happy.
Thoughts? Do you see these stylistic variances in those or other settings with text-to-speech or synthetic speech systems? Leave your comments below.
Implying the Style moving forward
If you decided to take a look at the styles available on type-recorder, you would have seen that there are a limited number of style options for a small set of voices (only two voices at the time of writing this article: en-US-AriaNeural and zh-CN-XiaoxiaoNeural). The blog post from Microsoft that I pointed at earlier is only just over a month old now. If you look at the Amazon documentation for Polly that I linked to earlier, you will see that they too only have a select set of styles available for a small group of voices. What does that mean? It means that these technologies are still well under development and only now being opened up to the general developer community. That, to me, is exciting because it means an opportunity for developers to build on this technology and innovate. More applications for this type of technology are within our grasp:
and plenty of other applications that I’m sure I haven’t thought about.
Tying it back
Tying speaking styles back to the construction and synthesis of Neural Voices, these styles add an additional layer to the mix. Neural text-to-speech systems are now required to differentiate between the various tones and patterns used to express different emotions and associate the appropriate patterns with the correct emotion/style on top of the original requirements to create neutral, natural sounding text output. It’s going to require more data, training, and “learning”, but it is going to happen. Soon enough, we will start to see these systems incorporating a greater range of the speaking styles and emotions that we humans employ everyday: anger, sarcasm, skepticism, nervousness, happiness, joy, elation and so on.
Conclusion
I’m not sure that there is truly a profound conclusion here beyond the fact that text to speech, as complex and advanced as it is, is continuing to evolve. As computers become more comfortable and less fatiguing to interact with, I believe that we will only continue to talk to computers like people to complete tasks, get information, or to simply have a conversation…. That is until Neuralink embeds computers into our minds and we only need to think about what we want… Maybe we will end up communicating without speaking…. Who knows!