
Want to build a web application using Node.js? Let’s dive right in and build one from a template (that I created from another template). This tutorial will show you how to quickly clone and launch a Node.js web application locally and how to deploy your application to Heroku.
We are using Node.js because… well, because I like Node.js! Node is designed with modularization in mind, and the Node package manager, npm, is an incredibly powerful tool. It really makes getting projects started a breeze once you know the basic framework.
Heroku allows you to deploy an application super quickly and share it with others. To learn more about why I like Heroku, see my previous post, Heroku and Other Cloud Services.
After this tutorial, you should have a simple, cool web application that you can customize, enhance, or totally scrap and rebuild. If you are a more junior developer, this can be a great learning experience, and it could result in something fun to add to your portfolio. All I ask is that you
- Change the name and the styling within your application if you plan to share it with others or use it for other purposes.
- Give type-recorder LLC credit somewhere on your website! Link to our blog and the original site!
Let’s get started!
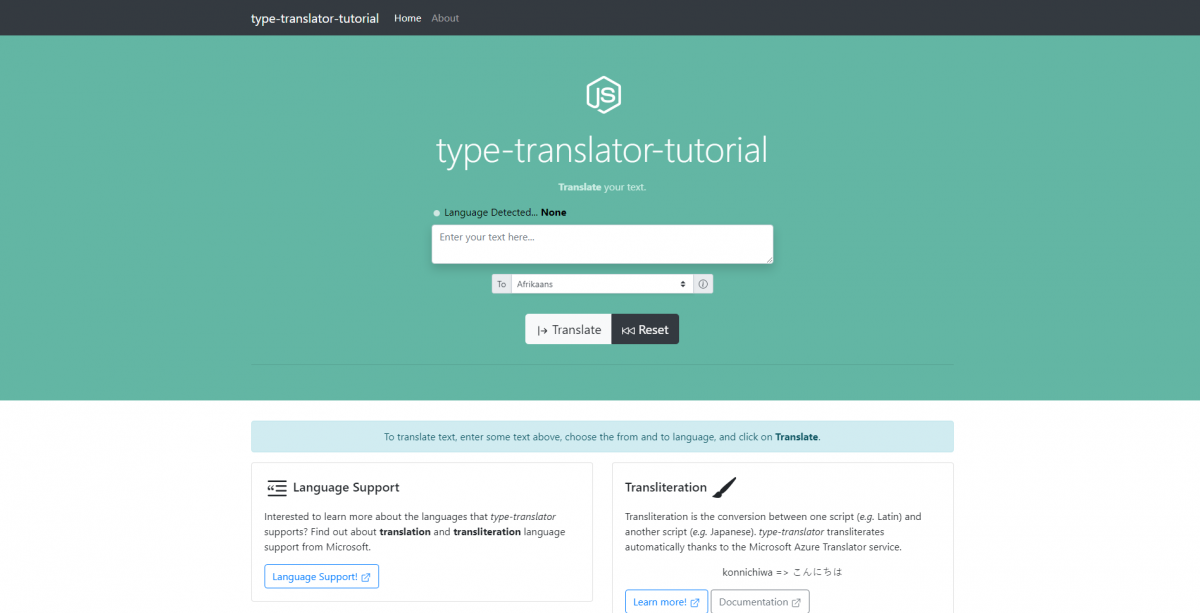
Take a look at this! This web app is what you are going to build! type-translator is a Node.js application using the Express framework and the EJS template engine that performs real-time translation of text to a specified language. Nothing out-of-this-world these days, but it’s still pretty cool, and it requires a few different pieces of technology: Node.js, Microsoft Azure, and Heroku.
This tutorial assumes that you have a basic knowledge of the command line interface, source control, and of general software/development principles. Don’t let that scare you off though! Most of this stuff is straightforward and simple to pickup. I encourage you to work along and Google what you don’t know!
Step 1: Install the basics
Node.js
Our web app is a Node.js app – it runs on Node.js. In order to run and test our application locally, Node.js needs to be installed.
- Download Node.js: https://nodejs.org/en/download/
- Choose the installer appropriate for you.
Downloading and installing Node.js also installs npm (Node Package Manager). npm is critical for installing and updating modules and libraries that our application relies on.
Git
Git is necessary to clone our source code, but it is also necessary to have if you plan to do future development and utilize source control.
- Install Git: Follow the instructions for your operating system.
- Confirm Git is installed:
- Open the terminal/command-prompt.
- Type
git --version - If you do not receive an error, you are in good shape!
Heroku Account
If you intend to launch your test application on Heroku as part of this demo/tutorial, you will need to create an account on Heroku. Don’t worry, it’s free. This step is optional – you don’t have to host/launch your app on Heroku to create the web application on your machine locally. You will not be able to share a link to your app, though, without hosting your application on a publicly accessible web server (be it Heroku or something else).
- Create account on Heroku: https://signup.heroku.com/
No further steps needed on Heroku at this point.
Heroku CLI
The Heroku CLI (command-line interface) is utilized for deploying your application from your local machine to Heroku. If you do not intend to launch your application on Heroku, you do not need to install the CLI. That said, I recommend doing it if you are trying to learn more about development because it is a fun learning experience (and it is fun to share the link with your friends and say, “I put this web app together!”).
- Install the Heroku CLI: https://devcenter.heroku.com/articles/heroku-cli
- Confirm the installation by running
heroku --versionon the command terminal.
Visual Studio Code
Visual Studio Code is an all around great editor, and it has been embraced by much of the developer community. This is a matter of personal preference, but if you don’t already have an editor for code development, I recommend using VS Code!
- Install Visual Studio Code: https://code.visualstudio.com/
Basic command-line navigation
If you don’t know how to get around in the terminal, check out my post, The Most Basic Command-Line Commands.
Step 2: Setup Azure
Microsoft Azure’s Translator Service (part of Microsoft Azure’s Cognitive Services set of tools) allows for real-time language detection and translation of text via API. We use Azure’s Translator Service to perform translations on type-translator, and it is, therefore, what I will show you how to use in your app!
- Set up a free Azure account: https://azure.microsoft.com/en-us/free/.
- Log in to the Microsoft Azure Portal after account setup.
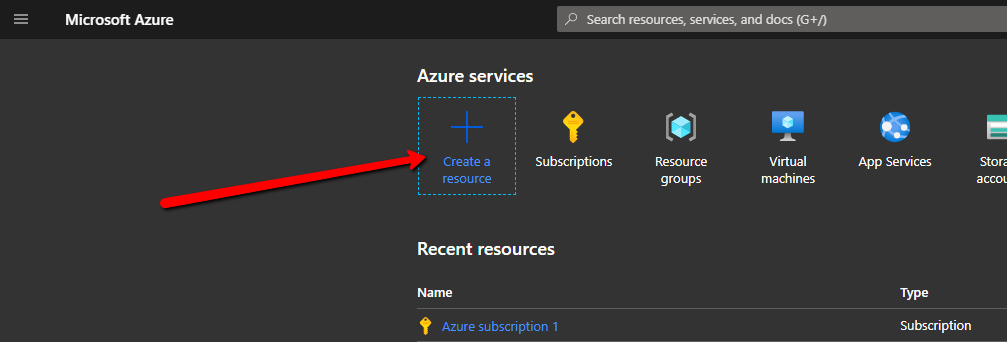
- Create a New Resource
- Type Translator and select the suggested result:
- Click on Create.
- Select or create a Resource Group.
- Choose the “Global” Region (or another region suitable for you).
- Enter a name for the resource (ex. MyTranslatorResource).
- Select the F0 (free) Pricing Tier.
- Click on Review + create.
- Click on Create.
- Open your new Translator resource once it is ready.
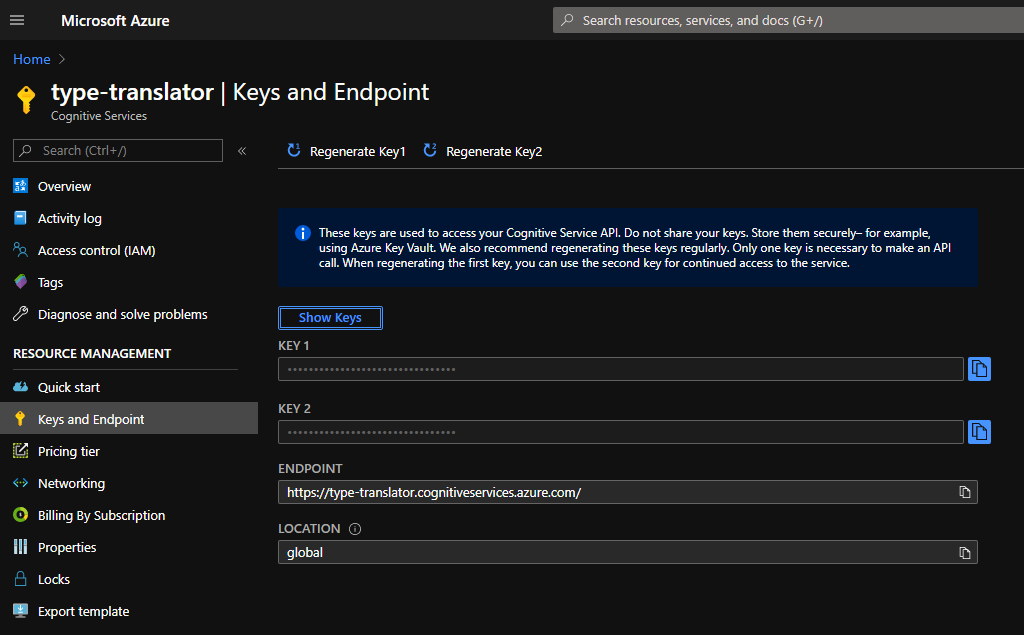
- Click on Keys and Endpoint to access important subscription key and endpoint information:
We should be good to move on to the next step for now.
To learn more about Microsoft Azure’s Translator, check out the Quickstart.
Step 3: Clone repository
Good to go with Git? Here is the Install Git link if you still need it. I’ll do another post explaining Git, but in the meanwhile, we’ll get on with this.
You need to clone (copy) my project from GitHub. This will serve as your template. You won’t be building the site from scratch, but you will instead be taking my site, modifying it, and deploying to Heroku (or wherever you want).
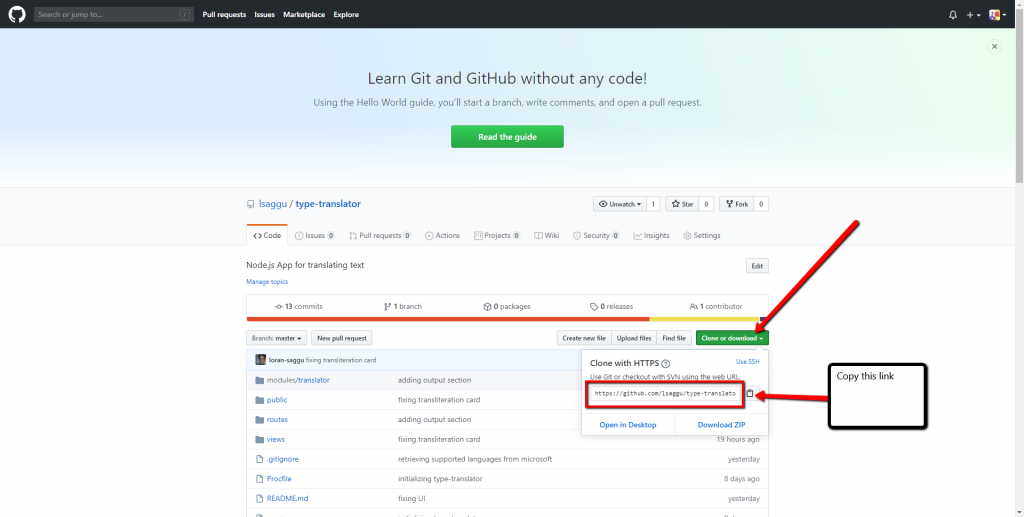
- Open the type-translator-tutorial GitHub repository: https://github.com/lsaggu/type-translator-tutorial
- Click Clone or Download.
- Copy the Clone with HTTPS link.
- Open your terminal (command-line interface).
- Navigate into the directory that you want to save this project.
- Clone the repository using Git:
git clone https://github.com/lsaggu/type-translator-tutorial.git- Navigate into your local project/repository
cd type-translator-tutorialNice. Now you have a local copy of the web app on your machine. At this point, you can change the name of the parent folder from type-translator-tutorial to something that you prefer. You can also set up your own git remote using your preferred git provider (GitHub, GitLab, etc.). I’ll leave that to you.
Step 4: Update Keys
In order for your instance of type-translator-tutorial (or whatever you’ve decided to call it) to work properly and interact with Microsoft’s Translation services, you will need to update some information in the app. Specifically, you will need to specify your Subscription Key (from Step 2) in order to make callouts to the Translator service.
- Open Visual Studio Code (or your preferred editor), and open the type-translator-tutorial folder that you cloned.
- Type
Alt - Click on File > Open Folder…
- Type
- Once the type-trasnlator-tutorial is open in VS Code, create a new file in this top-level app folder – do not put the file in a subfolder.
- Right click in the bottom (empty space) of the Explorer in VS Code.
- Click on New File.
- Name the file .env
- Copy the following content into the file:
TIMES=2
AZURE_TRANSLATION_SUBSCRIPTION_KEY=<Replace with your Microsoft Azure Translator Service Key>
AZURE_SERVICE_REGION=global- Add your Key (either Key 1 or Key 2) where specified in the content above. See step 13 in Setup Azure for reference as to where to find your keys.
- Save the file as “.env”.
- The file should not have any other extensions… .env.txt is not going to work.
The Heroku system uses the .env file that we just created to reference global environment variables specific to the app that we are running.
Step 5: Run Locally
Okay! We have the application code on our computers, and we have Node.js, Git, and Heroku CLI installed.
- Open the terminal.
cdinto the directory that contains the application.- Run
npm install
This will install all dependencies that the app requires to run!
- Run
heroku local
The heroku local command emulates a Heroku web dyno (server) locally on your machine, and it runs your app.
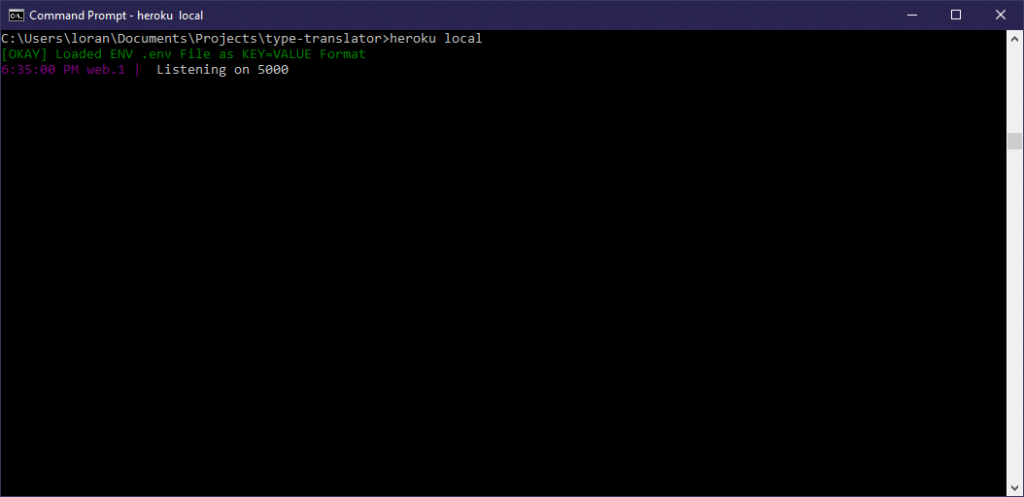
heroku localAfter running heroku local, you should see that the server is “Listening on 5000.” This means that the server is listening for requests to the web application on port 5000.
- Open a web browser.
- Navigate to
localhost:5000in the browser.
Boom! We should see type-translator up and running locally on your machine.
Step 6: Change Styling
Now, we can’t have you parading around, sharing and/or using my app as your own. Let’s change the styling to something that is original and unique. Also, I’d like a bit of credit on your site!
- Open Visual Studio Code (or your preferred editor) and open the directory containing your web app.
I suggest making the changes below one at a time, saving, and checking. This way, you can easily identify the cause of any issues that you might face.
Change Jumbotron Color
- Open the ./public/stylesheets/main.css file.
- Change the background attribute in the
.jumbotronblock.- Choose a color that you like that is different from the one that I am using.
- If you are unfamiliar with hex color codes, Google “hex color”, and use the color picker to find a color that you like. Copy and paste the HEX value into the CSS file.
- You can change the text color of the main heading by changing the “color” attribute in the
.jumbotronblock. - You can change the text color of the subtitle by changing the “color” attribute value in the
.jumbotron pblock.
Change Names
Let’s give your app a new name. Come up with something that you like. Or name it after yourself (e.g. “John’s Translation App”).
Note: You may notice that the pages have a .ejs extension (instead of .html as you might expect). This is because this Node.js app uses Embedded JavaScript Templating (EJS) to allow for the injection of code and data from the application framework.
Header
- Open ./views/partials/header.ejs.
- Change the text between the <title> tags from type-translator-tutorial to whatever you’ve decided to call your app.
- Save.
Footer
- Open ./views/partials/footer.ejs.
- Change type-translator-tutorial to whatever you have decided to call your app.
- Remove Copyright 2020 type-recorder LLC.
If you want to create your own Privacy Policy and/or Terms & Conditions, the app includes template Privacy Policy and Terms & Conditions pages in the ./views/pages folder. You will need to update these pages.
Body
- Open the ./views/pages/index.ejs page.
- Type
Ctrl+fand search for type-translator-tutorial. - Change all instances of type-translator-tutorial to your app’s name.
About Page
- Open the ./views/pages/about.ejs page
- Type
Ctrl+fand search for type-translator-tutorial. - Change all instances of type-translator-tutorial to your app’s name.
Give Credit 😁
See the Build this App section on the About page? If you leave that section in your app (or maintain a section that says the same thing with the same links), then you are giving me and the open source community credit! Thank you!
Save and Verify
Make sure to save all of your changes!
Refresh the browser window that contains localhost:5000. If you don’t see all of your changes, you might need to restart your local (Heroku) webserver.
- Open the terminal where you are currently running
heroku local. - Type
Ctrl+c. - Type
Ctrl+cagain to confirm that you want to terminate the job. - Run
heroku localto restart the app.
You should now see all of your changes, and you should be able to continue making and testing changes in the same way.
Step 7: Deploy to Heroku
Are we doing okay so far? Awesome!
Finally, let us deploy our application to Heroku so that we can share it with the world! Or at least one or two of our friends…
- Open the terminal.
- Navigate to the directory containing your application.
- Log into Heroku via the command line:
- Type
heroku login - Follow the instructions to log in to and authenticate your Heroku account.
- See here for more information.
- Type
- Type
heroku create - Type
git push heroku master
You should see a bunch of information print to the console. This is the output of Heroku building and deploying your application.
We use the git push command to deploy to Heroku because Heroku is acting as a remote Git repository for our application. For more information, see Creating a Heroku Remote.
Let’s open our Heroku App:
- Type
heroku open
Voila! This should open a browser window containing your app. The URL is the app’s address on Heroku. If you continue working on your own app and want a custom domain name, Heroku let’s you associate your own domain with an app.
The End
Thanks for reading!! Hopefully this gave you some tangible skills and some practice using Node.js, Heroku, and Git! Hopefully you had some fun!