As we know, .NET applications require the .NET platform/framework in order to run.
Now, you don’t actually need to install the .NET framework on your Raspberry Pi if you only intend to run self-contained .NET apps deployed to your Pi. However, these self-contained apps will be larger because they need to contain all of the libraries and runtimes that would otherwise be a part of the already installed .NET platform/framework.
So, if you plan to install a number of .NET apps on your Pi, and/or if you really enjoy spending time on your Pi and want to build .NET apps directly on it (maybe using unofficial builds of VS Code or some other editor), you might consider installing .NET Core on your Raspberry Pi. Also, if you simply want to learn more about building/running .NET applications on the Pi, installing .NET Core might be good from an educational point of view.
Let’s look at how to install the .NET platform on the Raspberry Pi.
This walk-through will discuss installing the .NET Core platform on a Raspberry Pi 4. This tutorial assumes that you
Have a Raspberry Pi (4+)
That your Pi is setup, hooked up to a monitor, mouse, and keyboard and powered on.
That your Pi is connected to the internet.
If you don’t have a Pi, consider getting a starter kit! (This is an affiliate link for which I may receive financial compensation if you click on the link and make a purchase on the target website).
.NET Core
There are two options, .NET Core and .NET Framework. The .NET Framework is for use on Windows PCs and devices… The Raspberry Pi, though, is running a Linux based Operating System (Raspbian). Luckily, we have .NET Core available to us – .NET Core is for use on a broader range of devices and computers (not just Windows). Thus, we need to install .NET Core on our Raspberry.
Let’s do it
To install .NET on my Raspberry Pi 4, I followed Edi Wang‘s steps (outlined as follows) in his article Setup .NET Core 3.0 Runtime and SDK on Raspberry Pi 4. I highly recommend reviewing Edi’s post as he shows you how to create a simple console app and ASP.NET web app as well as how to turn your Pi into a web server. I, however, hope to focus (in this post) simply on the installation of .NET Core on your Raspberry Pi.
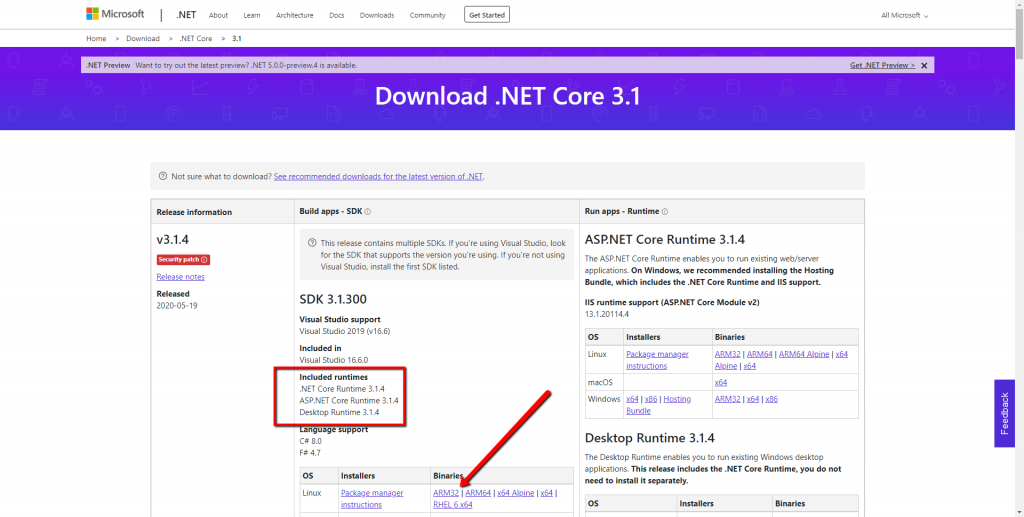
Download the .NET Core 3.x SDK – Linux ARM 32 Binaries from (see image below) directly onto your Raspberry Pi from your Pi’s browser.
If you are running Raspbian, you need to use the ARM 32 Binaries. Other Operating Systems might support ARM 64, but I cannot comment on those.
Note: Edi Wang suggests downloading/installing both the .NET Core 3.x SDK and the ASP.NET Core 3.x Runtime. I do not believe that this is necessary to install both because the .NET Core 3.x SDK claims to include the ASP.NET Core Runtime. The .NET Core 3.x SDK alone should suffice.
Download the ARM32 Binaries onto your Raspberry Pi from Mircosoft (click here)
Within the terminal on your Raspberry Pi, in your home directory, create a new folder called dotnet.
Note: I named my folder dotnet as you can see in the screenshot of the terminal below. Edi Wang named his folder dotnet-arm32 – make sure to use whatever folder name you choose consistently moving forward.
Note: For those unaware of what I mean by “home directory,” the “home” directory typically is the folder that contains all of the content created by the user of the system. Each time you open a new terminal window, it should open in the “home” directory.
mkdir dotnet
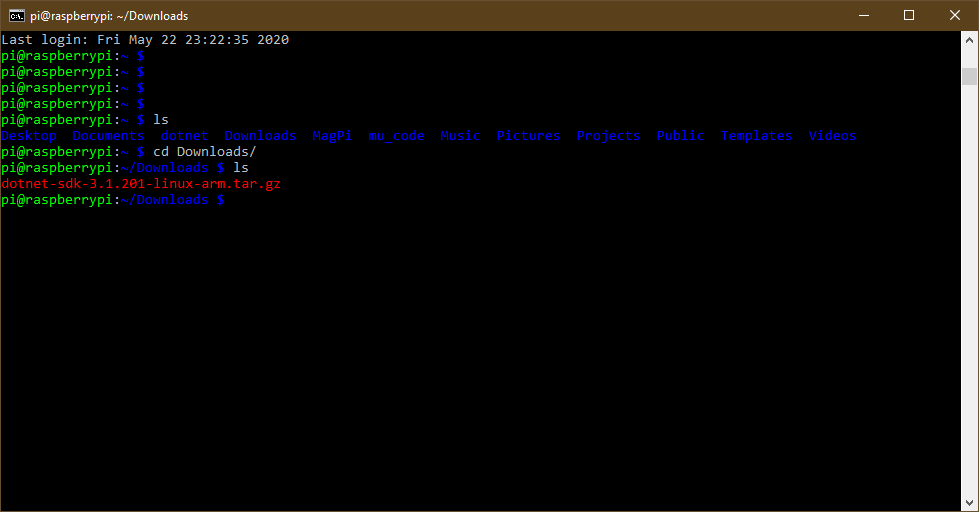
Within your terminal on the Raspberry, navigate to the location of the downloaded ARM32 tar.gz file.
If you downloaded the binaries directly onto your Raspberry, the zip file should be in the Downloads folder.
The terminal on my Raspberry Pi showing the folders in my $HOME director and the zipped .NET Linux ARM32 Binaries file in my Downloads/ folder.
Unzip the contents of the tar.gz file into your dotnet folder as follows (replace <filename> with the name of the tar.gz file; for example, dotnet-sdk-3.1.201-linux-arm.tar.gz).
tar zxf <filename> -C $HOME/dotnet
Set Environment Variables so that you can reference your newly installed dotnet tool anywhere within your terminal by running the following commands:
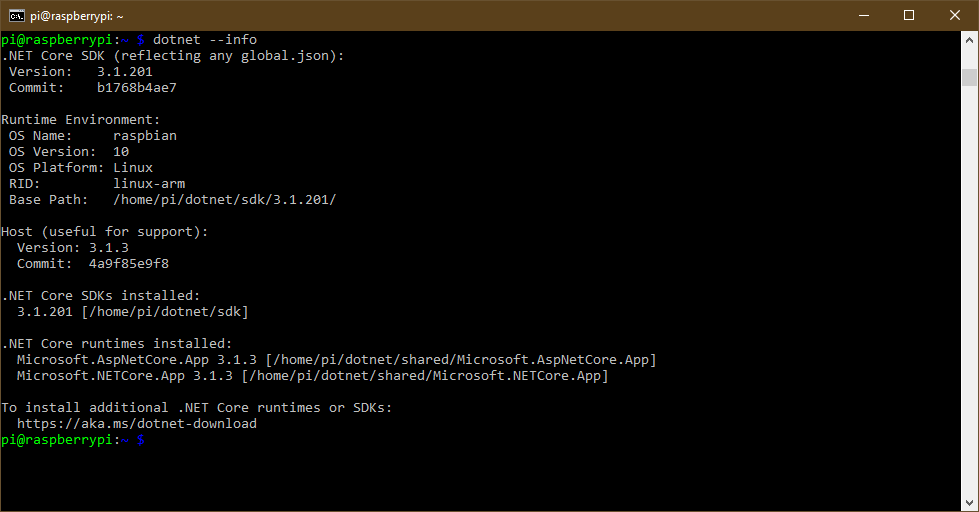
Run a test to confirm that .NET is installed on the Pi:
dotnet --info
Run dotnet –info on the Pi to see if .NET Core is installed
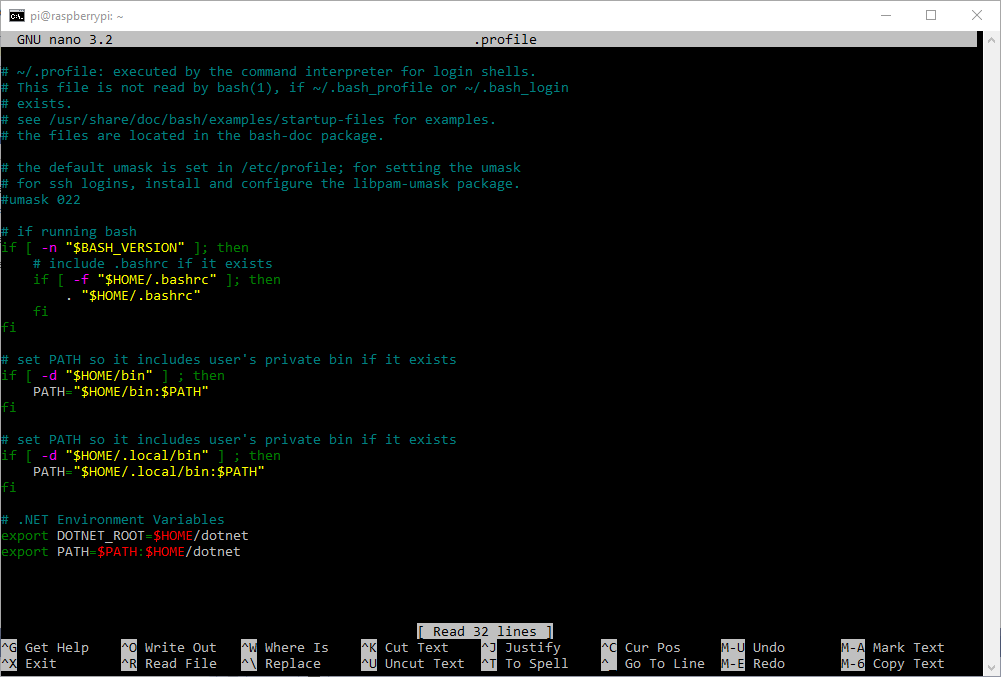
Update the .profile file with your new Environment Variables.
From the home directory run ls -a, you should see a list of all files/folders in the directory (including .profile).
Run the following command to open the .profile file:
nano .profile
At the bottom of the file add the following lines (see my screenshot of the .profile file below).
export DOTNET_ROOT=$HOME/dotnet
export PATH=$PATH:$HOME/dotnet
Type Ctrl + o to save.
Hit Enter to save the file with its original name (.profile).
Type Ctrl + x to exit the editor.
Adding the two export statements to the bottom of the .profile file. Remember to maintain consistent usage of the directory name (dotnet vs. dotnet-arm32). I used dotnet, but if you used dotnet-arm32, be sure to use that instead.
Note: Updating the .profile file is important to do so that the dotnet command is available to all terminal sessions in the future on your Pi. If you do not update the .profile file, you will have to reset the environment variables (step 6) every time you open the terminal.
Note: The .profile file is a “startup file” that runs on startup of the Pi and initializes variables and functions.
The End
Boom, you did it! Thanks for Reading!
As mentioned earlier, Edi Wang’s article goes on, to show you how to create some simple .NET apps and ASP.NET web apps directly on/for the Pi. Be sure to check it out!!
According to the video above, a development platform is a set of languages and libraries that enable developers to create and run software applications. That means that the .NET platform needs to be installed in your development environment so that you can create, debug, and test your .NET application, and the .NET platform needs to be present anywhere that a .NET application is running.
There are a few flavors of the .NET platform:
.NET Framework
.NET Core
Xamarin/Mono
.NET Framework is the version of .NET that is tailored for use creating/running apps on Windows.
.NET Core is the version of .NET for creating and running applications that are cross-platform. .NET Core can be used to create/run .NET Core application on Windows, MacOS, and Linux. The .NET Foundation supports .NET Core, which is open source.
Xamarin/Mono is a .NET implementation/extension for creating and running applications on mobile Operating Systems (Android and iOS).
The .NET platform supports a set of development languages by Microsoft for specific use on .NET:
C#
F#
Visual Basic
Putting all of this together, it should makes sense that .NET applications are software applications written in one of the languages supported by .NET (C#, F#, VB), and .NET applications require and run on .NET (the platform).
Why use a Development Platform?
For anyone that might be asking this question, a development platform allows developers to more simply create complex software applications. The libraries and languages of a development platform allow people to perform common tasks in simple, efficient, and predefined ways by providing standard data types, functions, and data management flows so that developers don’t have to build everything from scratch. These capabilities are easily extensible within the development framework so that developers can create more complex data types, functions, and libraries. Development platforms promote standardized development in order to allow for modularization and sharing/reuse of code.
If you are like me, you think (for no valid reason) that it is a low-key flex to say that you know C#… If you are like me, you might also want to get better at .NET and C# so that you can back up the statement that you know C#… Finally, if you are like me, you might think that Raspberry Pis are cool devices that you want to understand a bit more.
This post is an explanation and tutorial that touches on both .NET and Raspberry Pis. This tutorial will not make you an expert in either .NET or Raspberry Pis, but it will serve as a way to get started using .NET on your Raspberry Pi.
Disclosure
In this article, I suggest the use of particular tools in the Blinking Light Tutorial – I reference these tools using affiliate links. If you click on an affiliate link and make a purchase on the target website, I will receive a commission.
Introduction
Here is a quick intro to .NET and Raspberry Pi. To skip to the tutorial, click here: Blinking Light Tutorial.
What is .NET
In short, .NET is a development platform and framework by Microsoft for building and running custom software applications. For more information see my post, What is .NET (don’t worry, it’s short).
What’s the deal with the Raspberry Pi?
A Raspberry Pi is a computer. For a better explanation, see how the Raspberry Pi Foundation describes it here.
Raspberry Pis are terrific educational vehicles for understanding computers from both a hardware and software perspective. Plus, Pi’s have tons of practical uses from serving as a complete desktop computer for personal use to being used as a remote server (web, email, etc.) , an IoT sensor, a Weather Station, and much more.
Blinking Light Tutorial
Let’s get on with it, shall we?
In this tutorial, we will create a .NET application for blinking a light on and off with a Raspberry Pi. This tutorial assumes some basic working knowledge of the command-line/terminal (but if you don’t know too much, you should be able to pick it up).
I used .NET Core 3.1 while building this project. Hopefully this solutions should continue to work for future versions!
Let’s do it
Requirements
You will need the following:
Raspberry Pi 4 – This is the exact one that I ordered off of Amazon: https://amzn.to/3cUs5mM
Electronic Components – I used an electronic set (though it might be overkill for a simple project like this): https://amzn.to/2AUos20. Specifically, you need:
A Solderless Breadboard
A 220 Ohm Resistor
1 LED
2 Male-to-Female Dupont Wires
Wired/Wireless Keyboard (for your Raspberry Pi)
Wired/Wireless Mouse (for your Raspberry Pi)
Monitor (for your Raspberry Pi) – This monitor should accept HDMI input.
If you don’t have an extra wired/wireless keyboard and mouse laying around, I was able to plug into my Raspberry Pi and play without issue using this simple set: https://amzn.to/2WXhgux.
As for monitors, I have a Lenovo that I really like. The one that I bought doesn’t look like it is available anymore (https://amzn.to/3ecFTJk), but this one looks similar:
Setup
Now that we’ve got all the pieces that we need, let’s get set up.
1. Set up the Raspberry Pi
Follow the instructions in your Raspberry Pi kit to get set up. If you purchase the CanKit starter kit, you should have all the pieces that you need to
Hook the Raspberry Pi up to a monitor and plug in your mouse/keyboard.
Boot the Raspberry Pi
Install an OS from the SD chip
I installed the recommended Raspbian OS. When complete, you will be able to interact with your Raspberry Pi through a desktop interface similar to any other (Linux) PC.
For a solid video walk-through of setting up your Pi, see the Raspberry Pi Setup Tutorial, part of the IoT 101 Series from Channel 9 (by Microsoft). I highly recommend watching this series as you put together your Blinking Light application to learn more about IoT and to see some of this tutorial in action. The IoT series does skip over a few things, though, that I hope to explain more thoroughly in this article.
2. Download and Install .NET Core onto the Raspberry Pi
This step is optional. You don’t have to install .NET Core on your Raspberry Pi. Your decision here, though, will determine how we publish our light blinking application later.
3. Install Visual Studio and .NET on your personal machine
Having fun yet? 😁 In order to properly develop, debug, and test .NET applications, you will want to use an IDE suited for .NET development. An IDE or Integrated Development Environment allows developers to build, test, run, and publish code quickly and in a standardized way. Many IDEs nowadays integrate with Git allowing you to manage source control without leaving the comfort of your IDE.
Without question (in my opinion) there is no better IDE for .NET development than Visual Studio.
At this point, we need to install Visual Studio Community 2019 (the free version) onto our personal machines (the laptop or desktop that you normally use to do stuff).
As you go through the installation process, make sure that you choose the latest .NET Core SDK and Runtime during the installation process. I think that the simplest way to do this is by selecting all of the Web & Cloud workloads as well as all of the Desktop & Mobile workloads when prompted. This will give you tools to develop ASP.NET, C#, F#, VB, Node.js, and Python applications (as well as others that you select).
See Micorosft’s Visual Studio installation documentation here.
4. Create a new Visual Studio project
Once Visual Studio 2019 is installed on your regular computer, go ahead and open it from the Start menu.
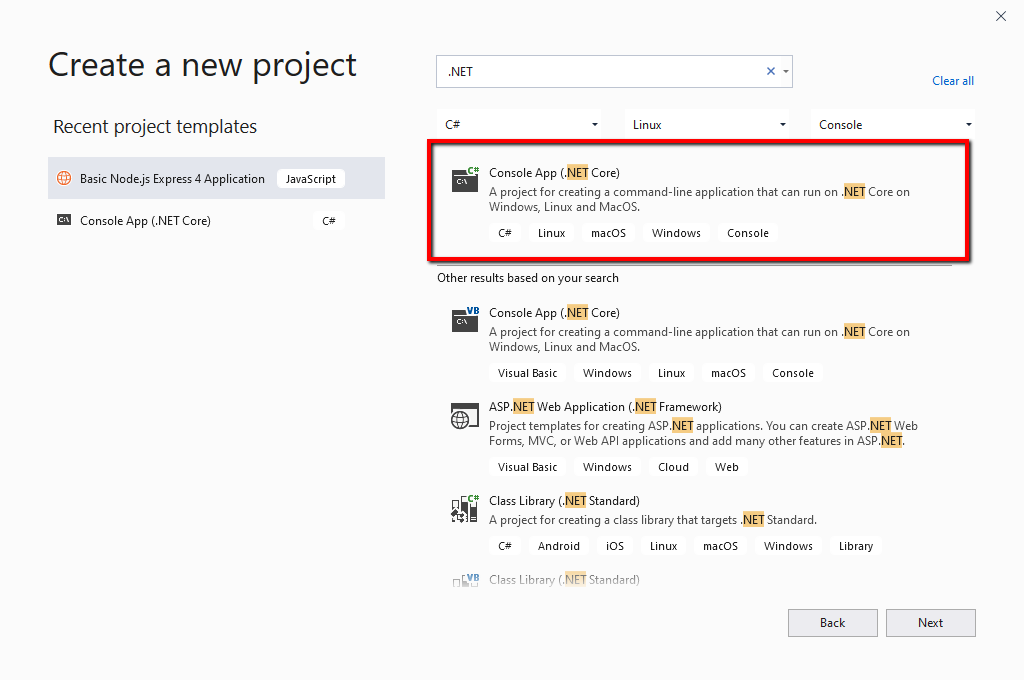
Click on Create a new project.
Search for and select the C# Console App (.NET Core)
Note: We are creating a .NET Core application that will run on any major operating system, including Linux.
Note: We are create Console application as opposed to another type because this light blinking application will be run from the console (terminal), and it will not have a graphical interface.
Choose a name and folder for your new project. You might call it “blinky” or “blinker” or something.
Select the C# Console App (.NET Core) when creating your new Visual Studio project.
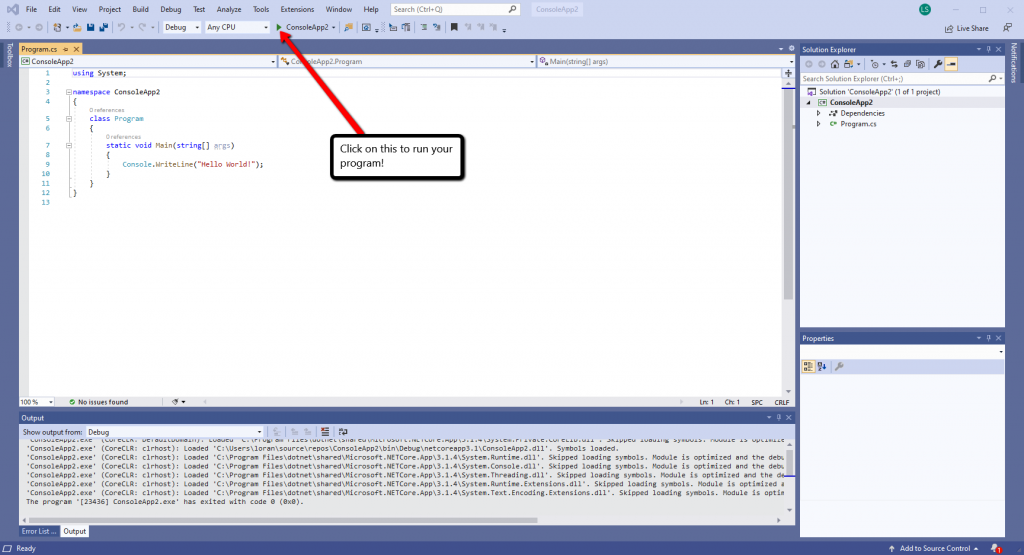
Click on the run button to run the sample code that is populated in your new project.
You should see a console appear and the “Hello World!” message display.
Note: If the console disappears automatically, un-check the following: Tools -> Options -> Debugging -> Automatically close the console when debugging stops.
This is what your new Visual Studio C# .NET Console App looks like!
5. Install the Libraries
Finally, some C#!
But first, in order for our C# application to be able to communicate with the Raspberry Pi’s physical input and output ports used to interact with physical equipment (sensors, cameras, LEDs, etc.), we need to include libraries designed for communicating with these interfaces within our application. Does that make sense?
Basically, we need to install libraries (extra code) so that our application will know how to interact with the stuff we hook up to the Raspberry Pi like our LED (which we will wire together later).
We will be adding the .NET Core IoT Libraries to our application in order to fulfill this requirement. These libraries are open source and managed by the .NET Foundation, founded by Microsoft to promote the open source ecosystem around .NET). This means that anyone can contribute to these libraries, but people from the .NET Foundation generally review and approve changes or enhancements. As of writing this piece, these libraries are still “experimental.” Pretty cool, right?!
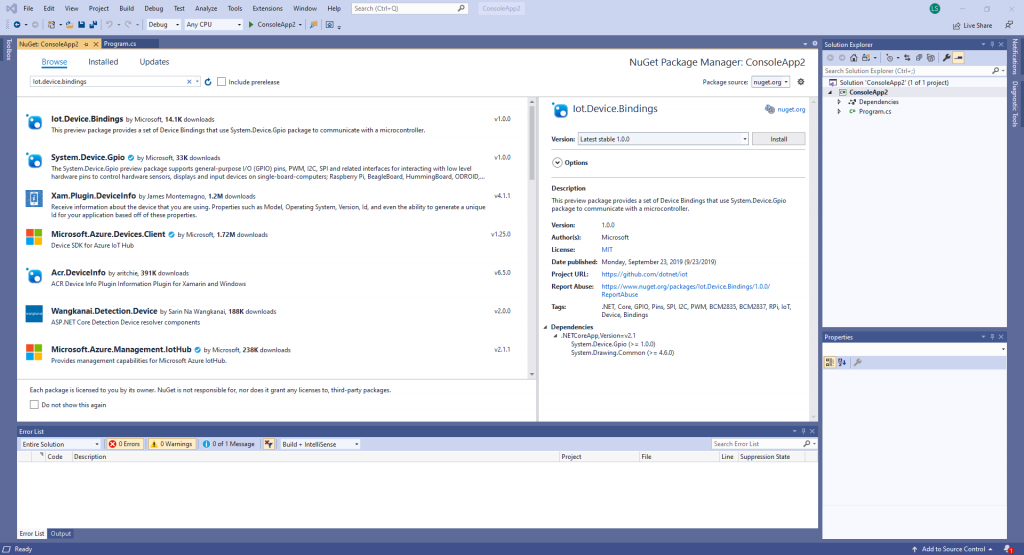
You can install the .NET Core IoT Libraries into your blinker project from directly within Visual Studio.
Open your new blinker project in Visual Studio on your regular machine. Right now, all it does is print “Hello World!” to the console.
Go to Project > Manage NuGet Packages.
Click on the Browse tab.
Search for Iot.Device.Bindings and select the Iot.Device.Bindings option.
Install the Iot.Device.Bindings package
Click on Install.
Click on Okay and accept the license.
Great. Now that we’ve got the libraries installed, let’s write some code!
6. Wire the LED to the Raspberry Pi
… I’m sorry. Let’s get one more setup item out of the way – let’s wire together our LED circuit.
First, I will assume that you have a basic understanding of electrical circuits and that electricity flows from the power source (+) to ground (-). I won’t get into breadboards or electronics here (but I might do another article on the subject later…). If you want to learn more about how a breadboard works, I found this video from 2009 (it seems so long ago when looking at the video quality) that explains it quite well.
Second, the positive lead on the LED is the longer leg/lead. This leg should be connected to the side of the circuit the power/electricity is coming from.
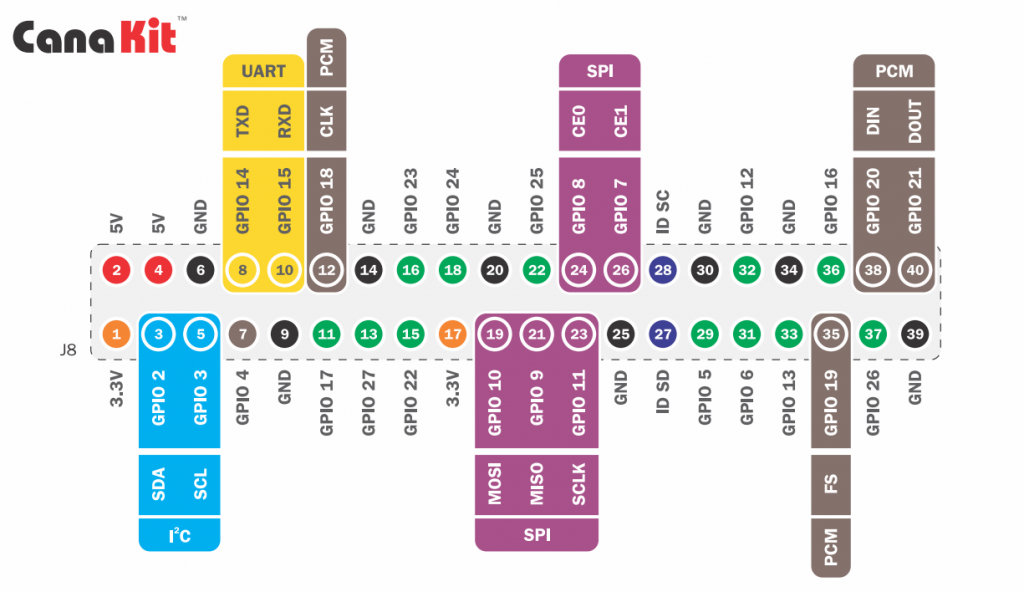
Third, take a look at the GPIO (General Purpose Input/Output) reference diagram on page 11 of the CanaKit Quick-Start guide (or see below). GPIO pins allow the Raspberry Pi to interface with external circuits and devices. Note that the physical pin number is different from the GPIO pin number. We will be using GPIO pin 17 as the power source of our circuit. This pin will be referenced in our code to control the LED. GPIO pin 17 corresponds to physical pin 11 as seen in the diagram.
Raspberry Pi 4 GPIO Pins diagram – this corresponds to the pins on the Raspberry Pi when looking at the Pi from above with the Raspberry Pi symbol the correct side-up.
Fourth, the ground wire in your circuit can get plugged into any of the ground (GND) pins noted in the diagram. I plugged my ground wire into pin 6.
Fifth, perform any and all wiring while the Raspberry Pi is off in order to avoid damaging the Raspberry Pi or harming yourself.
With those points made, it might be helpful to reference this video from the IoT Series by Channel 9 and Microsoft as your wire up your circuit:
Code
I think it’s safe to say that we have all of the“setup” done. Now we can write our code, publish and deploy our application, and run our light blinker program.
7. Write some code
I’ll make this too easy. Within your Visual Studio blinker project, replace the contents of the Program.cs file with this code. That code is from the C# .NET application that I built and based this article off of. My code is wholly based off of the led-blink sample code from the .NET Foundation. Referencing line numbers from my code, I’ll walk us through it.
The first three lines of code initialize/import the libraries that our application requires.
using System; is always present – this library allows our application to interact with the system our code is running on with classes/functions like Console.WriteLine("...");.
using System.Device.Gpio; allows our application to interact with the GPIO pins of the Raspberry Pi by introducing the GpioController() class.
using System.Threading; introduces functions for controlling application threads like Thread.Sleep(...).
I’ll avoid delving too deep into the structure/purpose of namespaces and classes, and we can jump down to the code that sits in the Mainmethod, the method that gets called when you run your .NET application.
On line 13, we set the GPIO pin number.
Lines 14 and 15 respectively set the on and off time (in milliseconds) for the LED.
Line 18 instantiates a new GpioController with which our program can interact with the GPIO pins on the Raspberry Pi.
On line 20, we tell the program to use GPIO pin 17 for output purposes because we will be outputting instructions to pin 17.
Lines 22 and 23 are simple messages that we will write to the console at this point in our program.
Lines 25 through 28 handle the safe disposal of resources that our program uses. We essentially release use of the GPIO pins (pin 17 in our case) and any other ports or resources that our program may have called on.
Finally, lines 30 through 38 run a loop that turns our LED on and off.
Line 32 sets the pin value of our GPIO pin 17 to “High.” This effectively raises the voltage of pin 17 compared to the Ground in our circuit, allowing electricity to flow and the LED to turn on.
Line 33 tells the application to wait (sleep) for the amount of time (in milliseconds) that we set earlier on line 14.
Line 34 writes to the console that our LED is “On.”
Line 35 sets the pin value of our GPIO pin 17 to “Low.” This lowers the voltage of pin 17 (and the voltage across our circuit), causing the flow of electricity to stop and our LED to turn off.
Line 36 again tells our application to wait (sleep) for the amount of time (in milliseconds) that we set earlier on line 15.
Line 37 writes “Off” to the console.
8. Publish the code
Now that our code is in place, make sure to save your application (File > Save All). At this point, we need to publish our application so that we can copy it, share it, and (most importantly) use it.
Click on Build > Publish <application name>
Select Folder when asked to pick a “publish target.”
Choose a folder where your release items will be placed – choose or create an empty folder for this.
Click on Create Profile
Under the name of your publish profile, click Edit.
Pause
Did you install .NET Core onto your Raspberry Pi?
Yes, I have .NET Core installed on my Raspberry Pi
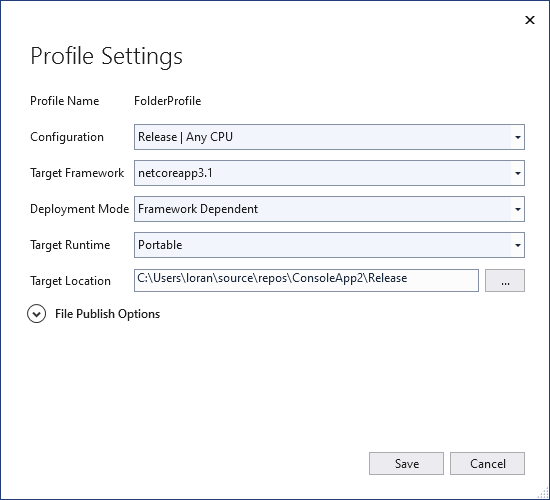
Make sure the Profile Settings match these (your Target Location will be different… and your Target Framework might be different if you are using a newer version in the future):
Publish Profile Settings if .NET is installed on your Raspberry Pi.
These settings indicate that we will be publishing an application that is “Framework Dependent” with a “Portable” runtime. This means that our application will require the .NET framework to already exist in the target environment in order to run. It also means that our application is allowed to run in a variety of .NET runtime environments – it is transferable between a Microsoft, OS X, and Linux runtime. A “Portable” runtime isn’t really necessary for us because we only intend to run our application on our Raspberry Pi (a Linux environment), but it will work 🙂. You could specify a linux-arm Target Runtime if you want instead.
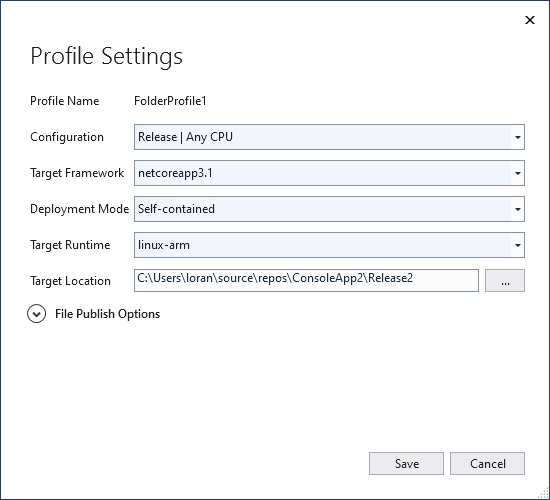
Make sure the Profile Settings match these (your Target Location will be different… and your Target Framework might be different if you are using a newer version in the future):
Publish Profile Settings if .NET is not installed on your Raspberry Pi.
These settings indicate that we will be publishing an application that is “Self-contained” with a “linux-arm” runtime. This means that our application will include all of the .NET libraries and the Linux runtimes necessary to run within it. Our application will, as a result, be quite larger. It also means that our application can only run in Linux environments. This is fine for this application because we only intend to run it on the Pi anyway.
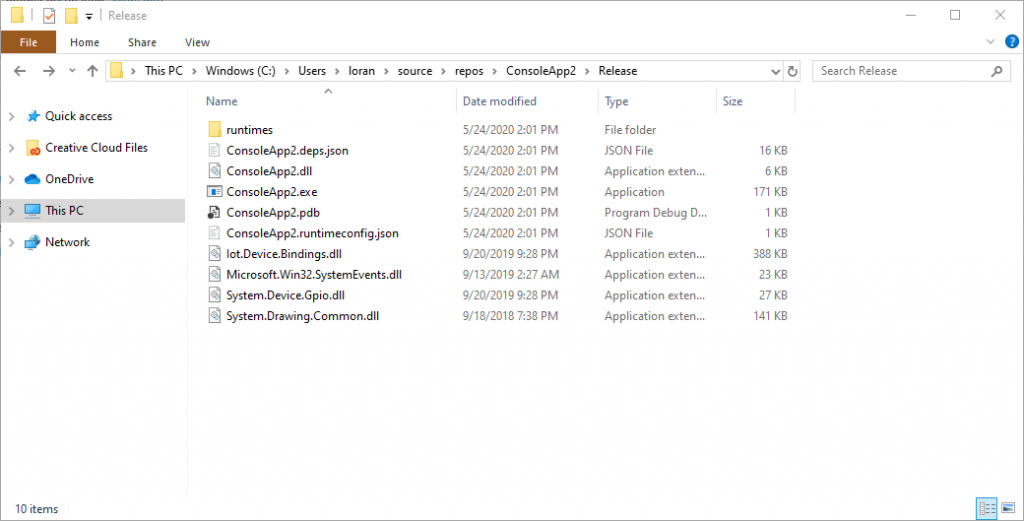
Navigate to the folder you designated as your Publish Target. You should see it now contains a bunch of files.
A bunch of .dll and other files in my target Release folder. You will have a different set of files if you published a “Self-contained” application.
Our application is now published!
Deploy and Run
We are almost there!! 😃 Now, all we need to do is deploy (send a copy of) our application to our target environment, the Raspberry Pi.
9. Deploy to the Pi
There are a few ways to deploy your code to your Pi. Basically, you want to create a folder for your application on the Pi, and then you want to migrate/copy your newly published application release files/folders from your main computer over to the new folder on your Pi.
Deploy with Google Drive
The first time, I did this, I did it with Google Drive. I loaded my files (everything in my Publish Target folder where I published my application, including all sub-folders) to Drive from my local development machine then downloaded them from Drive onto the Raspberry. This can be time consuming and slow because you have to go back and forth between your computer and your Pi. Plus you will have to download and then unzip the files, or download them one by one.
Deploy with SSH
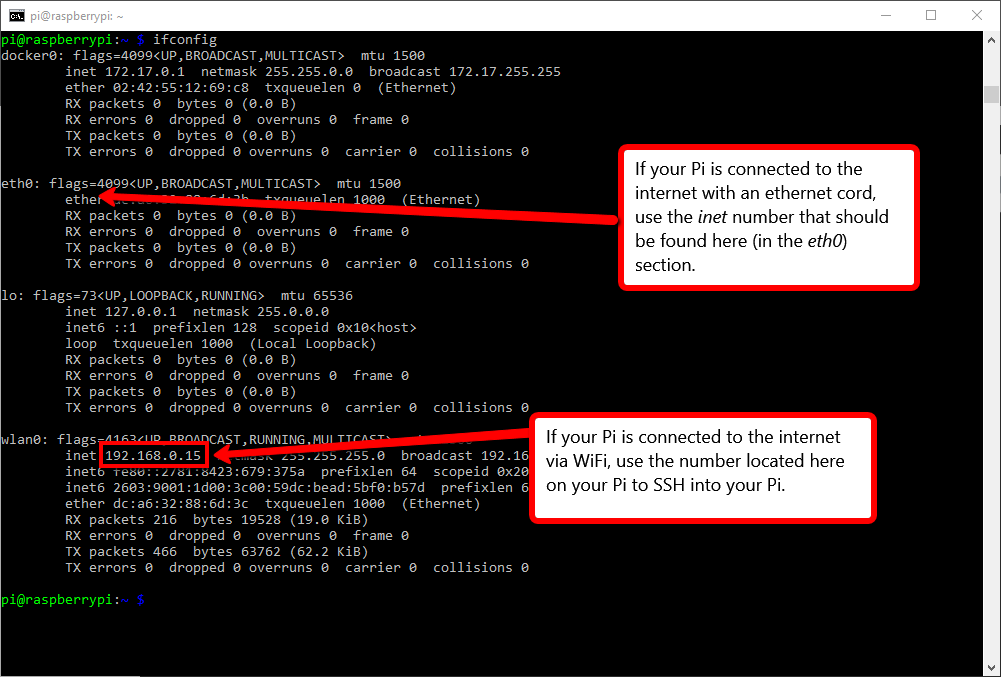
A simpler/faster, way for somebody that might be doing more regular migrations would be to use the command-line and SSH. If you watched the Raspberry Pi Setup Tutorial, you may know that by running ifconfig in the Pi’s terminal, you can access the network address of the Raspberry Pi. We can use the network address to SSH into the Raspberry Pi from our local machine (on the same network) as well as to send files to the Pi from our local machine.
How to find the inet address of your Raspberry Pi, used to SSH into the Pi from another computer on your network.
With your Pi’s inet address (and with the Raspberry Pi on),
Go back to your main computer,
Open the terminal/command-line,
Type ssh pi@<inet.address> and hit Enter,
Enter your password for your Pi. (Hopefully you still remember it! If not, you might have to go back to the Pi and change it.)
You should now be logged into your Raspberry Pi from your main computer. If you run ls, you should be able to see the folders in your Pi’s home directory. You can run logout to close the connection.
Be sure to create a folder in your Raspberry Pi as the target for our light blinker application. To do that, SSH into the Pi following the steps immediately above (or go directly to your Pi and open the terminal), and type mkdir <folderName>. Replace <folderName> with whatever you have decided to call this project.
To actually copy over your files to the target folder on your Raspberry Pi via SSH, do the following:
Open the terminal/command-line on your main computer.
Navigate to the directory (folder) that contains your published application. For example, I might run the following:
cd ./someFolder/.../blinkyReleaseFolder
Run the scp command to copy files via SSH as follows:
The -r option tells the system to copy all sub-folders and content.
Be sure to replace <inet.address> with your Pi’s inet address.
Be sure to replace <targetFolderPath/Name> with the path to and name of your desired target folder.
I wanted to save my files in a folder called raspberryPi-1, which was a sub-folder of Projects (another folder that I created) on my Pi. The Projects folder was created in my HOME directory.
As such, my <targetFolderPath/Name> looked like Projects/raspberryPi-1
Note that Sweeky (the speaker in the video) publishes her code from the command line (as opposed to using Visual Studio like we did). She publishes her .NET application specifying that the runtime should be linux-arm. It also looks like she published a Self Contained application as opposed to a Framework Depenedent one. A Self Contained application will have many more files (the runtimes and libraries necessary to support the application).
Phew! 😌
10. Run your application!
The moment of truth.
Open your Raspberry Pi’s terminal.
You can either SSH into your Pi’s terminal from the command line of your main computer:
ssh pi@<inet.address>.
Or you can open the Pi directly and open the terminal.
Navigate into the directory where you application is located:
cd <projectFolderPath/Name>
Pause
Did you deploy the Framework Dependent application (the one that requires .NET Core to be installed on the Pi)? Or did you deploy the Self-contained application?
I deployed the Framework Dependent application
Run your code!
dotnet <ProjectName>.dll
I chose the Self-contained application
Change the permissions of the application file so that you can run it.
chmod 755 <ProjectName>
Run your code!
./<ProjectName>
Celebrate your success!
Is your light blinking? We did it!!!
You can stop your program by typing Ctrl + c in the terminal.
Conclusion
Man… this post is way longer than I thought it was going to be. As you can tell, there is a lot here (and a lot more that we didn’t get into)!! All to make a light blink on and off programmatically!
There are a number of other tutorials and demos that I drew from to put this together, but I hope that this proves to be a more complete tutorial with fewer gaps that doesn’t require as much jumping around on your part.
Check out the resources below to learn more and explore additional concepts. Now that you have the foundational pieces in place, you can try putting together new/different/more complex applications for your Raspberry Pi using .NET!
I hope this has been fun! Thanks so much for reading.
Resources
A big thanks to the great resources that allowed me to put this together.
If you don’t want to read it, though, it’s cool. The gist is that Neural Voices are synthetic voices powered by (usually large) computer systems. These computer systems use Neural Voices to synthesize human-like (some might say “realistic”) speech leveraging Deep Learning and Artificial Intelligence. Computers are able to do this through speech pattern emulation. So, when generating speech from predefined text, the computer emulates speech patterns using contextual clues like words and punctuation to decide what sounds to make and tones to use when synthesizing the speech.
Neural Processing
This article by Microsoft on text-to-speech synthesis in .NET breaks down the ideas of deconstructing speech and artificially reconstructing speech, and it highlights some of the concepts that I mention in my previous article on this subject. Some of those concepts include the idea that speech is composed of basic building blocks (phonemes), and that computers can “learn” to construct speech with phonemes by deconstructing large volumes of training data – speech samples with defined text values.
The amazing thing about these powerful cloud computing systems is that they can perform mind-boggling calculations at incredibly high speeds… they maybe can’t handle computations as complex as the ones tasked to the fabled Deep Thought, but we are headed in the right direction, I think. The computers of today, though, are fast enough to, for example, give us the fastest route from New York to Los Angeles in seconds. There are a plethora of possible routes that you could take to get from New York to Los Angeles. A computer scientist might even say that there are millions or more routes when you consider all of the possible turns that you could make at every intersection. Most of these routes would be inefficient, having you drive into Canada and/or Mexico and probably up and down the continental United States on the way. The point is that even after initially filtering out most of the poor options, there are so many potential routes that it would probably take a human a good few minutes if not longer to consider the options and pick the best one (especially if the human is considering things like construction and traffic). Knowing that a software program like Google Maps, when given two random points on a map can determine the fastest route between them in a matter of seconds is amazing!
I digress here because I got caught up thinking about my algorithms courses from college and the shortest path problem (Dijkstra’s algorithm anyone?). However, I also want to illustrate the point that there are a range of ways that a written sentence may be read aloud when considering things like prosody, tone, inflection, mood, and so on. There are multiple different “routes” one could go with reading the sentence (if you will allow that analogy). It is the job of the neural system to select the best possible “route” of speech to represent the text that is given.
In many cases, though, having the text isn’t enough to accurately read it aloud and express its desired message… Think of all the times you’ve probably misinterpreted a text 📱… What does she mean by “It’s fine.”? People very often need additional information to accurately read text aloud and properly express the desired emotion and message.
Set the Style
Hello, how is it going?
Think of the different ways that this could be said.
Take the phrase above, “Hello. How is it going?” It’s simple, and you probably have already spoken it to yourself in your head. Yet, it, like many sentences, can be said in multiple ways. How would you say those sentences if you were talking to someone who had recently suffered a great loss? Or how might you say it to a stranger compared to a good friend?
Having the context of the situation allows you to more accurately express yourself, and for that reason, modern text-to-speech system developers are allowing inputs for “style” or disposition. The big players like Microsoft, Google, and Amazon are enhancing their Neural text-to-speech capabilities so that developers can specify a style of speech and so that, ultimately, the text-to-speech systems can become evermore realistic and applicable.
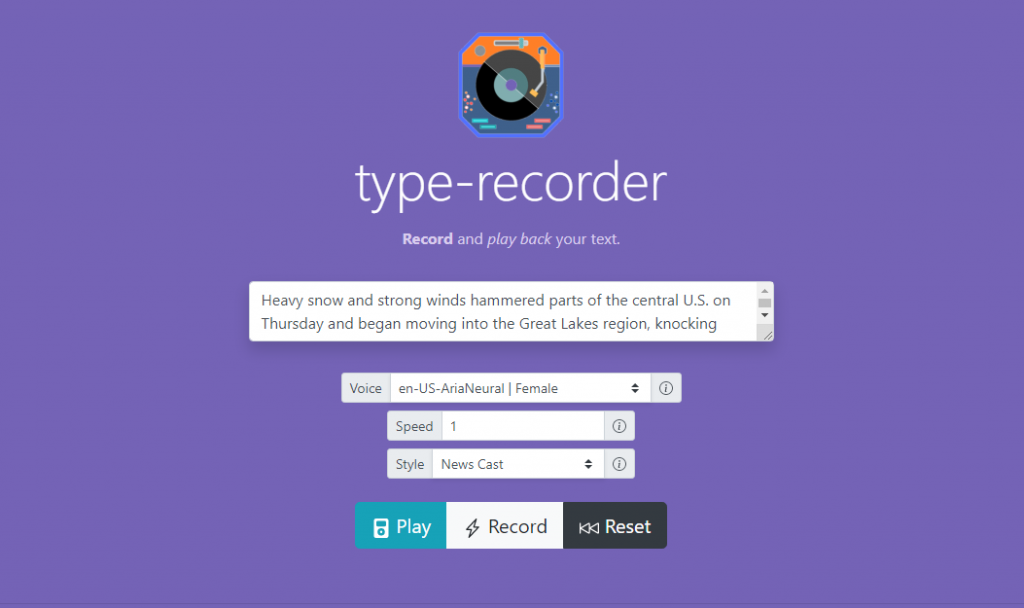
Want to get a look at how some of these styles compare? Check out the neural, female en-US-AriaNeural or zh-CN-XiaoxiaoNeural voices on type-recorder. You will be presented with a few style options to select from.
See the Style select list that is available for en-US-AriaNeural and zh-CN-XiaoxiaoNeural voices.
Let’s look at the phrase from earlier, “Hello. How is it going?” Using type-recorder, I’ve recorded the phrase with a “Cheerful” style and with an “Empathetic” style.
“Hello. How is it going?” – en-US-AriaNeural | Female | Cheerful“Hello. How is it going?” – en-US-AriaNeural | Female | Empathetic
Hear the difference? The empathetic voice aligns more so with how one might start to console a grieving friend, while the cheerful voice sounds like how you might say hi to your friends when you go to meet up for a drink.
Pretty interesting to think about.
Many systems these days are actually smart enough to select a style of speaking based on your interactions with them. Try telling Google or Alexa that you are sad and see how it responds. Compare that to how it responds when you tell it you are happy.
Thoughts? Do you see these stylistic variances in those or other settings with text-to-speech or synthetic speech systems? Leave your comments below.
Implying the Style moving forward
If you decided to take a look at the styles available on type-recorder, you would have seen that there are a limited number of style options for a small set of voices (only two voices at the time of writing this article: en-US-AriaNeural and zh-CN-XiaoxiaoNeural). The blog post from Microsoft that I pointed at earlier is only just over a month old now. If you look at the Amazon documentation for Polly that I linked to earlier, you will see that they too only have a select set of styles available for a small group of voices. What does that mean? It means that these technologies are still well under development and only now being opened up to the general developer community. That, to me, is exciting because it means an opportunity for developers to build on this technology and innovate. More applications for this type of technology are within our grasp:
and plenty of other applications that I’m sure I haven’t thought about.
Tying it back
Tying speaking styles back to the construction and synthesis of Neural Voices, these styles add an additional layer to the mix. Neural text-to-speech systems are now required to differentiate between the various tones and patterns used to express different emotions and associate the appropriate patterns with the correct emotion/style on top of the original requirements to create neutral, natural sounding text output. It’s going to require more data, training, and “learning”, but it is going to happen. Soon enough, we will start to see these systems incorporating a greater range of the speaking styles and emotions that we humans employ everyday: anger, sarcasm, skepticism, nervousness, happiness, joy, elation and so on.
Conclusion
I’m not sure that there is truly a profound conclusion here beyond the fact that text to speech, as complex and advanced as it is, is continuing to evolve. As computers become more comfortable and less fatiguing to interact with, I believe that we will only continue to talk to computers like people to complete tasks, get information, or to simply have a conversation…. That is until Neuralink embeds computers into our minds and we only need to think about what we want… Maybe we will end up communicating without speaking…. Who knows!