Categories
Development Technology Tutorials type-recorder

Let’s Build a Web App

Want to build a web application using Node.js? Let’s dive right in and build one from a template (that I created from another template). This tutorial will show you how to quickly clone and launch a Node.js web application locally and how to deploy your application to Heroku.

We are using Node.js because… well, because I like Node.js! Node is designed with modularization in mind, and the Node package manager, npm, is an incredibly powerful tool. It really makes getting projects started a breeze once you know the basic framework.

Heroku allows you to deploy an application super quickly and share it with others. To learn more about why I like Heroku, see my previous post, Heroku and Other Cloud Services.

After this tutorial, you should have a simple, cool web application that you can customize, enhance, or totally scrap and rebuild. If you are a more junior developer, this can be a great learning experience, and it could result in something fun to add to your portfolio. All I ask is that you

  1. Change the name and the styling within your application if you plan to share it with others or use it for other purposes.
  2. Give type-recorder LLC credit somewhere on your website! Link to our blog and the original site!

Let’s get started!

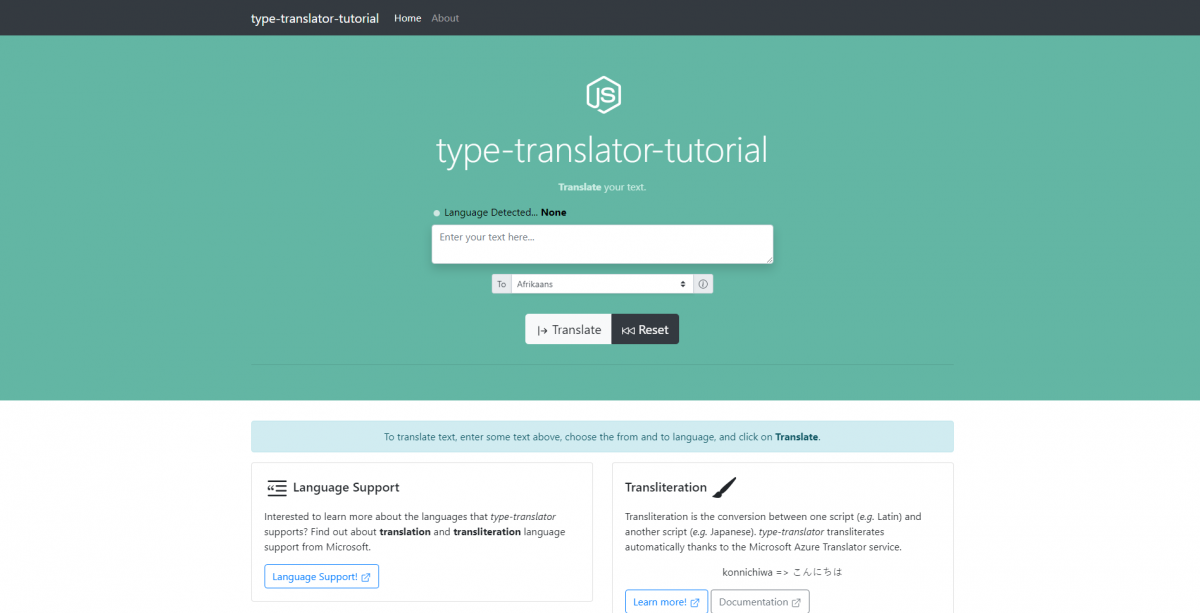
Take a look at this! This web app is what you are going to build! type-translator is a Node.js application using the Express framework and the EJS template engine that performs real-time translation of text to a specified language. Nothing out-of-this-world these days, but it’s still pretty cool, and it requires a few different pieces of technology: Node.js, Microsoft Azure, and Heroku.

This tutorial assumes that you have a basic knowledge of the command line interface, source control, and of general software/development principles. Don’t let that scare you off though! Most of this stuff is straightforward and simple to pickup. I encourage you to work along and Google what you don’t know!

Step 1: Install the basics

Node.js

Our web app is a Node.js app – it runs on Node.js. In order to run and test our application locally, Node.js needs to be installed.

  1. Download Node.js: https://nodejs.org/en/download/
    • Choose the installer appropriate for you.

Downloading and installing Node.js also installs npm (Node Package Manager). npm is critical for installing and updating modules and libraries that our application relies on.

Git

Git is necessary to clone our source code, but it is also necessary to have if you plan to do future development and utilize source control.

  1. Install Git: Follow the instructions for your operating system.
  2. Confirm Git is installed:
    1. Open the terminal/command-prompt.
    2. Type git --version
    3. If you do not receive an error, you are in good shape!

Heroku Account

If you intend to launch your test application on Heroku as part of this demo/tutorial, you will need to create an account on Heroku. Don’t worry, it’s free. This step is optional – you don’t have to host/launch your app on Heroku to create the web application on your machine locally. You will not be able to share a link to your app, though, without hosting your application on a publicly accessible web server (be it Heroku or something else).

  1. Create account on Heroku: https://signup.heroku.com/

No further steps needed on Heroku at this point.

Heroku CLI

The Heroku CLI (command-line interface) is utilized for deploying your application from your local machine to Heroku. If you do not intend to launch your application on Heroku, you do not need to install the CLI. That said, I recommend doing it if you are trying to learn more about development because it is a fun learning experience (and it is fun to share the link with your friends and say, “I put this web app together!”).

  1. Install the Heroku CLI: https://devcenter.heroku.com/articles/heroku-cli
  2. Confirm the installation by running heroku --version on the command terminal.

Visual Studio Code

Visual Studio Code is an all around great editor, and it has been embraced by much of the developer community. This is a matter of personal preference, but if you don’t already have an editor for code development, I recommend using VS Code!

  1. Install Visual Studio Code: https://code.visualstudio.com/

Basic command-line navigation

If you don’t know how to get around in the terminal, check out my post, The Most Basic Command-Line Commands.

Step 2: Setup Azure

Microsoft Azure’s Translator Service (part of Microsoft Azure’s Cognitive Services set of tools) allows for real-time language detection and translation of text via API. We use Azure’s Translator Service to perform translations on type-translator, and it is, therefore, what I will show you how to use in your app!

  1. Set up a free Azure account: https://azure.microsoft.com/en-us/free/.
  2. Log in to the Microsoft Azure Portal after account setup.
  3. Create a New Resource
Create a resource in Microsoft Azure
  1. Type Translator and select the suggested result:
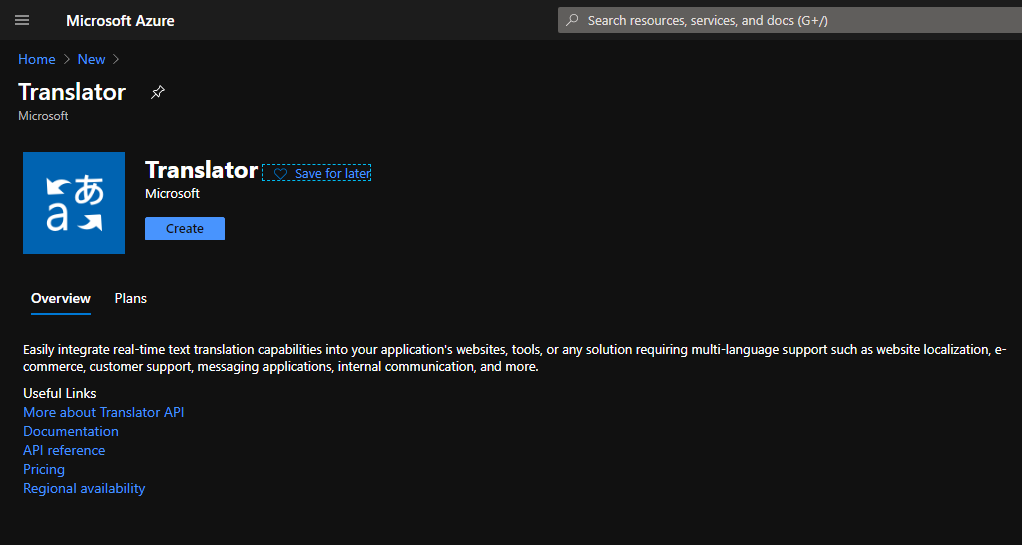
Translator resource in Microsoft Azure
  1. Click on Create.
  2. Select or create a Resource Group.
  3. Choose the “Global” Region (or another region suitable for you).
  4. Enter a name for the resource (ex. MyTranslatorResource).
  5. Select the F0 (free) Pricing Tier.
  6. Click on Review + create.
  7. Click on Create.
  8. Open your new Translator resource once it is ready.
  9. Click on Keys and Endpoint to access important subscription key and endpoint information:
The Keys and Endpoint section of the Translator resource. These keys will be important for accessing the Translator service via API.

We should be good to move on to the next step for now.

To learn more about Microsoft Azure’s Translator, check out the Quickstart.

Step 3: Clone repository

Good to go with Git? Here is the Install Git link if you still need it. I’ll do another post explaining Git, but in the meanwhile, we’ll get on with this.

You need to clone (copy) my project from GitHub. This will serve as your template. You won’t be building the site from scratch, but you will instead be taking my site, modifying it, and deploying to Heroku (or wherever you want).

  1. Open the type-translator-tutorial GitHub repository: https://github.com/lsaggu/type-translator-tutorial
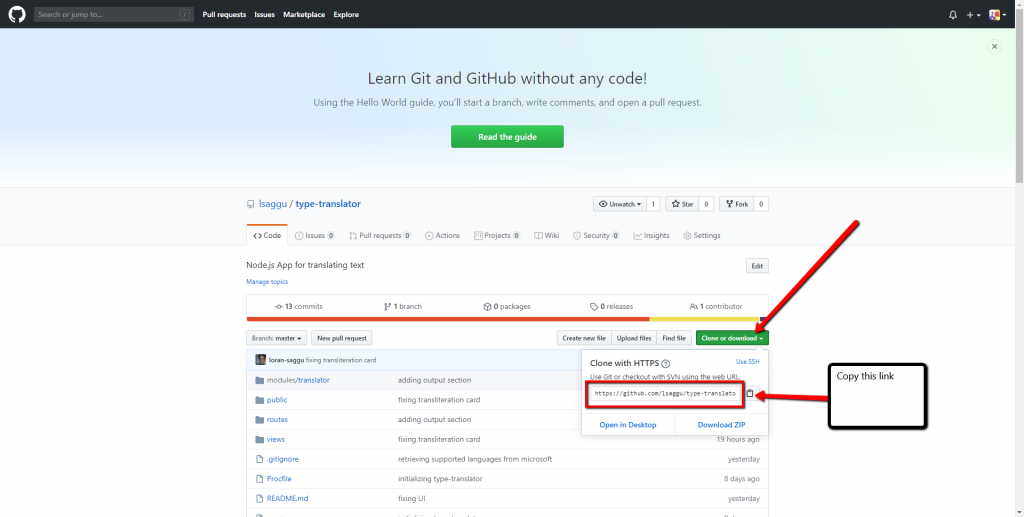
  2. Click Clone or Download.
  3. Copy the Clone with HTTPS link.
  1. Open your terminal (command-line interface).
  2. Navigate into the directory that you want to save this project.
  3. Clone the repository using Git:
git clone https://github.com/lsaggu/type-translator-tutorial.git
  1. Navigate into your local project/repository
cd type-translator-tutorial

Nice. Now you have a local copy of the web app on your machine. At this point, you can change the name of the parent folder from type-translator-tutorial to something that you prefer. You can also set up your own git remote using your preferred git provider (GitHub, GitLab, etc.). I’ll leave that to you.

Step 4: Update Keys

In order for your instance of type-translator-tutorial (or whatever you’ve decided to call it) to work properly and interact with Microsoft’s Translation services, you will need to update some information in the app. Specifically, you will need to specify your Subscription Key (from Step 2) in order to make callouts to the Translator service.

  1. Open Visual Studio Code (or your preferred editor), and open the type-translator-tutorial folder that you cloned.
    1. Type Alt
    2. Click on File > Open Folder…
  2. Once the type-trasnlator-tutorial is open in VS Code, create a new file in this top-level app folder – do not put the file in a subfolder.
    1. Right click in the bottom (empty space) of the Explorer in VS Code.
    2. Click on New File.
    3. Name the file .env
  3. Copy the following content into the file:
TIMES=2
AZURE_TRANSLATION_SUBSCRIPTION_KEY=<Replace with your Microsoft Azure Translator Service Key>
AZURE_SERVICE_REGION=global
  1. Add your Key (either Key 1 or Key 2) where specified in the content above. See step 13 in Setup Azure for reference as to where to find your keys.
  2. Save the file as “.env”.
    • The file should not have any other extensions… .env.txt is not going to work.

The Heroku system uses the .env file that we just created to reference global environment variables specific to the app that we are running.

Step 5: Run Locally

Okay! We have the application code on our computers, and we have Node.js, Git, and Heroku CLI installed.

  1. Open the terminal.
  2. cd into the directory that contains the application.
  3. Run npm install

This will install all dependencies that the app requires to run!

  1. Run heroku local

The heroku local command emulates a Heroku web dyno (server) locally on your machine, and it runs your app.
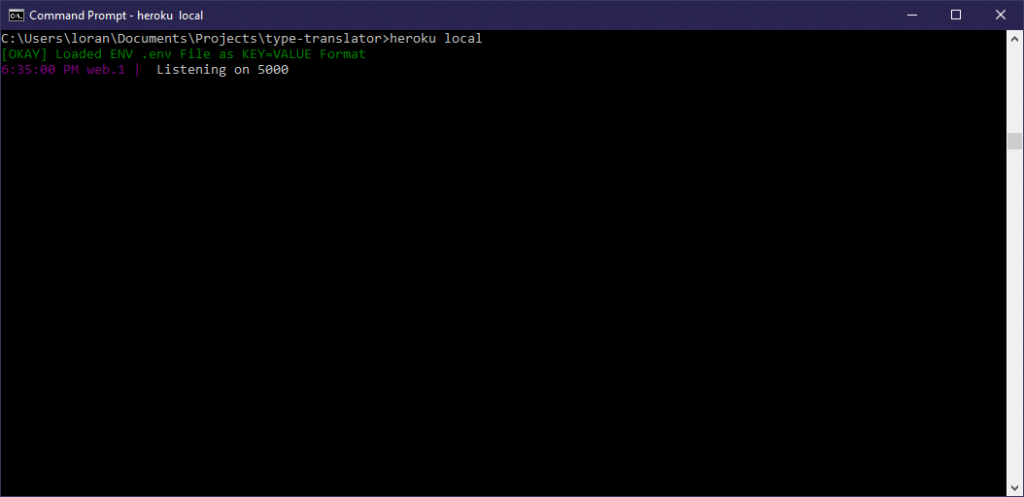
heroku local

After running heroku local, you should see that the server is “Listening on 5000.” This means that the server is listening for requests to the web application on port 5000.

  1. Open a web browser.
  2. Navigate to localhost:5000 in the browser.

Boom! We should see type-translator up and running locally on your machine.

Step 6: Change Styling

Now, we can’t have you parading around, sharing and/or using my app as your own. Let’s change the styling to something that is original and unique. Also, I’d like a bit of credit on your site!

  1. Open Visual Studio Code (or your preferred editor) and open the directory containing your web app.

I suggest making the changes below one at a time, saving, and checking. This way, you can easily identify the cause of any issues that you might face.

Change Jumbotron Color

  1. Open the ./public/stylesheets/main.css file.
  2. Change the background attribute in the .jumbotron block.
    • Choose a color that you like that is different from the one that I am using.
    • If you are unfamiliar with hex color codes, Google “hex color”, and use the color picker to find a color that you like. Copy and paste the HEX value into the CSS file.
  3. You can change the text color of the main heading by changing the “color” attribute in the .jumbotron block.
  4. You can change the text color of the subtitle by changing the “color” attribute value in the .jumbotron p block.

Change Names

Let’s give your app a new name. Come up with something that you like. Or name it after yourself (e.g. “John’s Translation App”).

Note: You may notice that the pages have a .ejs extension (instead of .html as you might expect). This is because this Node.js app uses Embedded JavaScript Templating (EJS) to allow for the injection of code and data from the application framework.

Header
  1. Open ./views/partials/header.ejs.
  2. Change the text between the <title> tags from type-translator-tutorial to whatever you’ve decided to call your app.
  3. Save.
Footer
  1. Open ./views/partials/footer.ejs.
  2. Change type-translator-tutorial to whatever you have decided to call your app.
  3. Remove Copyright 2020 type-recorder LLC.

If you want to create your own Privacy Policy and/or Terms & Conditions, the app includes template Privacy Policy and Terms & Conditions pages in the ./views/pages folder. You will need to update these pages.

Body
  1. Open the ./views/pages/index.ejs page.
  2. Type Ctrl+f and search for type-translator-tutorial.
  3. Change all instances of type-translator-tutorial to your app’s name.
About Page
  1. Open the ./views/pages/about.ejs page
  2. Type Ctrl+f and search for type-translator-tutorial.
  3. Change all instances of type-translator-tutorial to your app’s name.

Give Credit 😁

See the Build this App section on the About page? If you leave that section in your app (or maintain a section that says the same thing with the same links), then you are giving me and the open source community credit! Thank you!

Save and Verify

Make sure to save all of your changes!

Refresh the browser window that contains localhost:5000. If you don’t see all of your changes, you might need to restart your local (Heroku) webserver.

  1. Open the terminal where you are currently running heroku local.
  2. Type Ctrl+c.
  3. Type Ctrl+c again to confirm that you want to terminate the job.
  4. Run heroku local to restart the app.

You should now see all of your changes, and you should be able to continue making and testing changes in the same way.

Step 7: Deploy to Heroku

Are we doing okay so far? Awesome!

Finally, let us deploy our application to Heroku so that we can share it with the world! Or at least one or two of our friends…

  1. Open the terminal.
  2. Navigate to the directory containing your application.
  3. Log into Heroku via the command line:
    1. Type heroku login
    2. Follow the instructions to log in to and authenticate your Heroku account.
    3. See here for more information.
  4. Type heroku create
  5. Type git push heroku master

You should see a bunch of information print to the console. This is the output of Heroku building and deploying your application.

We use the git push command to deploy to Heroku because Heroku is acting as a remote Git repository for our application. For more information, see Creating a Heroku Remote.

Let’s open our Heroku App:

  1. Type heroku open

Voila! This should open a browser window containing your app. The URL is the app’s address on Heroku. If you continue working on your own app and want a custom domain name, Heroku let’s you associate your own domain with an app.

The End

Thanks for reading!! Hopefully this gave you some tangible skills and some practice using Node.js, Heroku, and Git! Hopefully you had some fun!
Categories
Development Salesforce Technology type-recorder

Heroku and Other Cloud Services

Interested in building a web application? There are a bunch of tools out there and services to consider when it comes to building and hosting an application. This article discusses different types of cloud services for supporting web applications, and it specifically talks about the benefits of using Heroku for quickly launching a web application.

Heroku (in my opinion) provides the perfect space to quickly setup, test, deploy, and launch your application. And for small businesses, hobbyists, and those who simply want to learn and teach themselves, Heroku makes it easy to get started for free.

Disclaimer

This article is not affiliated with Heroku – the recommendations made here are the recommendations and opinions of type-recorder only. type-recorder is not compensated by Heroku in any way for or through this article.

Please perform your own additional and comprehensive research when making decisions for yourself or for your business regarding cloud service selection and website development/hosting tools.

Why did you write this article?

Good question. It’s an especially good question when you consider that I appear to really be selling Heroku in this article’s opening paragraph.

I wrote this article because I built type-recorder on Heroku. Heroku made the job of building type-recorder straightforward and (I would say) fun. As I will discuss in this article, Heroku allowed me to not have to worry about the complicated infrastructure pieces involved in hosting a web application – I only had (and have) to really worry about the application itself. I want to share the tools and methods that I used to get type-recorder off the ground with anyone that might be interested in building their own web application. I also want to help give others a better understand of the different cloud tools/services available to individuals and businesses for developing applications.

Building type-recorder has given me a terrific avenue to improve my knowledge of application development, website hosting, source control, and so on. Plus, it has allowed me to work on building a brand and a business (however small). The project has turned into a huge learning experience for me, and it is something that (at the very least) I can add to my portfolio. I highly encourage any techies as well as any wannabe techies interested in building an application for themselves to do so (with whatever tools that you want to use)! You will learn and reinforce a lot!

What is Heroku

Heroku (owned by Salesforce) is a PaaS (Platform as a Service). A PaaS system is a cloud service that is (usually) generally available to the public, used to build and host custom applications. Heroku, specifically, is a PaaS that allows users to build and host web applications built in modern application languages and framworks. For more information on Heroku from Heroku, see What is Heroku. (Now, say Heroku three times fast.)

What is a PaaS

As mentioned, a PaaS or Platform as a Service is a cloud service.

What’s a Cloud Service?

A cloud service is a service that is available (for free or for a fee) to users over the internet that would traditionally require hardware if the cloud service did not exist. A simple example of a cloud service is Google Photos. Normally, or maybe I should say “in the old days,” you would need a hard-drive to store photos. Today, you can store photos in the cloud on services like Google Photos or Google Drive, and you do not need to have a large hard-drive somewhere to keep those photos. The other awesome thing about storing photos in the cloud is that you can access them from anywhere and from any device, and you don’t need to worry about losing your photos if you lose your hard-drive(s).

Cloud services abstract away the infrastructure required to perform those services so that users only need to focus on what the services allow them to do. Looking at Google Photos again, users only need to think about their photos, making sure that they get loaded into Google Photos, making sure that any tags are applied to the photos as desired, editing the photos as desired, and so on. Users of the service don’t have to worry about where the photos are physically stored, how they are stored, making sure the storage drives are on or hooked up to the internet, or any of the concerns one might associate with managing the infrastructure required to store photos.

Cloud Services: IaaS, PaaS, SaaS

So we know conceptually what a cloud service is, and we know that there is a type of cloud service known as a PaaS (Platform as a Service). As you may have guessed (or as you may already know), there are multiple types of cloud services. Here is a list of the ones that I am fully aware of along with common tools that fit within each category.

Cloud ServiceExamples
IaaS: Infrastructure as a Service– Google Cloud
– Amazon Web Services
– Microsoft Azure
– DigitalOcean
PaaS: Platform as a Service– Heroku
– Salesforce.com
– AWS Elastic Beanstalk
– Google App Engine
SaaS: Software as a Service– Atlassian
– Zoho
– Slack
– Microsoft 365
– Google Photos
Cloud Service types and well-known examples of each type

Note: Some consider Salesforce to be a SaaS instead of a PaaS. If your business primarily uses Salesforce’s out-of-the-box capabilities, then yes, I would agree from that perspective. However, if your business, like many businesses, leverages Salesforce’s capabilities to build out custom solutions, tools, integrations, and the like, than I would argue that Salesforce is being used as a platform.

Another Note: Through my (albeit brief) research on this subject, I have found that the definitions for what may or may not be considered SaaS or Paas, or IaaS, or none of the above are somewhat varied. Some arguments (like this one from an IBM blog post in 2014) suggest that any software that provides a service through the internet and that does not require download/installation and additional hardware by a user is inherently XaaS. This would include Facebook, Google, and any web application out there. Others, however, argue that applications/tools may only fall in the XaaS realm if their business model is such that users subscribe to the services and pay a monthly or annual fee for the services (see this thread on Quora, or this blog post by SaaStr). With all of that said, I suggest understanding the concepts of Cloud Services and what differentiates IaaS, PaaS, and Saas so that you can make your own determination.

To understand the differences between IaaS, PaaS, and SaaS, we can break out, at a high level, the pieces of infrastructure that are required to support a software application.

  • Applications – the service or tool that an end-user interacts with
  • Data – this encompasses the metadata (the definition of the data) as well as the data itself
  • Runtime – the libraries necessary to run an application
  • Middleware – software used to connect an application to external applications via a standardized set of APIs
  • OS – the operating system that allows all programs to interact with a computer
  • Virtualization – creation of virtual resources to support multi-tenancy in large scale computing systems that support large numbers of users and large numbers of highly complex tasks
  • Servers – the physical computers that any and all software tasks and programs are completed on
  • Storage – the physical databases that store information
  • Networking – routers, cables, WiFi, and the tools needed to allow separate computers to talk to one another

Not all software tools will use all of these pieces, but these pieces are required for any comprehensive application with a front-end for user interaction, a processing layer (back-end) for computing, sending, and transforming data, and a storage component for storing data. Think GMail, Box, Slack, etc. Most user facing applications will use most, if not all, of these components.

In most cases, an application is the thing being supported by a cloud service, whether that application is hosted by the cloud service or somewhere else.

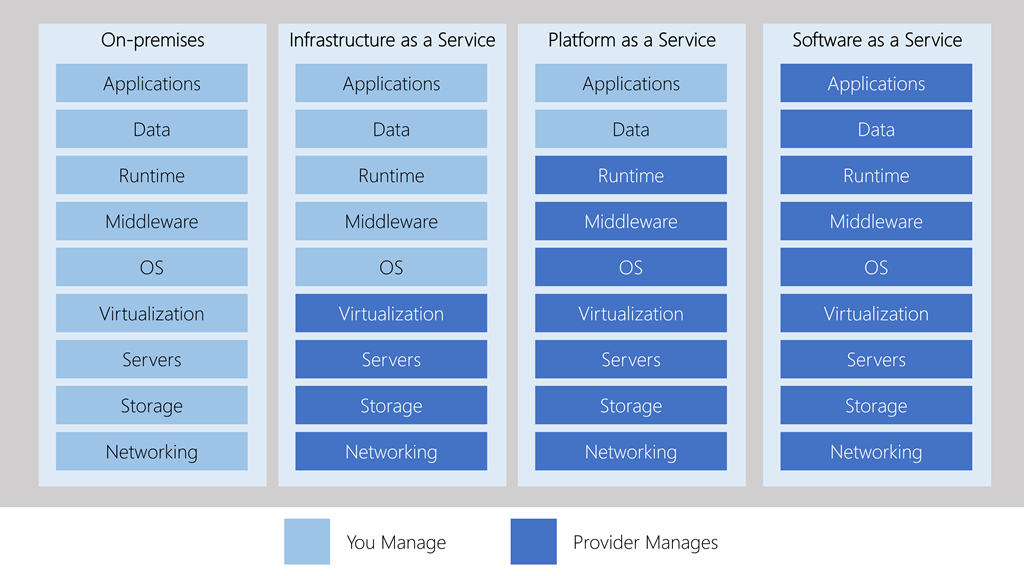
The fundamental difference between the types of cloud services is in what pieces of infrastructure the cloud service provider manages and controls and what pieces the provider allows the user to manage and control:

Diagram from Microsoft Learn depicting the resources involved in running a software application and who is responsible for managing those resources in each category (IaaS, PaaS, SaaS). On-premises is the scenario where all of an applications resources and support framework are entirely owned and managed without the use of a cloud service.

On-premises in the diagram above illustrates the scenario where you acquire, manage, and maintain the entire physical infrastructure required to host an application. The on-premises scenario does not involve a cloud service. Though there may be valid scenarios requiring the use of on-premises solutions, this article, as mentioned, focuses on cloud services.

SaaS

As we can see from the diagram above from Microsoft Learn (check out their learning module on Types of Cloud Services), the entire underlying framework for a SaaS tool including the application itself is completely managed by the service provider. If you think about GMail (a SaaS), all of the underlying components like the storage of email and the sending/delivery of email are managed by Google (the service provider). Users access GMail over the internet. You do not have to download and install anything on your own computer, and you do not need your own email Server even if you have a custom domain (example@myCustomDomain.com) – you simply pay Google to set it up and maintain it for you.

SaaS solutions are targeted at specific needs like GMail for email management, Google Photos for photo storage, Microsoft 365 (Word, Excel, PowerPoint) for office tools, or Jira for business productivity. SaaS providers make money by charging a monthly or annual fee to users for use of their tools (though a number of SaaS solutions are free for individuals).

PaaS

With SaaS, the application is already built for you. What if you wanted to build your own custom application that allowed you to input/output/transform data as needed and desired by you and/or your business? That’s where PaaS comes in.

For users that want to develop custom applications without worrying about the setup and maintenance of additional layers (such as determining the servers, operating systems, runtimes, databases, and so on), a PaaS solution is optimal. A PaaS provider handles all of the items indicated in the graphic above, and it leaves the actual application and data definition to the application developer (you).

For instance, if you want to build an application in Python for users to be able to log in and upload and share their favorite quotes, you could do this with a PaaS. You would develop the Python application to allow users to create an account, log in, and upload a quote. You would define how the quote gets uploaded and where it gets saved (do you have the user fill out a form on your website and enter some text, or do you let the user upload a file?). You also define the user experience and how your application looks/feels. When you are done, or as you continue to build out new features, you deploy your application to your PaaS host. The PaaS gives you a framework and infrastructure to host and run your application after you’ve developed it and as you work to maintain and improve it. You may have to build your application locally (on your own computer) depending on what capabilities the PaaS offers, but after deploying your application to the PaaS, it will run from there. It won’t matter if your computer is on or off, or at the bottom of the ocean at that point.

As a PaaS user, you pick an application framework and language (from what is supported by your PaaS*), and you define the type of data that your application will handle (and how it will handle it). Again, the beauty here is that you don’t have to spend tons of time setting up servers, managing traffic, or keeping operating systems up to date. Your main focus is on the application itself, how it looks, how efficiently the code is written, and so on.

* As mentioned in parentheses above, you choose your language and application framework from options that are supported by your given PaaS, and these options may vary between different PaaS systems. Due to the fact that PaaS systems manage and maintain the underlying infrastructure to build and host applications, only certain application frameworks and languages are supported based on the whatever the PaaS system and infrastructure has been optimized for. Thus, if you are building an application in Salesforce, you can only build your application using Salesforce tools (Apex, Visualforce, Lightning, etc.). Heroku, on the other hand, offers support for a wider range of more common languages/frameworks (Python, Go, Scala, Java, Node.js, and others).

IaaS

What if you want more control? What if you want to use an uncommon, unsupported (or maybe even proprietary) application language and framework ? How about a complex scenario where multiple custom, complex applications need to be supported, connected, and available to end-users with seasonal or variable demand?

IaaS is where you turn here. IaaS solutions give users more control (as indicated by the diagram above). Users can set up virtual machines or containers that will run their applications. Users can specify the operating systems used on these virtual machines in order to support their custom application frameworks, and users can implement middleware solutions to connect applications together.

Google, AWS, Microsoft Azure, and DigitalOcean are cloud service providers and are bucketed as IaaS providers because they provide a range of cloud tools and services that allow users/businesses to fully manage and customize their technology stack in the cloud. For example, within a single IaaS system, a business could set up an array of resources to support its business operations:

  • Multiple databases with specific type (relational, no-SQL, etc.), security, and space requirements
  • Virtual Machines where operating systems and scripts can be specified
  • Load Balancers to manage traffic and resource demands
  • Big Data Tools for IoT
  • AI Tools for Natural Language processing
  • And the list goes on…

Why Heroku

Essentially because it is straightforward, well-documented, and user friendly. Heroku supports a clearly specified set of languages and frameworks, it offers clear documentation for getting up and running, and it is very easy to create an account.

Why use Heroku over Google, AWS, Microsoft Azure, or DigitalOcean?

For one thing, the UI is not littered with a million different options πŸ™„! Plus (I think) the documentation is easier to find and navigate.

The big IaaS players (Google, Amazon, Microsoft, DigitalOcean, and others) offer a ton of services. They even offer services like the following that group together their other services in order to make it easy for users to launch and scale applications:

Elastic Beanstalk, App Engine, and App Service are basically PaaS systems analogous to Heroku in that they manage the underlying infrastructure required to launch and host an application.

So Google Cloud, AWS, or Microsoft Azure are viable alternatives to Heroku?

Yes, most definitely. I suggest Heroku, though, over these solutions because Heroku is simpler. The Heroku platform is targeted at hosting applications built in specific languages and frameworks, and it removes all of the extra frills, headache, and mumbo-jumbo associated with the larger IaaS providers. I mean, just take a look at the sheer quantity of services under the Products tab on AWS and Google Cloud compared to Heroku. (It’s really intimidating when you look at all of the options under Services after logging into your AWS console.)

For someone like me, interested in quickly building applications in popular coding languages, Heroku is perfect. I don’t want to spend lots of time setting up my environments or databases, thinking about scaling and system maintenance. I don’t want to have to sift through boatloads of information to understand and use my hosting platform.

Granted, many people want to learn more about (and/or want more control over) the underlying components of a web application. To those persons, I say go forth, immerse yourself, and use Google, AWS, Microsoft Azure, DigitalOcean, or any other tools that you wish.

Why use Heroku as opposed to Wix, Squarespace, WordPress, etc.?

The answer to this has to do with the difference between a website and a web application, which I want to highlight in this article.

A Website

Wix, Squarespace, and WordPress are terrific tools and services for building custom websites, but they are not optimized for creating custom web applications.

A standalone website to showcase a product, a brand, a blog, or a portfolio is powerful. Any legitimate entity is expected to have a website in our current day and age. Wix, Squarespace, WordPress, and other website builders are great tools for setting up, configuring, designing, and even launching a website for these purposes. These website builders also allow users to market and sell products through their websites, capture contact information for mailing lists, and share calendars, photos, and other content. A number of these capabilities are often provided through plugins and add-ons that make building a traditional website super easy.

Though there is some capturing and sending of data, the fundamental focus of a traditional website is on its front-end and the data presented to the user.

A Web Application

A web application has a front-end (HTML, CSS, JS, etc.) like a traditional website with pages, images, and other content for users to interact with, but in addition, a web application has a back-end (Java, Node.js, Python, etc.) for processing and transforming data. The front-end and back-end of a web-application are closely tied together (usually with a web application framework), passing data back and forth to display data to and capture input from the user. Building a custom application requires the ability to define and host the front and back-ends.

As an example type-recorder (😁) is a custom web application. The website shows users information, and it accepts data (text) as an input. That text data is sent from the front-end to the Node.js back-end. The back-end interacts with an API from Microsoft Azure Cognitive Services to transform the text data into audio data. Finally, that audio data is further manipulated by the back-end and sent to the front-end to be presented to the user.

Heroku because…

Again, because it is the simple option for those looking to build an application (as opposed to building a website or a blog).

For those looking to build a website, I think Heroku is a solid option to consider when your site is highly custom with custom styling (let’s say you are using Sass or Less), and/or a highly dynamic front-end with lots of JavaScript. Adding custom CSS or JS in common website builders can be cumbersome (if not allowed).

That said, if you only want to build a site for your portfolio, for your political campaign, or for your line of watches that you sell on Amazon, then a website is all you need, and any one of the website builders out there are worth looking at. For the same reasons that I suggest using Heroku over a more complex solution provider for a straightforward web application, I would suggest using a website building over Heroku for a straightforward website.

Why not Heroku?

I hope that my explanation of and comparison between different cloud services has already answered this question, but I will reiterate the main points and add a couple additional ones here.

You may not want to use Heroku because

  1. Heroku doesn’t support the application tools that you want to use to build your application.
  2. Heroku is overkill for your needs.
  3. Heroku does not meet your hardware/software specifications or it does not give you the necessary control that you require over operating systems, databases, middleware, etc., and you want to manage all of these items through one service provider.
  4. You don’t want to build a web application, but instead want to use an existing tool or service.
  5. You want to learn about and become familiar with other service providers and/or the underlying components required to support an application.
  6. The cost for Heroku is too high or doesn’t make sense for your business model.
    • I personally think that the price is reasonable, especially considering that you can host an application for free while you are building it.
    • Other service providers, though, offer more granular control over and insight into costs because you determine what resources you use to support your application.
    • You may prefer a service provider with on-demand pricing options for an application, for example, where the number of requests to the application are highly variable.
  7. You just don’t want to use Heroku.

Heroku isn’t for everyone, but for people that want to quickly rock-and-roll with a popular web application framework, I think it is the ultimate choice!

Get Started with Heroku

If you are interested in trying Heroku and launching an app (whether you are an experienced dev pro or more of a novice), I highly recommend going through a Heroku Getting Started Guide. Pick the guide for the given language that you want to develop your app in.

I recommend starting from the beginning and going through each step carefully. If you do that, then you will have an app up and running! From there, you can customize your app entirely as you wish, and you can create your own git repository for it to keep it safe.

Going forward, I know that if I want to quickly build a web application, I simply need to

  1. Grab the appropriate Heroku Getting Started Guide for the language that I want to develop in.
  2. Go through the guide and clone the template app code locally (to my own computer).
  3. Associate my local code with my own remote Git repository so that I can make and save changes/versions at will.
  4. Deploy the app (following the guide) to Heroku.

From there, I would have my own application up and running on Heroku! I would be able to customize and iterate on the app to meet my needs and goals.

Key Resources

Thanks!

Thanks for reading. I’d love your feedback on this article – please leave a comment below.